Tutorials
- "Hello, World!" in Node.js
- Web App Template for Beginners
- How to fix "Internal data stream error" in Processing 4
- Command Line Tools & Utilities
- Making a website for your HTML, JS, CSS or p5.js files
- How to export your p5.js as a video
"Hello, World!" in Node.js
Introduction
The first program most people write when learning a new programming language is one form or another of the infamous "Hello, World!".
Preparation
What you'll need to know
To follow this tutorial you should be familiar with the basics of the command-line (also known as Terminal on OS X or Command Prompt on Windows). Below are some resources that will help you get up to speed on this topic:
-
Code Academy short course - Code Academy provide a short course on command line. It has an interactive prompt in the browser so you can get to grips with the syntax before diving into the CLI.
-
An introduction to Unix and Shell - The Interactive Telecommunications Program at NYU has a very interesting introduction to Unix, which is the precursor and model for Android, Apple iOS, Raspbian (Raspberry Pi), Linux and OSx operating systems. It is also a good overview of the history, philosophy and the anatomy of the shell.
Install NodeJS
You will need to download and install NodeJS. Download the installer for your particular operating system (OSX, Windows or Linux) from the NodeJS website and follow the instructions.
To test if NodeJS has been installed successfully:
- Open a command line prompt (Terminal or Command Prompt)
- And type the following:
$ node -v
Do not type the `$`. This just tells you that everything following the dollar is a single line in the command line prompt.
You should see the version of NodeJS that you installed. Something like: v4.4.7. If you see an error then you may need to downloading and installing again.
Install other software (optional)
We recommend installing and using Atom text editor, because it is free, cross-platform and good for beginners to advanced programmers.
You will be editing JavaScript files throughout this tutorial, which can be done with almost *any* simple text editor you happen to have on your computer. This excludes Microsoft's Word, Apple's Pages or other word processing software, which don't count as simple and will add other unseen characters to your file.
Tutorial
To create and execute our first NodeJS application we simply (1) create a text file with the .js suffix, (2) edit the file and add some JavaScript and (3) pass this file to NodeJS using the command-line prompt.
(1) Create a directory and file
Our goal is to create a directory called hello-world and within it a file called hello.js. You can create a directory and a file using many methods but below are the instructions and an animation of how this is done using the command line.
$ cd Desktop
$ mkdir hello-world
$ cd hello-world
$ touch hello.js
The commands above explained:
-
cd [directory-name]- Change the current directory you are in -
mkdir [directory-name]- Make a new directory in your current location -
touch [file-name]- Create an empty file

The result of this should be a directory and file on your desktop in this structure:
Desktop/
   └── hello-world/
      └── hello.js
(2) Edit file and add JavaScript
- Open the file
hello.jsin your preferred text editor - Add the following code to the top of the file and save:
console.log("Hello, world of NodeJS!");
(3) Execute our hello.js script using NodeJS
- Open a command-line prompt
- Change directory so that you are inside
Desktop/hello-world/
$ cd ~/Desktop/hello-world
TIP: When changing directory with the `cd` command (or using any command for that matter) you can use the tilde (`~`) to navigate to your home directory. e.g. `cd ~/Desktop`
- Pass your `hello.js` script to the `node` command ``` $ node hello.js ``` You should see the "Hello, world of NodeJS!" message printed out into your CLI prompt.Below is an animation of this step.

Web App Template for Beginners
Start with this one. Learn to build a local web app that you can modify in your future projects.
Background
Each web app has a frontend and backend. Frontend is usually for UI and design and runs on browser, on user’s own computer. P5.js sketches are frontend.
Backend is behind-the-scenes code that runs on server. It is stores and organizes data and delivers your app to users, ie. clients. If 10 people access your website, there are 10 frontends in action but only 1 backend.
Backend is often built with Node.js or Python. Here we use Node.js.
Setup
1)
2)
3)
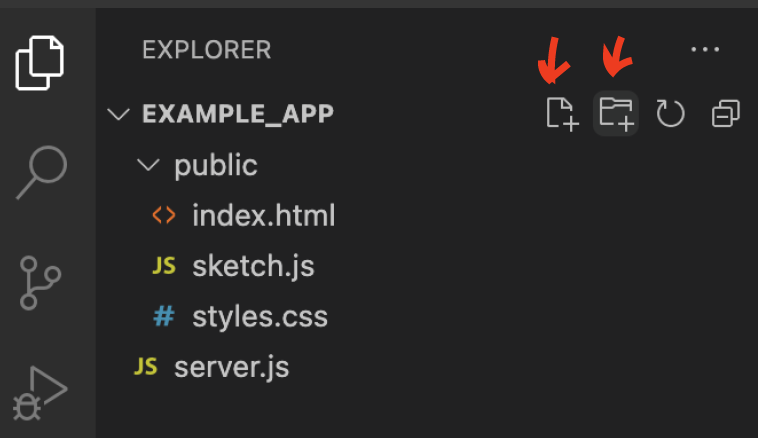
So there are three empty files in “public” subfolder and an empty server.js outside that in the root folder.
Alternatively you can create the setup outside your code editor, however Visual Code has made it really easy to create code files from the scratch so that’s why I recommend it.
Server with Node and Express
4)
5)
6)
On command line, type cd. Then in Finder, select "example_app" folder and drag it to command line. It gives you the path to that folder automatically. Press enter.
Now you are operating inside that folder using command line. It should look like this:

7)npm init. Answer the questions by typing to the command line and pressing enter after each question. This creates a package.json file that makes the project easier for others to manage and install. If confused, check the tutorial on step 5.
When done, type npm install express. This installs Express to this project folder (we only want it to live in this folder, not everywhere on your computer).
8)server.js file. Add the following code:
const express = require("express");
const app = express();
const server = app.listen(3000);
app.use(express.static("public"));
console.log("It works");
Here we are telling the backend to:
-Use Express framework
-Set our server to local port 3000
-Serve files that are in the folder called "public"
-Print "It works" when the server is running
9)node server.js on command line and press enter. This is how you tell Node to run a file called server.js. It should print "It works" on the command line.
10)
Now you should have a basic server running! But we don’t have anything that the server could show. We’ll fix it next.
HTML setup
11)
<!DOCTYPE html>
<html>
   <head>
      <meta charset="utf-8" />
      <title>My test project</title>
   </head>
   <body>
      <h1>My first title!</h1>
   </body>
</html>
12)
If you get any errors, check your server.js and index.html files again. It's very easy to make a spelling mistake!
Client Javascript setup
13)
In your html file, add the following line of code in the <head> section of your html, after the <title> line:
<script src="https://cdn.jsdelivr.net/npm/p5@1.4.0/lib/p5.js"></script>
So the section now looks like:
<head>
  <meta charset="utf-8" />
  <title>My test project</title>
  <script src="https://cdn.jsdelivr.net/npm/p5@1.4.0/lib/p5.js">  </script>
</head>
This line of code gives us access to p5.js library in our project. Note that you can add other Javascript libraries in a similar fashion, like ML5 for machine learning or Three.js for building 3D visuals.
14)sketch.js file. First we need to reference that file in out HTML so that there is a connection. You can think about this way: HTML file is like the frame of a painting, and JS is what happens on the canvas of the painting. We need both!
In index.html, add the following line to the <body> section:
<script src="sketch.js"></script>
So that it looks like:
<body>
  <h1>My first title!</h1>
  <script src="sketch.js"></script>
</body>
15)sketch.js, paste the following code:
function setup() {
  createCanvas(400, 400);
}

function draw() {
  background(100);
  rectMode(CENTER);
  strokeWeight(3);
  stroke(255, 0, 0);
  fill(255, 192, 203);
  rect(100, 100, 200, 200);
}
Here, we are first drawing a grey background of 400 x 400 pixels. Then we add a pink rectangle with red outline to the center of the canvas. For more p5.js help, see their reference.
16)
Note
This is a local server and local project. Currently it only lives on your computer. In order to make a public web app that anyone can access, you need to deploy it. There will be a tutorial for this later. :)
Next
Try to add a paragraph of text to your page. Guide
Try to add an image to your page. Guide
Try to change the color of the rectangle with a mouse click. Guide
How to fix "Internal data stream error" in Processing 4
Error
In Processing 4, you will see this error often BaseSrc: [avfvideosrc0] : Internal data stream error when using the video library with cameras and a MAC. To see more about the capture function, please see here.
How to fix (12/2024)
Change this line cam = new Capture(this, cameras[0]);
to "pipeline:avfvideosrc device-index=0"
Full Code
import processing.video.*;

Capture cam;

void setup() {
  size(640, 480);

  String[] cameras = Capture.list();

  if (cameras.length == 0) {
    println("There are no cameras available for capture.");
    exit();
  } else {
    println("Available cameras:");
    for (int i = 0; i < cameras.length; i++) {
      println(cameras[i]);
    }

    // The camera can be initialized directly using an
    // element from the array returned by list():
    cam = new Capture(this, width, height, "pipeline:avfvideosrc device-index=0", 30);
    cam.start();
  }
}

void draw() {
  if (cam.available() == true) {
    cam.read();
  }
  image(cam, 0, 0);
  // The following does the same, and is faster when just drawing the image
  // without any additional resizing, transformations, or tint.
  //set(0, 0, cam);
}
Command Line Tools & Utilities
A Command Line Interface is a way of interacting with a computer by issuing commands in the form of lines of text. These commands interface with your operating system and hardware to perform complex and intensive operations.
There is a large amount of useful Free and Open Source Software (FOSS) available online that does not need or use a Graphical User Interface (GUI). Often this software works more efficiently with the operating system or directly with the hardware and therefore can perform tasks such as image, video or sound manipulation with ease.
Also because the CLI has a scripting language you can write scripts that automates certain tasks. For example:
- Downloading/uploading files from servers or web pages
- Converting, cropping, trimming, splitting, combining video files
- Converting, cropping, combining image files
- Adding effects to, combining, trimming, splitting audio files
- Mixing video & audio
- Extracting video & audio
- Adding text to video or images
Installing CLI Tools
Homebrew - Package Manager for macOS
Homebrew is a package manager for the macOS CLI. Once you install it on the CLI you can with one line install a lot of software from it's repository.
-
Open Terminal
-
Copy and paste the following line:
/usr/bin/ruby -e "$(curl -fsSL https://raw.githubusercontent.com/Homebrew/install/master/install)"
- Hit enter and it will install it for you.
- To test if it was successful enter the following command:
brew -v
FFMPEG
FFMPEG is a powerful and flexible tool for performing any transformation tasks on video files.
Install
brew install ffmpeg \
    --with-tools \
    --with-fdk-aac \
    --with-freetype \
    --with-fontconfig \
    --with-libass \
    --with-libvorbis \
    --with-libvpx \
    --with-opus \
    --with-x265
Example use / Tutorial
SoX
The homepage for SoX calls it "the Swiss Army knife of sound processing programs" and gives the following description:
SoX is a cross-platform (Windows, Linux, MacOS X, etc.) command line utility that can convert various formats of computer audio files in to other formats. It can also apply various effects to these sound files, and, as an added bonus, SoX can play and record audio files on most platforms.
Install
brew install sox
Example use / Tutorials
- Good introduction and some examples - http://www.krisyu.org/blog/processing-audio-files-sox.html
ImageMagick
ImageMagick is a powerful image manipulation tool.
Install
brew install imagemagick
Example use
- A comprehensive list of example use - http://www.imagemagick.org/Usage/
Making a website for your HTML, JS, CSS or p5.js files
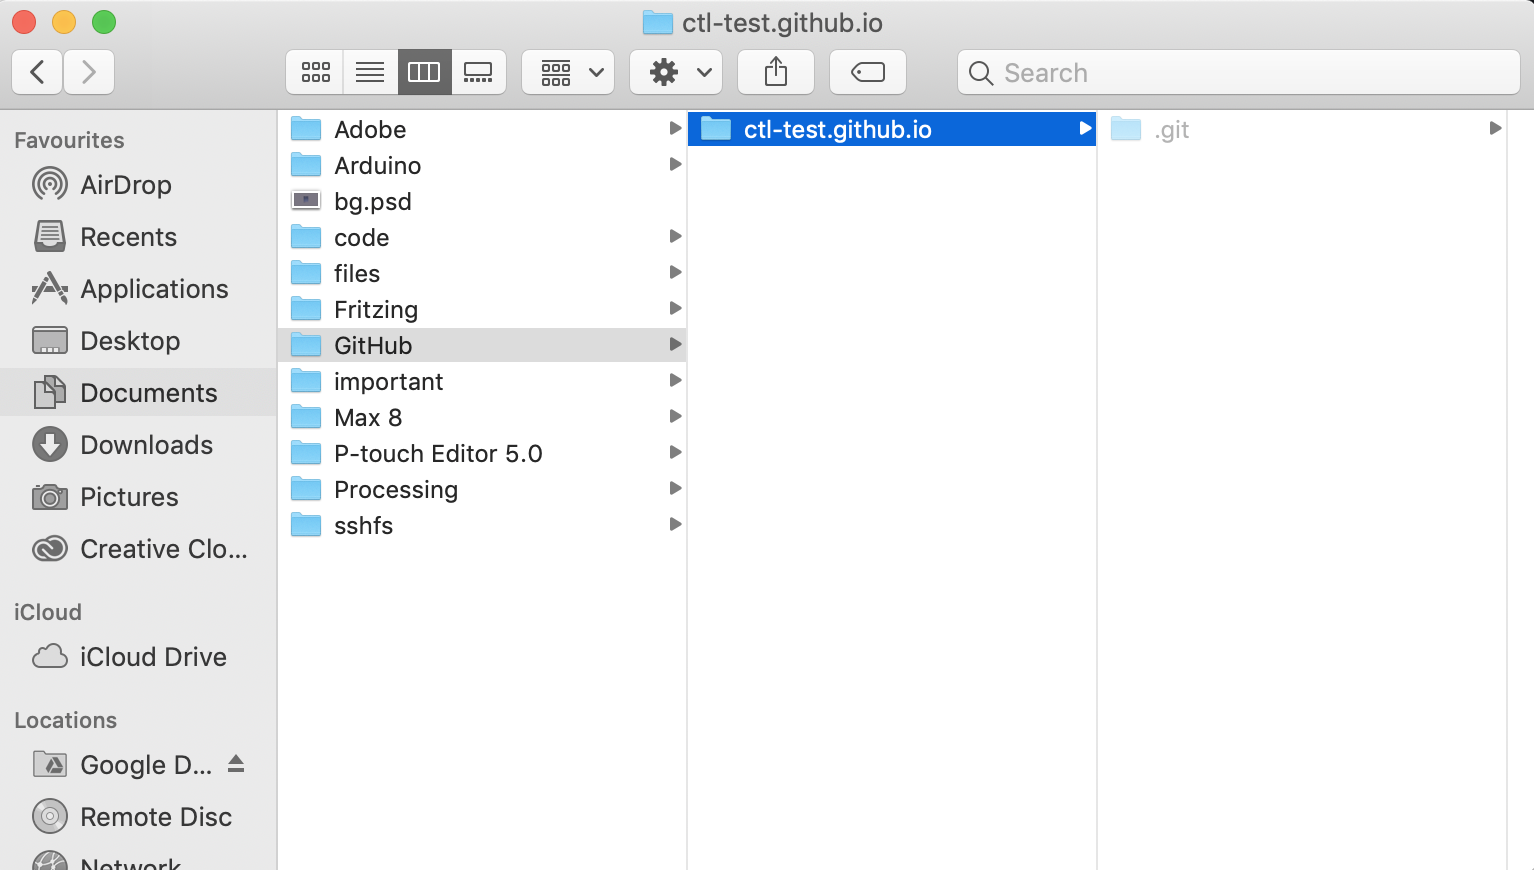
We are going to make a website using something called GitHub pages to make a website. Signing up for a GitHub account and subsequently creating a GitHub pages URL will allow you to upload your HTML, JS & CSS files online, so that you can access your website from anywhere.
Bit of background (Feel free to skip)
GitHub is a website that stores what are called repositories. Repositories contain code, very much just like a folder on your computer. Git is what is called a version control system and to us what it means is that when you save files and commit them it will also save the previous version of your files too. This is very popular with a lot of people in the world of tech, because if something goes wrong, you can always go back to when it did work!
Step 1: Signing up for GitHub
Go to https://github.com and sign up for an account, the form should be on the homepage. There will be a few extra forms when you signup, you can skip through these.
Very important!!!1!!1!
The way that GitHub pages work is that in the end, your website will have the name of your username in it (
Step 2: Creating a repository
Now we have to create a repository. On the left hand side there should be a link that says Create a repository. Click this link and it should take you to this page:
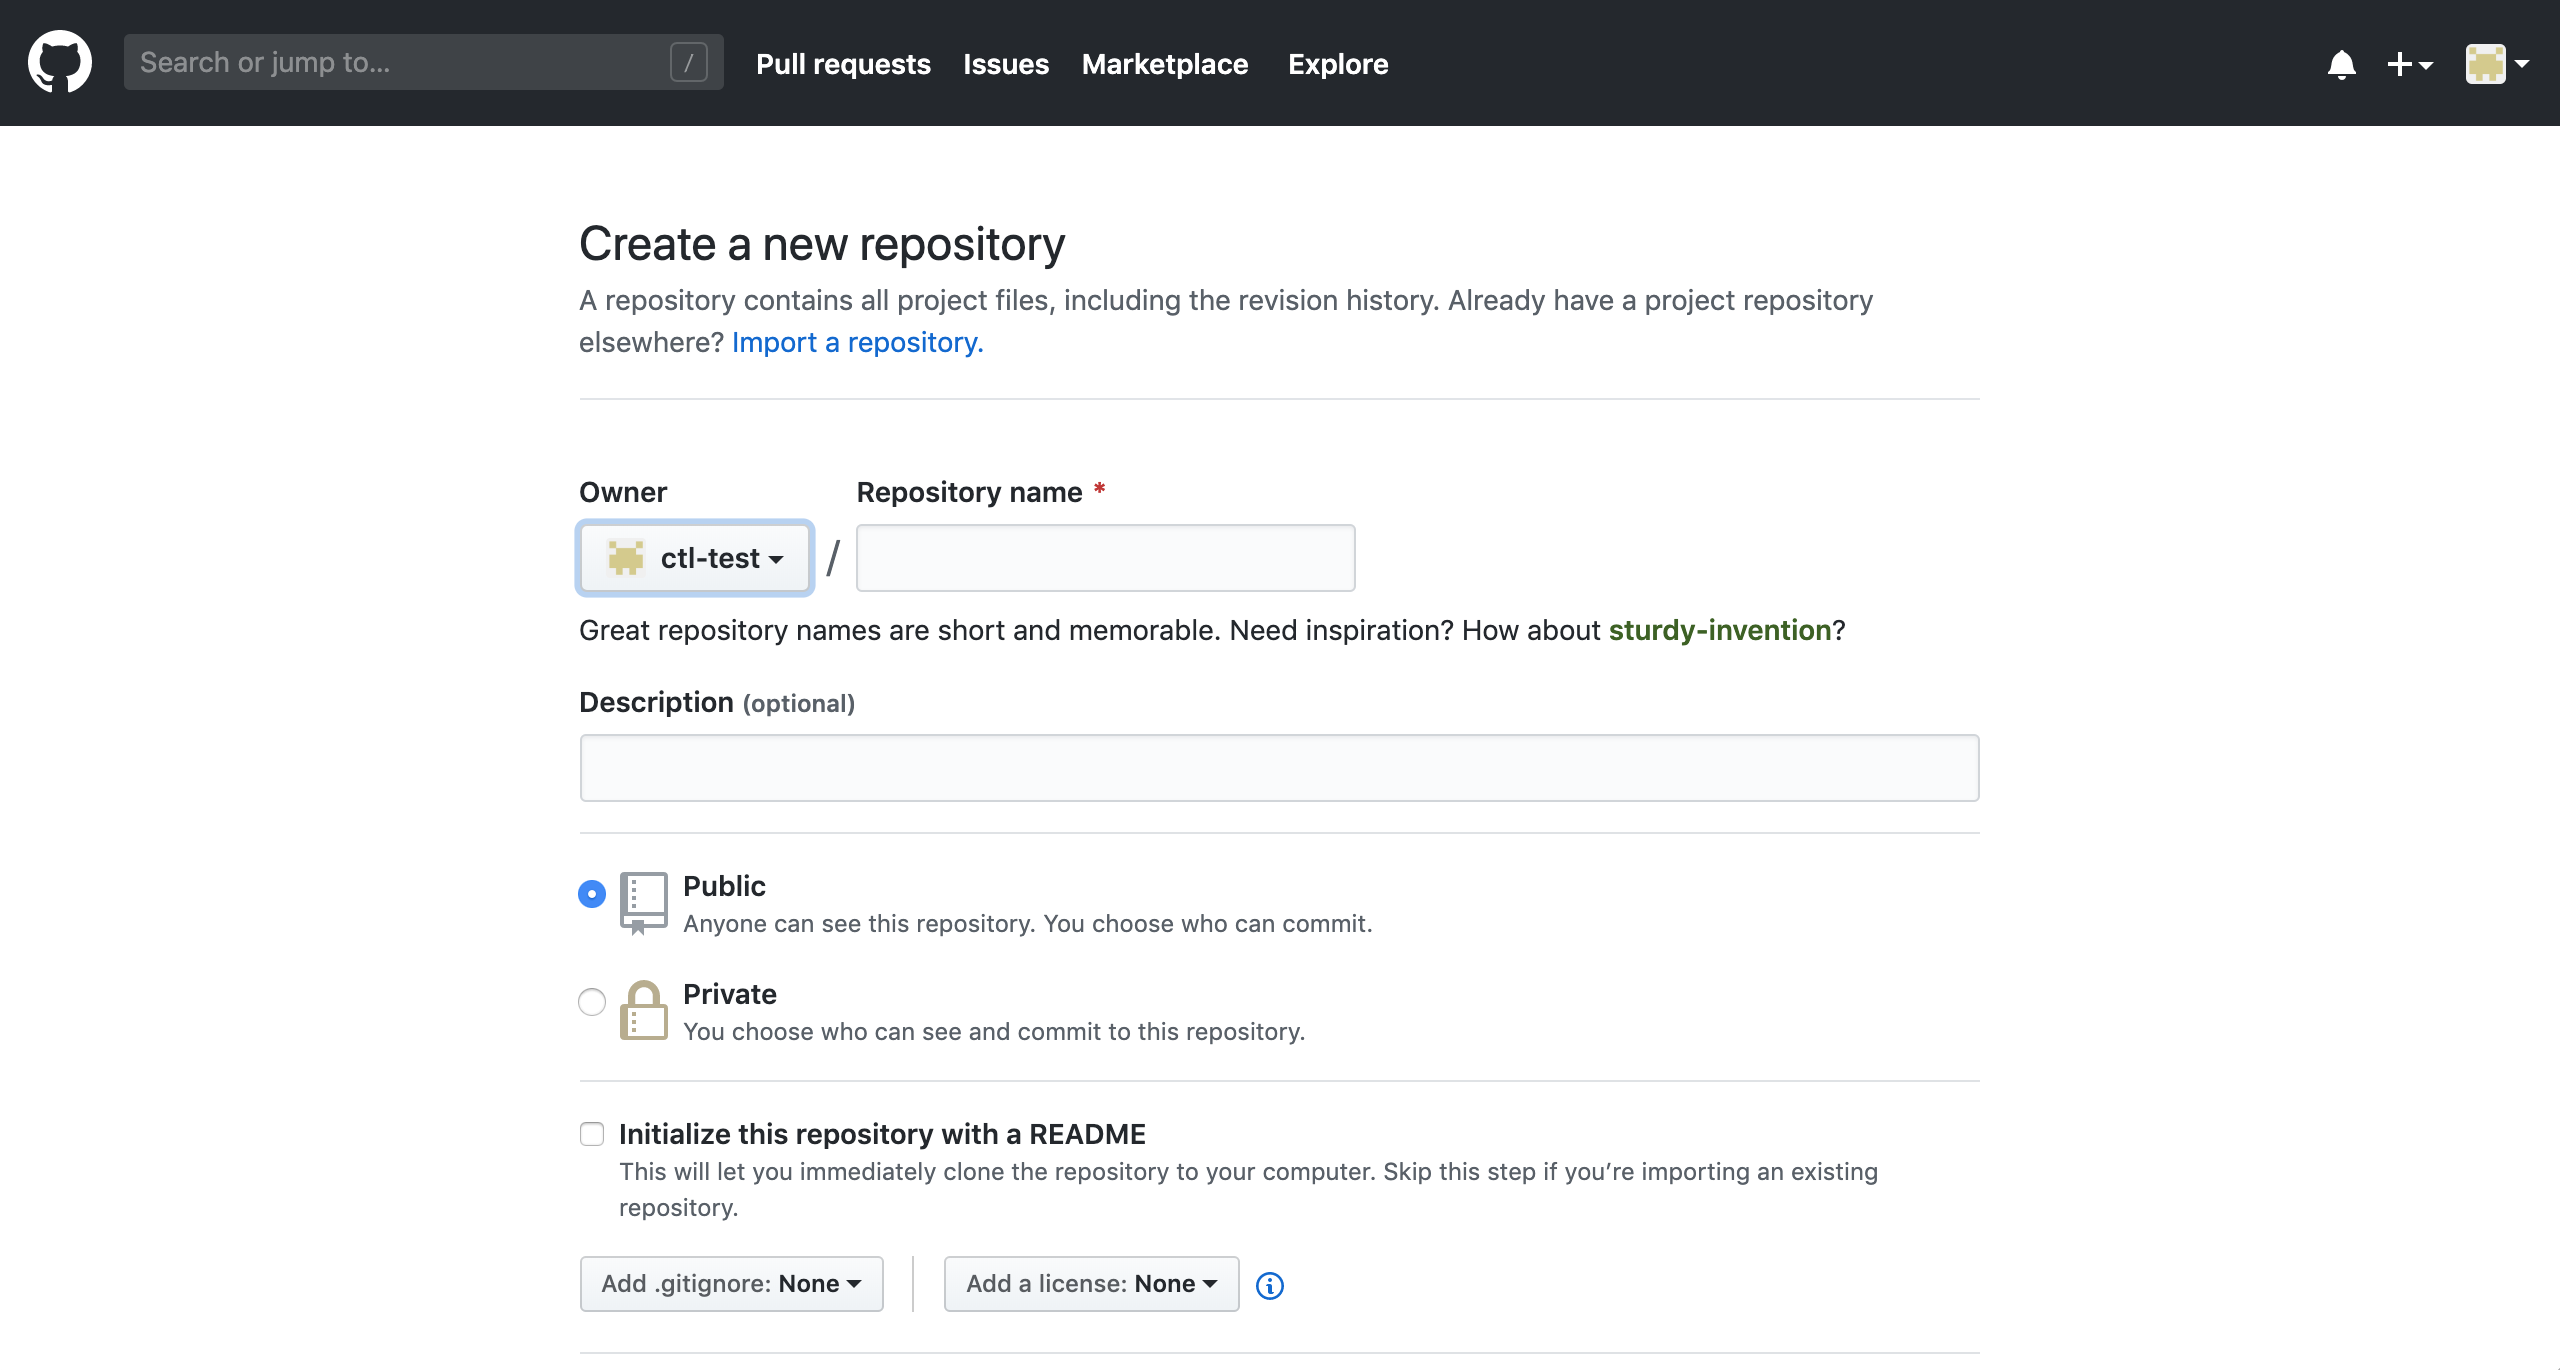
Very important!!!1!!1!
This is where we need to set our repository name to equal exactly this structure:
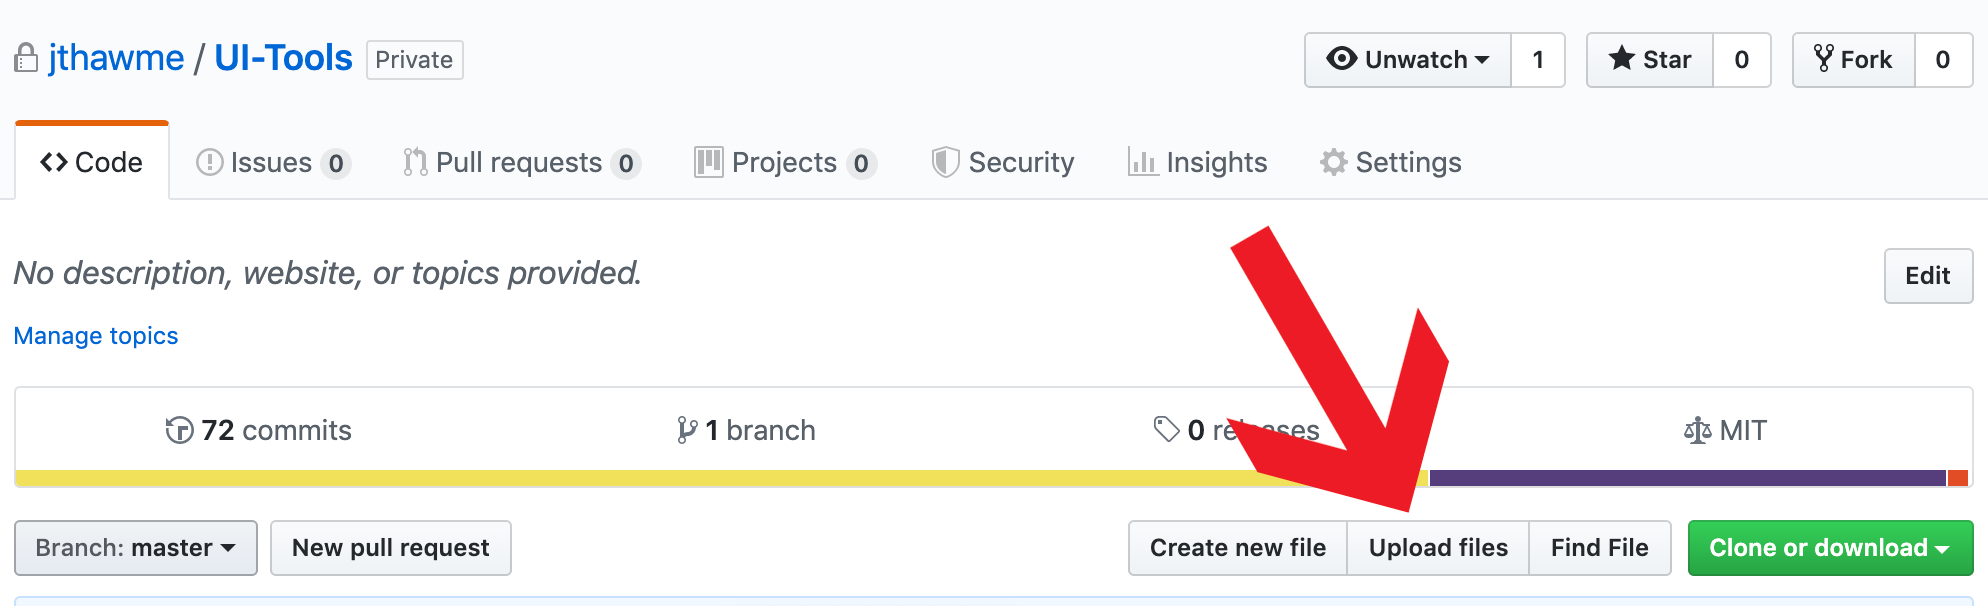
Step 3: Uploading your code
Now we need to upload our files to the Github repository. Hopefully after you created your repository you should see the below page. What we want to do is click the link that says uploading an existing file

After that, if you drag your HTML, JS and CSS files (if you have them) onto the upload section, they should upload to your repository. BUT! You need to 'commit the changes' for them to be saved.
Step 4: Commiting your changes
This section is also relevant if you want to update your files too. Everytime you make changes to the files, you have to 'commit them'. To the Git repository, that basically means, storing these new files, committing them to memory.
Github makes this part quite easy. If you want to add a message you can do, but if not, all you have to do is click Commit changes and your files will be stored in the git repository.

Step 5: Viewing your website
It may take a couple of minutes but, after you have uploaded your code, you should be able to see your website running at
Congratulations!
Step 6: Updating files
To update files so that you make your newest files available on the internet, you need to follow the same as Steps 3 & 4. The only difference is you now click that says Upload files which you can find where, below
Optional steps
Everything in this section isn't necessary but it might help you out, to work faster and better!
Step 7: Using a Git application
We can download github's application to help speed up commiting files. You can download the program here: https://desktop.github.com/. Once you've downloaded it, you need to log in and set up your name and e-mail address. Then you will see all of your repositories on your account.
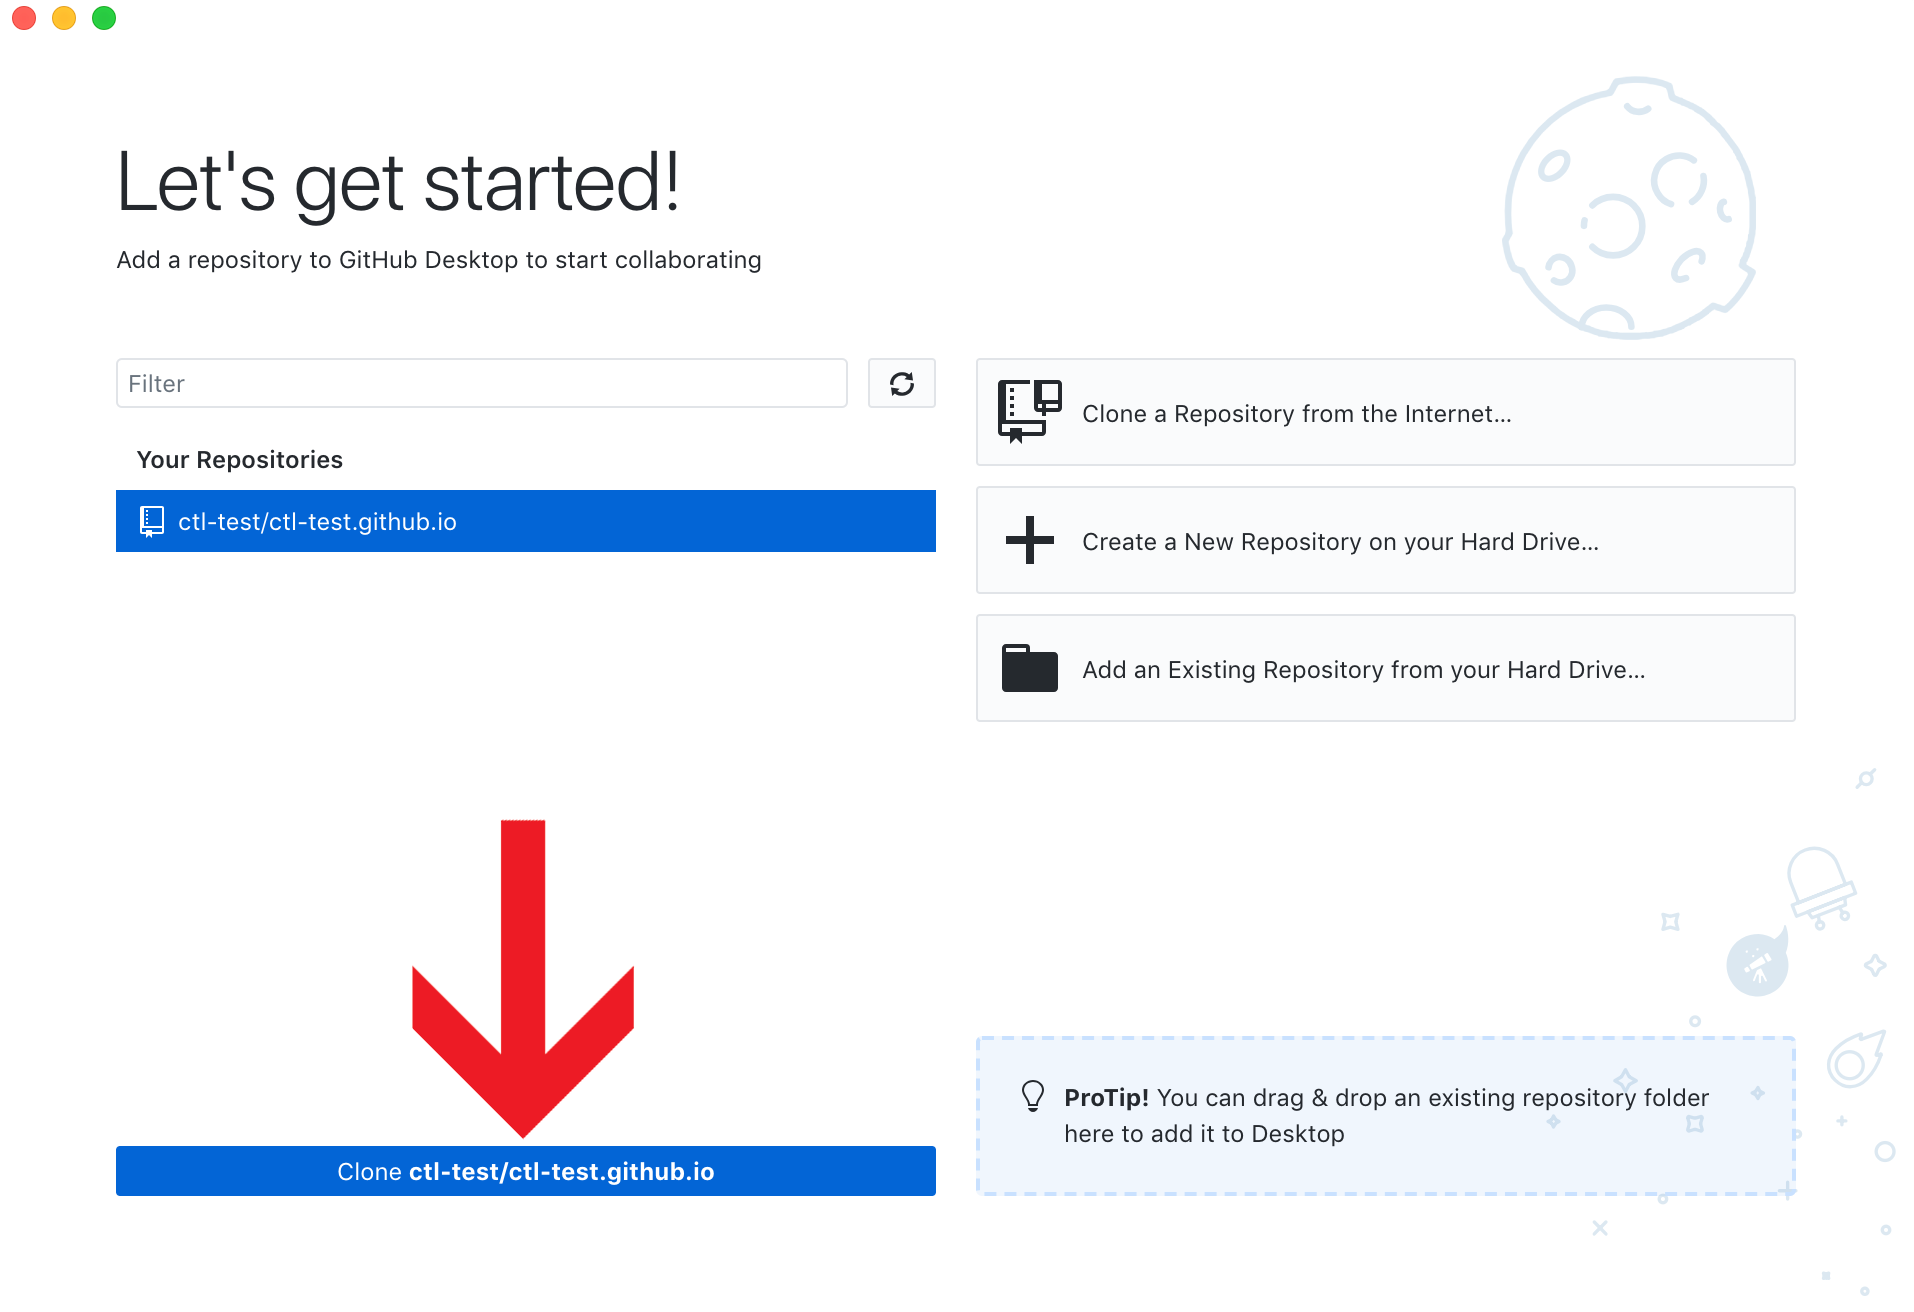
If you click your
By default it will download the repository to this location: Documents/Github/REPO_NAME
When you make changes to your files, if you check Github Desktop again, you should see that its detected changes in your files.
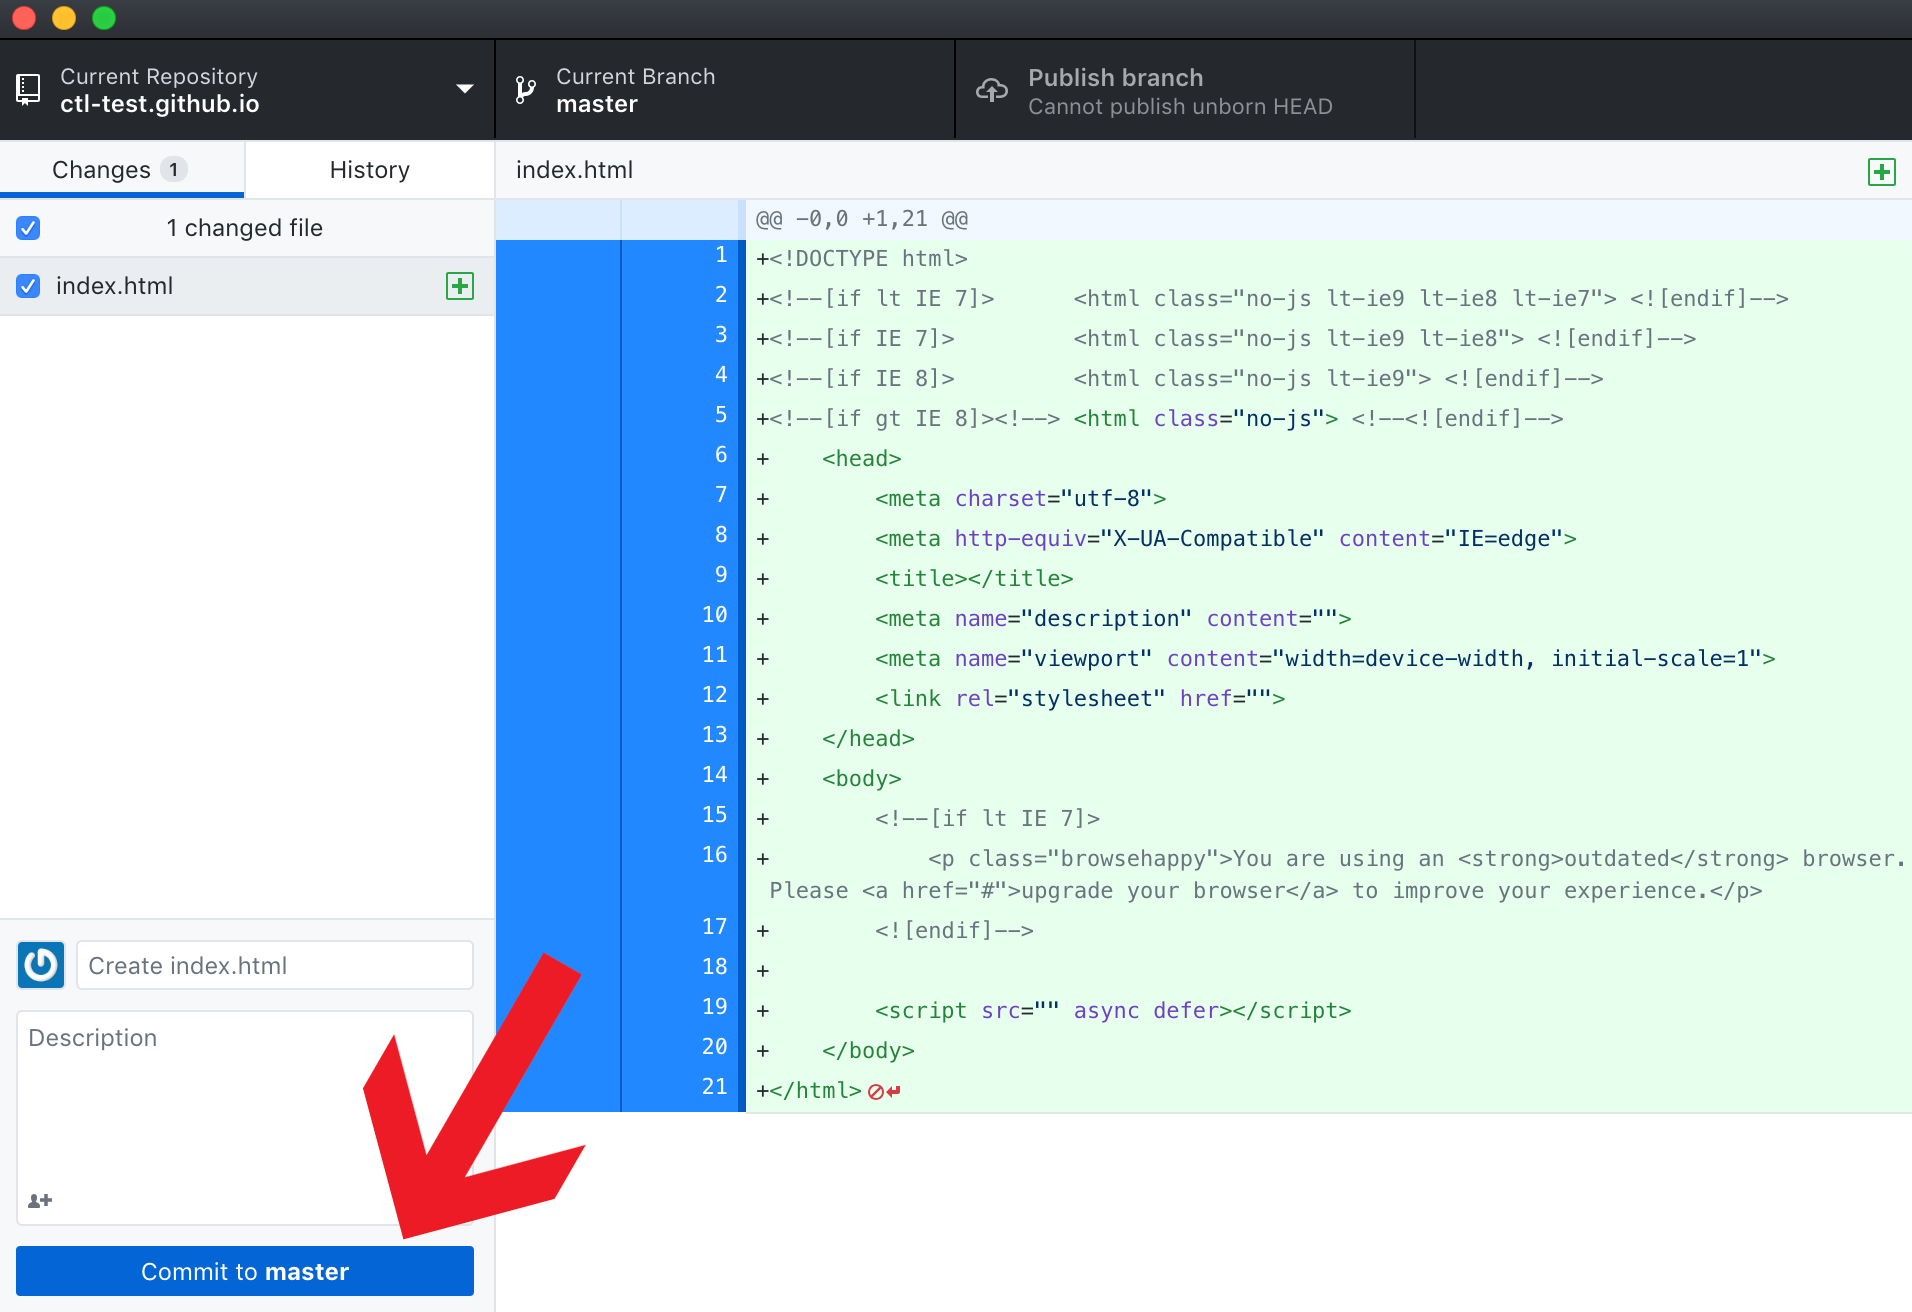
After you commit them in Github Desktop, in the bottom left of the screen (similar to Step 4) you can then publish the changes to your website

How to export your p5.js as a video
How to Video Capture your p5.js Sketch
If you're creating a piece of time-based work in p5.js you may want to capture the canvas as a video. For example, if you have a generative design that evolves over time, or an animation sequence. In this tutorial you will learn how to:
- Download and include a custom library to your p5.js sketch
- Program that library to access your camera as a capture card.
Custom Library
The first step we need to take is to download the custom library for this process. This library can be found at the following Moodle link . Following that link will automatically download a src.zip folder.
make sure you sign into Moodle to access the files.
Once this folder is downloaded you can extract it to either your desktop or downloads folder (anywhere you can easily find it). We are going to upload the files from this folder to our sketch now.
make sure you turn off "auto-refresh" if you have it enabled as this could cause the video capture to crash as you're programming
Your Sketch
- There is a red arrow ">" button beneath the play and stop buttons. Click this to expand the menu which shows all your sketch files. You will need to create a new folder called src and upload all the seperate files from the src.zip you downloaded at the beginning.
If you do not create a folder called src and upload the files into it then you may encounter errors with the next code block. You will see that my files are referened to the path "./src/"
2. Click on the "index.html" file in the side bar. We know need to add the following lines of code in the head of our html file. You should see the default p5.js scripts. Feel free to add these underneath. <script src = "./src/CCapture.js"> </script>
<script src = "./src/webm-writer-0.2.0.js"></script>
<script src = "./src/download.js"></script>
If you don't add these scripts to the head of the html file you will not be able to use the functions. If you encounter errors that describe undefined functions with regard to the capture code then check here first.
- Return to your "sketch.js" file where we can now add the following lines of code to the top of sketch as a global variable. This will create a new CCapture object that we can store in the variable "capture". We also set a captureLength variable. I set it to 60, which will capture 1 second of material at 60 frames per second.
let capture = new CCapture({
  frameRate: 60,
  format: "webm",
});

let captureLength = 60;
- Go to your draw function and put this code at the beginning to start the capturing
  if (frameCount == 1) {
    capturer.start();
  }
This line of code is telling the sketch to start recording once the frameCount == 1.We do this so that the program can run the first frame at setup before beginning to capture. If you wanted to delay the recording by a certain amount of frames you can change the boolean check.
- The last block of code in your draw function should be this. When your program reaches this point it is going to check if the frameCount is still below the captureLength, and if that is true, it will keep recording. The minute the frameCount is over the captureLength the code block is going to evaluate with the else clause which will end the capture and save the output.
  if (frameCount < captureLength) {
    capturer.capture(canvas);
  } else if (frameCount === captureLength) {
    capturer.save();
    capturer.stop();
  }
The Draw Function in Full
function draw() {
  //start capturing
  if (frameCount == 1) {
    capturer.start();
  }

  //start coding

  background(220);

  //stop capturing
  if (frameCount < captureLength) {
    capturer.capture(canvas);
  } else if (frameCount === captureLength) {
    capturer.save();
    capturer.stop();
  }
}
This is a link to a finished version if you're having problems with your own.
Video Exporter Template