Tutorials
- How to make the Raspberry Pi display a web page fullscreen at power on
- How to power the Raspberry Pi Pico
- How to make two Raspberry Pi Pico communicate via Wifi
- How to control Raspberry Pi Pico via Wifi
- How to set the sound output in Raspberry Pi
- How to install Node.js on Raspberry Pi
- How to use Waveshare E-Paper Display with Raspberry Pi
- How to Display Animation on Waveshare E-Paper Display
- How to send files to Raspberry Pi using SSH
- How to use Raspberry Pi Camera Module 3
- How to do Basic Commands in Terminal
How to make the Raspberry Pi display a web page fullscreen at power on
This short tutorial should be enough for you to be able to setup a Raspberry Pi with GUI mode and auto login enabled to disable a web page full screen automatically when it turns on.
- Copy
full-screen.shinto the home folder of the pi user, and run the following command:/home/pi/full-screen.sh
sudo chmod +x full-screen.sh
full-screen.sh
export DISPLAY=:0.0
xset s off
xset -dpms
xset s noblank
chromium-browser --noerrdialogs --kiosk https://google.co.uk --incognito
- Create a folder called autorun inside the
.configfolder of the home folder of the pi user:/home/pi/.config/autorun/kiosk.desktop
cd /home/pi/.config
mkdir autorun
kiosk.desktop
[Desktop Entry]
Type=Application
Exec=/home/pi/full-screen.sh
Hidden=false
X-GNOME-Autostart-enabled=true
Name=kiosk
- Reboot the Raspberry Pi.
sudo reboot now
How to power the Raspberry Pi Pico
Powering the Raspberry Pi Pico
The easiest way to power a Pico is through the USB cable either to a computer or a phone charger. If you are going for a wireless design, you can use batteries as well. This tutorial will demonstrate how to power a Pico with a 9V battery or 3 AA batteries.
Raspberry Pi Pico pinout
You have to find out the pinout of the model you are using. The pins you are looking for are VSYS and GND. In this tutorial, a Pico W is used.
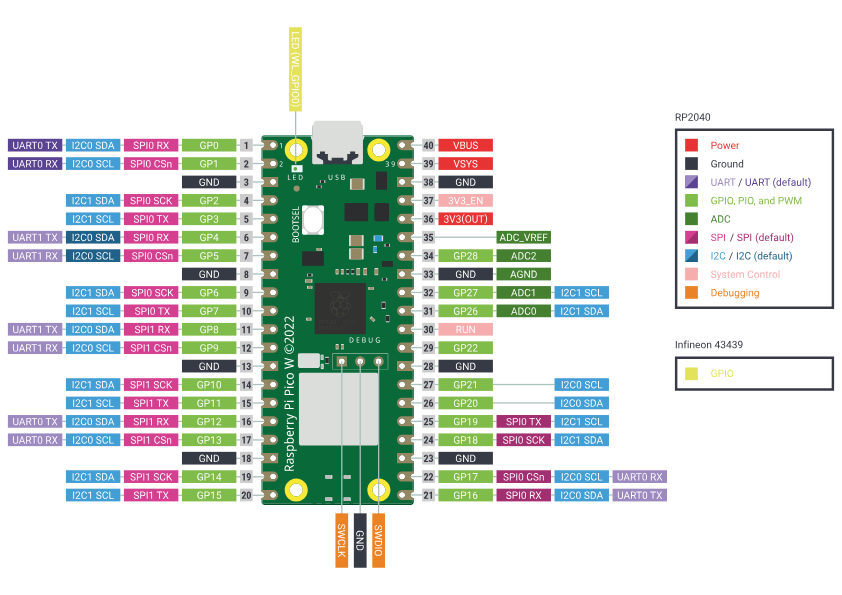
Raspberry Pi Pico's Power Need
VSYS (PIN 39): Pin for main system input voltage. The input voltage can vary between 1.8V to 5.5V. This voltage is used by the onboard SMPS to generate 3.3V to power the RP2040 microcontroller and GPIOs.
Why these parts are needed
-
Switch: When we are using batteries to power the microcontroller, a switch is preferred. Some battery holder has a built-in switch which will be more convenient for you. With a switch, you can turn off the Pico when not in use and not drain the battery.
-
LM7805: The LM7805 is a popular voltage regulator integrated circuit (IC). It is a positive voltage regulator that provides a stable and fixed output voltage of +5 volts. It is widely used in electronic circuits to regulate the voltage and ensure a consistent and reliable power supply. It can accept an input voltage in the range of 7V to 35V, depending on the specific model, so you will need this when you are using a power supply with a voltage higher than 5V.
-
Diode: - A diode is a semiconductor device that allows current to flow in one direction while blocking it in the opposite direction. In other words, it acts as a one-way valve for electric current. We need a diode for safety to prevent one power source from back-feeding the other. Raspberry Pi can have two power sources at the same time and there is a risk of unwanted power flow between the two power sources. Schottky diode is preferred for its low voltage drop, but any others should work with a bit of voltage drop around 0.2-0.6V.
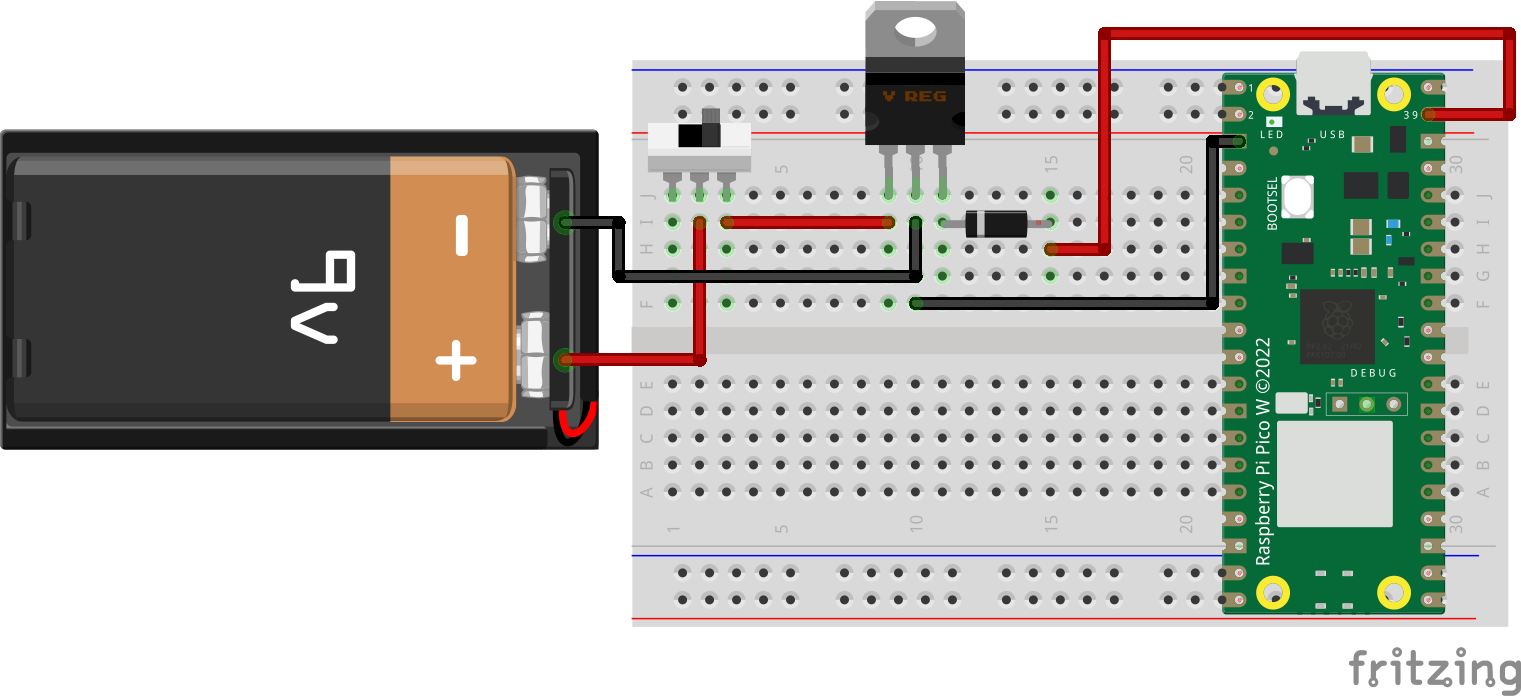
9V battery
Part needed: switch, LM7805 & Any diode
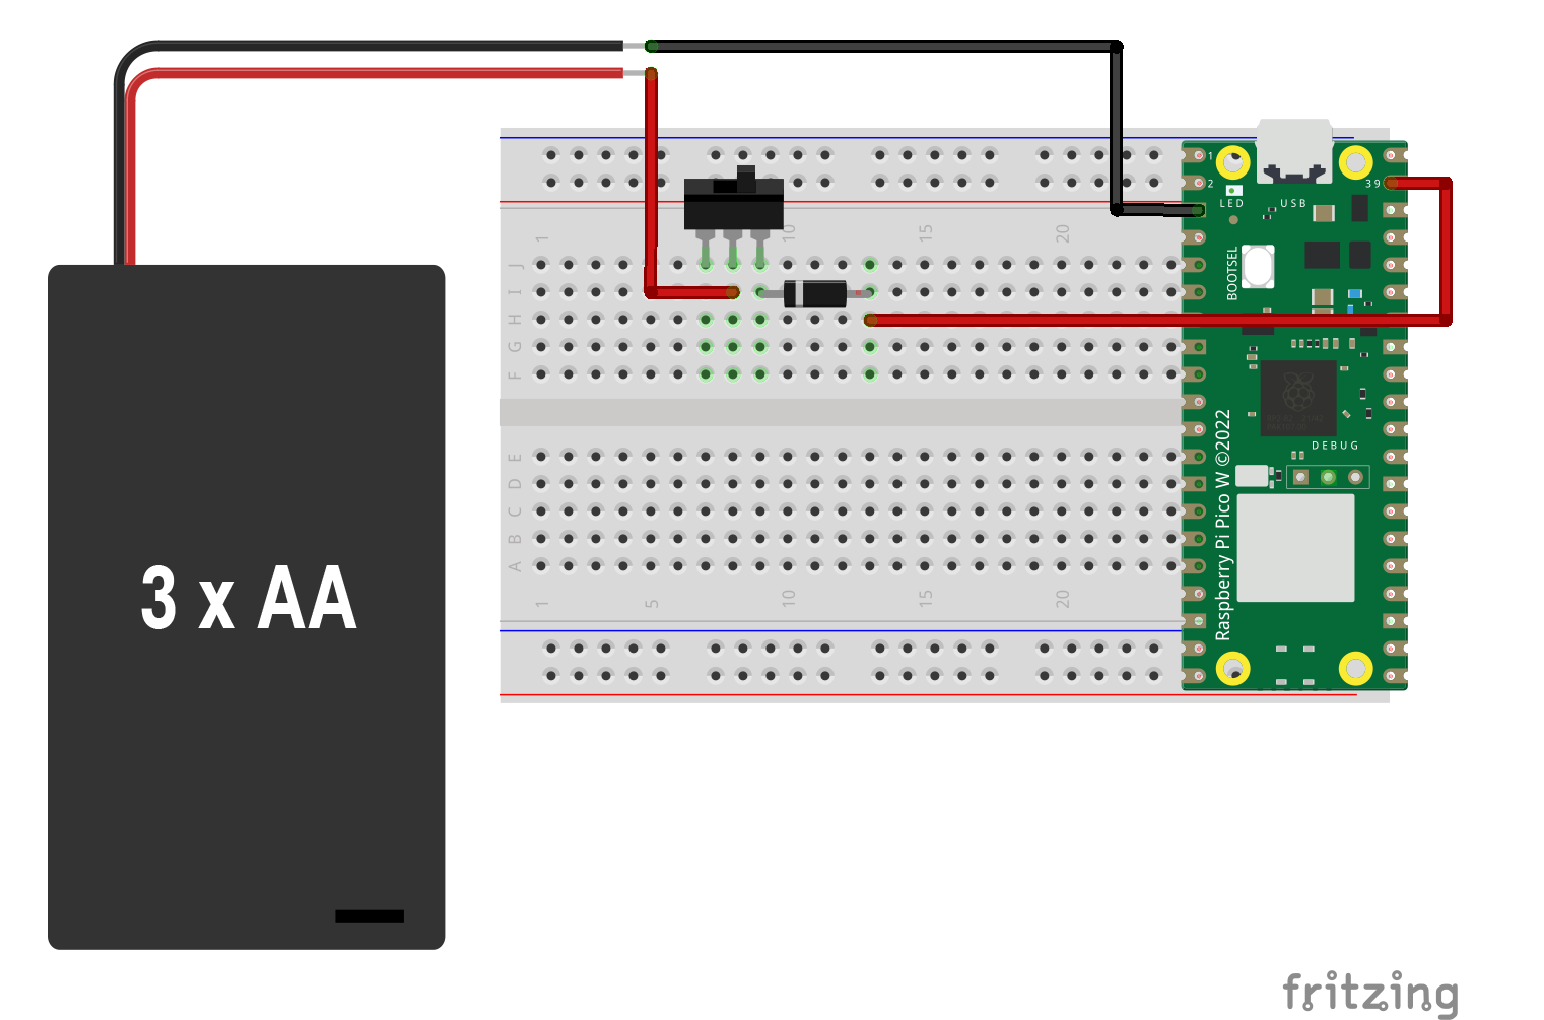
3 AA batteries
Part needed: switch & Any diode
How to make two Raspberry Pi Pico communicate via Wifi
Wifi Communication
Before heading to communication between two pico, you can try controlling pico via wifi with your computer first, see tutorial here.
Server Code
Client Code
How to control Raspberry Pi Pico via Wifi
What is Wifi
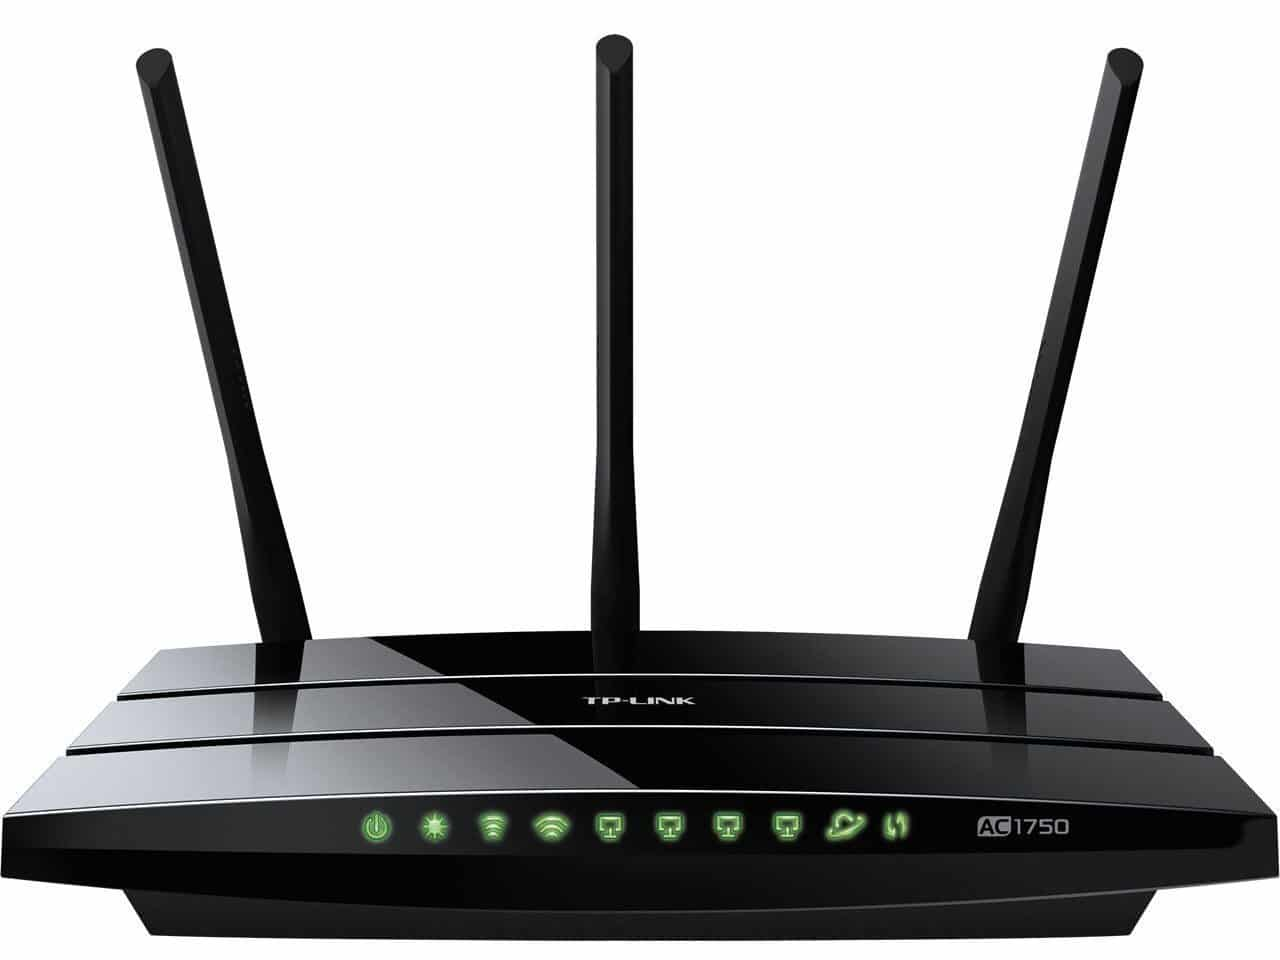
WiFi, short for Wireless Fidelity, is a technology that enables devices like smartphones, laptops, and other electronic gadgets to connect to the internet or communicate with each other without the need for physical cables. It operates by using radio frequency signals to transmit data between devices and a wireless router. The router, connected to the internet via a wired connection, acts as a central hub that facilitates communication between devices within its range. WiFi has become a ubiquitous and convenient way for people to access the internet and share information wirelessly, contributing to the proliferation of wireless connectivity in homes, businesses, and public spaces.
You can create a local wifi network with just powering up a wifi router. When two or more devices (computers, microcontrollers...) are connected to the same wifi network, they can communicate with each other, without accessing the internet. Not all microcontrollers come with a built-in Wifi module so we will be using Pico W (with a built-in wifi module) in this tutorial. But there are plenty of add-ons options you can add to your microcontroller for wifi.
External read for fun:)
What is IP address
An IP address, or Internet Protocol address, is a unique numerical label assigned to each device connected to a computer network that uses the Internet Protocol for communication. It consists of a series of numbers separated by periods, like xxx.xxx.xxx.xxx. Think of it as a digital address for your device on the internet. It allows devices to identify and communicate with each other on a network, much like a home address allows mail to be delivered to a specific location. IP addresses can be dynamic, meaning they change periodically, or static, where they remain constant. They play a crucial role in routing data packets across the internet, ensuring that information reaches the correct destination.
How to find my IP address
- Google Search - "What's my IP address?"
- Go to Network Preferences (MAC), Wifi Properties (Windows)
- Go to Terminal (MAC) or Command Prompt (Windows) and type in
ipconfig getifaddr en1
Get started
The example code will turn on/off the onboard LED on Pico via wifi without an external circuit. See this tutorial to learn how to set up your Pico. Before you go ahead, there are some things that you need to change for your wifi.
- Change
ssid,passwordin the code - Run your code in Thonny
- Find your
IP addressin the Thonny Shell, something likeip = 10.3.15.120 - open up a web browser
- go to
http:// **IP address**/light/onto turn the LED on - go to
http:// **IP address**/light/offto turn the LED off
import network
import socket
import time

from machine import Pin

led = Pin("LED", Pin.OUT)

ssid = 'YOUR NETWORK NAME'
password = 'YOUR NETWORK PASSWORD'

wlan = network.WLAN(network.STA_IF)
wlan.active(True)
wlan.connect(ssid, password)

html = """<!DOCTYPE html>
<html>
    <head> <title>Pico W</title> </head>
    <body> <h1>Pico W</h1>
        <p>%s</p>
    </body>
</html>
"""

max_wait = 10
while max_wait > 0:
    if wlan.status() < 0 or wlan.status() >= 3:
        break
    max_wait -= 1
    print('waiting for connection...')
    time.sleep(1)

if wlan.status() != 3:
    raise RuntimeError('network connection failed')
else:
    print('connected')
    status = wlan.ifconfig()
    print( 'ip = ' + status[0] ) //print your address

addr = socket.getaddrinfo('0.0.0.0', 80)[0][-1]

s = socket.socket()
s.bind(addr)
s.listen(1)

print('listening on', addr)

# Listen for connections
while True:
    try:
        cl, addr = s.accept()
        print('client connected from', addr)
        request = cl.recv(1024)
        print(request)

        request = str(request)
        led_on = request.find('/light/on')
        led_off = request.find('/light/off')
        print( 'led on = ' + str(led_on))
        print( 'led off = ' + str(led_off))

        if led_on == 6:
            print("led on")
            led.value(1)
            stateis = "LED is ON"

        if led_off == 6:
            print("led off")
            led.value(0)
            stateis = "LED is OFF"

        response = html % stateis

        cl.send('HTTP/1.0 200 OK\r\nContent-type: text/html\r\n\r\n')
        cl.send(response)
        cl.close()

    except OSError as e:
        cl.close()
        print('connection closed')
How to set the sound output in Raspberry Pi
Audio Setting
Most Raspberry Pis have a 3.5mm audio jack for outputting audio, but you can also output audio via HDMI as well. The below will show you two different ways to set the output device.
Method 1: Use Raspberry Pi Configuration (GUI)
- Click the Raspberry menu (top-left corner)
- Go to Preferences → Audio Device Settings
- In the Output Device dropdown, choose:
HDMIorHDMI 1(depending on your Pi model) - Click Select Controls if needed to unmute or adjust volume
- Click Close
You may not see the exact thing on your pi based on the operating system you used.
Method 2: Terminal Command
For example, setting HDMI as default audio output:
amixer cset numid=3 2
The 2 at the end indicates HDMI.
- 0 = Auto
- 1 = Analog (3.5mm jack)
- 2 = HDMI
Method 3: Use raspi-config
-
sudo raspi-config - Navigate to:
1. System Options → S2 Audio - Choose:
1 HDMI(or HDMI 1 if you see multiple) - Press Enter, then Finish
Test the Audio
- You can test it with:
speaker-test -t sine -f 440 -c 2 - Or play a WAV sound file:
aplay /home/pi/Music/youOwnSoundFile.wav - Or play a MP3 sound file:
cvlc /home/pi/Music/youOwnSoundFile.mp3
How to install Node.js on Raspberry Pi
Installing Node.js on Raspberry Pi is very simple for those with basic command line experience.
In the terminal or via SSH:
- Add the package source:
curl -sL https://deb.nodesource.com/setup_10.x | sudo -E bash - - Install Node using:
sudo apt-get install -y nodejs - Confirm package is installed:
node -v
Extra steps
You may also wish to install the development tools to build native addons:
sudo apt-get install gcc g++ make
And you may wish to install Yarn package manager to replace NPM:
curl -sL https://dl.yarnpkg.com/debian/pubkey.gpg | sudo apt-key add -
echo "deb https://dl.yarnpkg.com/debian/ stable main" | sudo tee /etc/apt/sources.list.d/yarn.list
sudo apt-get update && sudo apt-get install yarn
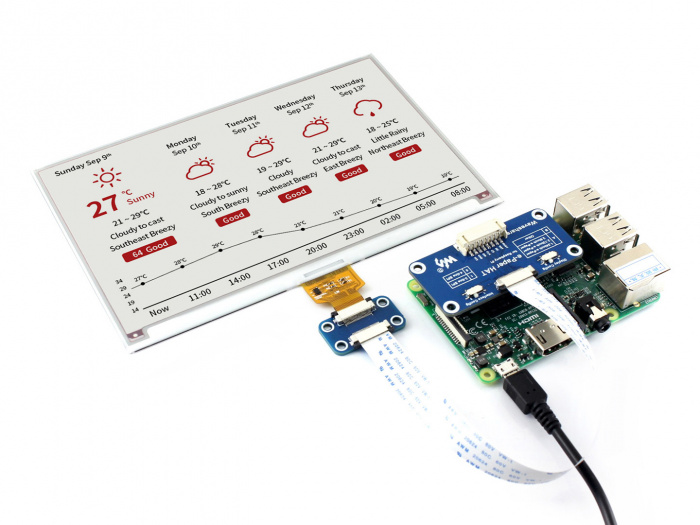
How to use Waveshare E-Paper Display with Raspberry Pi
What is a Waveshare E-Paper Display?
In this tutorial, we will be using the Waveshare model epd7in5V2, a Raspberry Pi 3 and Python as the programming language. The display is also compatible with Arduino, C and Jetson Nano. For more information or tutorials, please visit the official guide.
Connection
Disconnection from Power
Disconnect the power supply to the Raspberry Pi before you proceed with any connection.
The display comes with an e-paper Driver HAT, so simply plug in.
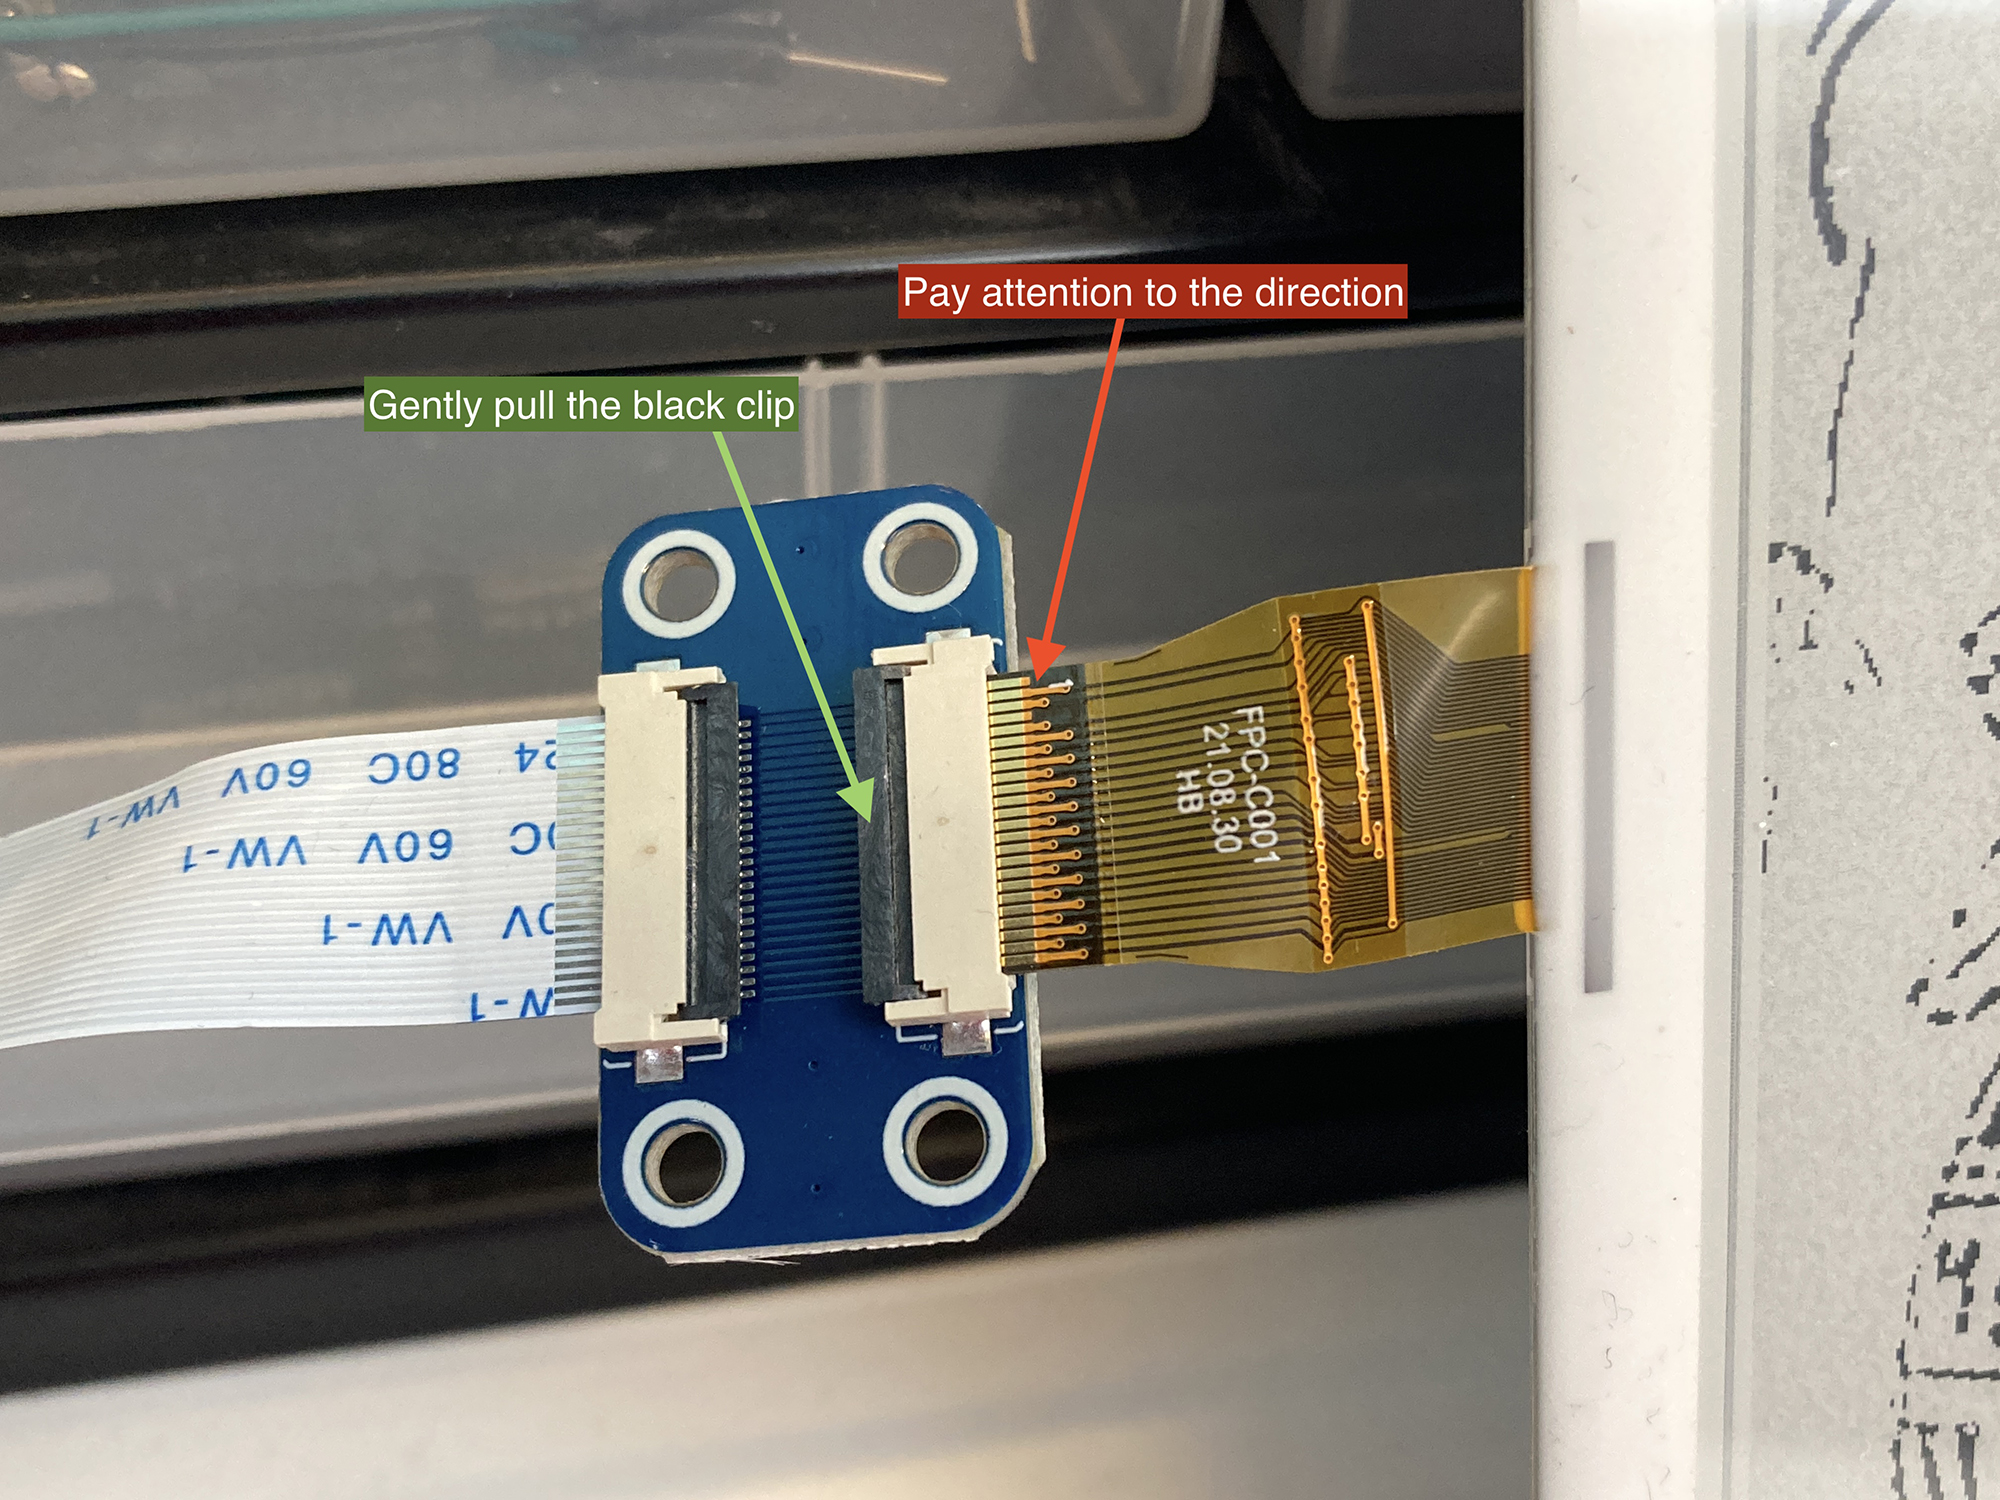
You may need to insert the ribbon cable (the golden one) from the display to the HAT.
- Gently pull up the black clip (green arrow)
- Insert the golden cable (red arrow, pay attention to the direction)
- Press down the black clip to secure it.
Setting Up the Pi
Enable SPI in pi
- Input this command
sudo raspi-configin the Terminal. - Navigate to Interface Options → SPI → Enable
- Reboot the pi by
sudo reboot
Install Python Library
sudo apt-get update
sudo apt-get install python3-pip
sudo apt-get install python3-pil
sudo apt-get install python3-numpy
sudo pip3 install RPi.GPIO
sudo pip3 install spidev
Download Python Example code from Github
git clone https://github.com/waveshare/e-Paper.git
Go to the Directory (folder) where the example codes are located
cd e-Paper/RaspberryPi_JetsonNano/python/examples/
Run the Python Code
You can either run the code from the Terminal or use a Python-based software such as Visual Studio or Thonny. In Terminal:
python3 epd_7in5_V2_test.py
The display should now be blinking and have some demos displayed.
Something more
The below code is to draw a rectangle with random size and location on the display.
#!/usr/bin/python
# -*- coding:utf-8 -*-
import sys
import os
libdir = os.path.join(os.path.dirname(os.path.dirname(os.path.realpath(__file__))), 'lib')
if os.path.exists(libdir):
    sys.path.append(libdir)

import logging
import random
from waveshare_epd import epd7in5_V2
import time
from PIL import Image,ImageDraw,ImageFont
import traceback

logging.basicConfig(level=logging.DEBUG)

try:
    logging.info("epd7in5_V2 Demo")
    epd = epd7in5_V2.EPD()

    logging.info("init and Clear")
    epd.init_fast()
    epd.Clear()

    #print(f"Display Width: {epd.width}, Display height: {epd.height}")
    # Display Width: 800, Display height: 480
    # Create a blank image
    Himage = Image.new('1', (epd.width, epd.height), 255) #255: white, clear the frame
    draw = ImageDraw.Draw(Himage)

#Drawing function Argyments:
# draw.rectangle((x1, y1, x2, y2), outline=0, fill=None)
# draw.arc((x1, y1, x2, y2),startAngle, endAngle, fill=0), (x1, y1, x2, y2) bounding box of the ellipse that the arc is part of
# draw.chord((x1, y1, x2, y2), startAngle, endAngle, outline=0, fill=None), different to arc as it will close the shape and allow fill colour
# draw.line((x1, y1, x2, y2), fill=0, width=1)

    while True:
        #Generate a random pattern
        draw.rectangle((random.randint(10,epd.width-10), random.randint(10,epd.height-10), random.randint(10,epd.width-10), random.randint(10,epd.height-10)), outline=0)

        #Display the generated image
        epd.display(epd.getbuffer(Himage))

        #Hold the frame for 2 seconds
        time.sleep(2)

#     logging.info("Goto Sleep...")
#     epd.sleep()

except IOError as e:
    logging.info(e)

except KeyboardInterrupt:
    logging.info("ctrl + c:")
    epd7in5_V2.epdconfig.module_exit(cleanup=True)
    exit()
How to Display Animation on Waveshare E-Paper Display
How to use Waveshare E-Paper Display?
Please follow the previous tutorial for setting up the basic. This tutorial assumes you already have an animation ready to use.
What type of animation will be suitable to display on E-Paper
- Black and White, as the display we have in stock is Black and White only
- Low framerate animation, such as hand-drawn animation, as the display is not refreshing very fast.
- Short animation, depends on the Pi you use, Pi 3 may not be powerful enough to drive and store long animation.
File Preparation - Adobe Premiere Pro
- Resize the resolution to fit the display - 800x480 pixels
- Lower the framerate to 10 or 12 fps
- Export the video to jpg sequences from Premier and save them in a folder called ‘animation’
- Rename all jpg to
1.jpg to #.jpgusing Terminal, if they are not alreadycd /path/to/your/folder a=1 for file in Sequence*.jpg; do mv "$file" "$a.jpg" ((a++)) done - Now you can transfer the folder to the Raspberry Pi, you can use a USB stick or via SSH. Place the folder
animationinside the foldere-Paper.
File Preparation - Raspberry Pi
We will need to convert jpg to bmp in Pi using ffmpeg.
- Install ffmpeg,
sudo apt install ffmpeg -y - Make sure you are at the
/animationdirectory - Start conversion,
for f in *.jpg; do ffmpeg -i "$f" "${f%.jpg}.bmp"; done - Remove old jpg files,
rm *.jpg - Now all images in the animation folder should look like
1.bmp to #.bmp
Code
The below code will display the animation from frame 1 to the end frame.
!/usr/bin/python
# -*- coding:utf-8 -*-
# Display Width: 800, Display height: 480

import sys
import os
libdir = os.path.join(os.path.dirname(os.path.dirname(os.path.realpath(__file__))), 'lib')
if os.path.exists(libdir):
    sys.path.append(libdir)

import logging
import random
from waveshare_epd import epd7in5_V2
import time
from PIL import Image,ImageDraw,ImageFont
import traceback

logging.basicConfig(level=logging.DEBUG)

try:
    logging.info("epd7in5_V2 Animation")
    epd = epd7in5_V2.EPD()

    logging.info("init and Clear")
    epd.init_fast()
    epd.Clear()

    animation_dir = os.path.join(os.path.dirname(os.path.dirname(os.path.realpath(__file__))), 'animation')
    image_files = sorted(
        [f for f in os.listdir(animation_dir) if f.endswith('.bmp')],
        key=lambda x: int(os.path.splitext(x)[0]))

    if not image_files:
        logging.info(e)
        epd.sleep()
        exit()

    logging.info("switch to partial refresh")
    epd.init_part()

    while True:
        for image_file in image_files:
            image_path = os.path.join(animation_dir, image_file)
            logging.info(f"Displaying: {image_file}")
            Himage = Image.open(image_path).convert('1')
            epd.display_Partial(epd.getbuffer(Himage), 0, 0, epd.width, epd.height)
#             time.sleep(0.1)


except IOError as e:
    logging.info(e)

except KeyboardInterrupt:
    logging.info("ctrl + c:")
    epd7in5_V2.epdconfig.module_exit(cleanup=True)
    exit()
How to send files to Raspberry Pi using SSH
What is SSH?
SSH stands for Secure Shell — it’s a network protocol that lets you securely log in to and control another computer remotely, usually over the internet or your local network.
Think of it as opening a remote terminal window on your Raspberry Pi from your laptop or another device.
What You Can Do with SSH:
- Run terminal commands on your Pi from another machine
- Transfer files (using scp, rsync, or SFTP)
- Install software, run Python scripts, update your system
- Control a headless Raspberry Pi (one without monitor/keyboard)
Enable SSH on Raspberry Pi
Option 1: Using Raspberry Pi OS with Desktop
- Go to Preferences → Raspberry Pi Configuration
- Under the Interfaces tab, enable SSH
- Reboot afterwards,
sudo reboot
Option 2: If You’re Using Pi Headless
- Put a file named ssh (with no extension) into the boot partition of the SD card
- When the Pi boots, SSH will be enabled
Find Pi's IP address
- In Terminal,
hostname -I - You will see something that looks like this:
192.168.1.42, this is your pi's IP address
File Transfer
1. From Your Computer → Raspberry Pi
scp /path/to/local/file pi@<raspberry_pi_ip>:/home/pi/
2. To Send a Whole Folder
scp -r /path/to/local/folder pi@<raspberry_pi_ip>:/home/pi/
3. From Raspberry Pi → Your Computer
scp pi@<raspberry_pi_ip>:/home/pi/somefile.txt /local/path/
Tips
- The default username is usually
pi - If SSH asks you to confirm the connection the first time, type
yes - If your Pi is using a custom SSH port (e.g. 2222), add
-P 2222
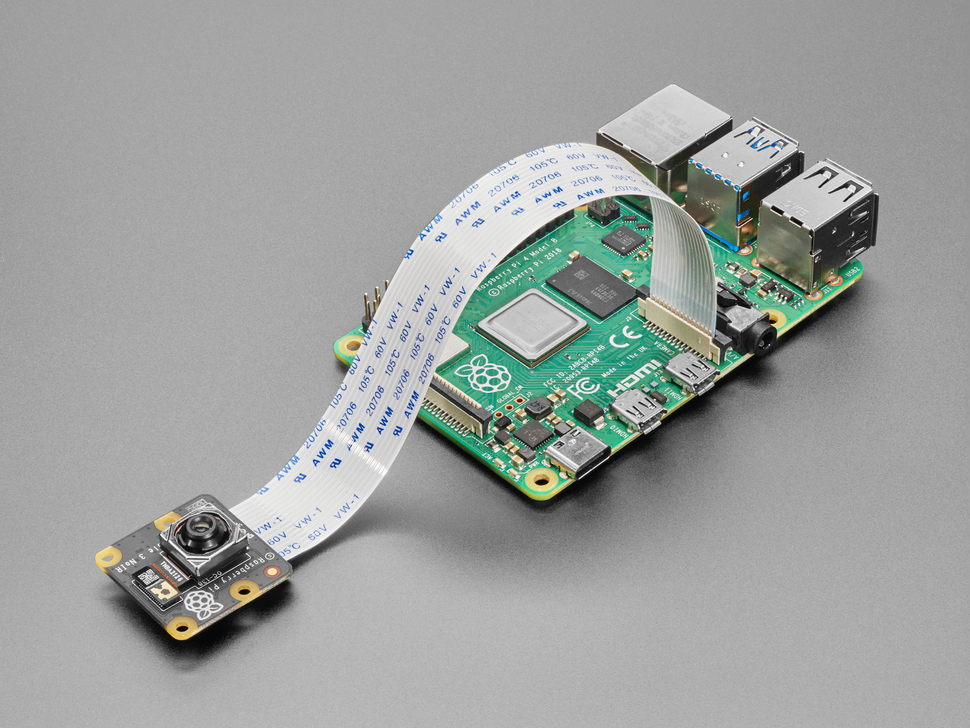
How to use Raspberry Pi Camera Module 3
What is Raspberry Pi Camera Module 3?
This tutorial will walk you through setting up and using the Raspberry Pi Camera Module 3 Noir on a Raspberry Pi 5, but other Pi like Pi 3 and Pi 4 will work as well.
Camera Module 3 — Key Features
| Feature | Description |
|---|---|
| Sensor | Sony IMX708 |
| Resolution | 12MP (4608 × 2592) |
| Autofocus | ✅ Yes (PDAF or EDOF depending on model) |
| HDR | ✅ Available on certain models |
| FoV Variants | Standard & Wide-angle |
| IR Version | Available (NoIR version) |
| Interface | CSI-2 via 22-pin MIPI ribbon cable |
| OS Support | Raspberry Pi OS Bookworm or later |
Requirements
Hardware
- Raspberry Pi (Pi 3 or later)
- Camera Module 3 (ensure it’s a v3 model)
- Camera ribbon cable (22-pin), Pi5 will need a 22pin to 15pin ribbon cable
- Power supply & HDMI or SSH access
Software
- Raspberry Pi OS Bookworm (64-bit recommended)
- Camera support via libcamera stack
- picamera2 Python library
Physical Connection
- Power off your Pi.
- Locate the CSI camera port on the board (next to the HDMI ports).
- Gently lift the connector latch.
- Insert the ribbon cable on the Pi: the blue tab faces the Ethernet port, metal pins toward HDMI.
- Insert the ribbon cable on the camera: blue side usually faces away from the camera sensor.
- Close the latch and ensure it’s snug.
- Power on the Pi.
Enable I2C communication
-
sudo raspi-config - Interface Options -> I2C -> Enable
-
sudo reboot
Update OS & Install Required Packages
sudo apt update && sudo apt upgrade -y
sudo apt install -y libcamera-apps python3-picamera2 python3-opencv
Test Camera via Terminal
- Basic Camera Preview (HDMI required):
libcamera-hello - Take a Photo:
libcamera-jpeg -o test.jpg - Record a Video (10 seconds):
libcamera-vid -t 10000 -o test.h264
Testing Code
Python Code Using picamera2
This code will pop a new window of live preview with autofocus.
from picamera2 import Picamera2
from libcamera import controls
import time

picam2 = Picamera2()
picam2.start(show_preview=True)

# Enable continuous autofocus
picam2.set_controls({"AfMode": controls.AfModeEnum.Continuous})

print("Camera feed started. Press Ctrl+C to stop.")
try:
    while True:
        time.sleep(1)
except KeyboardInterrupt:
    picam2.stop()
    print("Camera stopped.")
Face Detection Example with OpenCV
- Download the Haar Cascade XML and saved it in a folder called
haarcascades.wget -P ~ https://github.com/opencv/opencv/raw/master/data/haarcascades/haarcascade_frontalface_default.xml
import cv2
import numpy as np
from picamera2 import Picamera2
from libcamera import controls
import warnings

# Suppress the specific warning from OpenCV
warnings.filterwarnings("ignore", category=UserWarning, module="cv2")

# Initialize the Picamera2 instance
picam2 = Picamera2()

# Start the camera (no preview for better performance during processing)
picam2.start()

# Set autofocus to continuous mode
picam2.set_controls({"AfMode": controls.AfModeEnum.Continuous})

# Manually specify the path to the Haar Cascade file
face_cascade = cv2.CascadeClassifier('/home/pi/haarcascades/haarcascade_frontalface_default.xml')  # Adjust this path if necessary

# Check if the cascade classifier is loaded properly
if face_cascade.empty():
    print("Error loading Haar Cascade classifier. Make sure the path is correct.")
    exit()

# Start capturing frames and detecting faces
while True:
    # Capture a frame from the camera
    frame = picam2.capture_array()

    # Check if the frame was captured successfully
    if frame is None:
        print("Failed to capture frame.")
        break

    # Convert the image to grayscale (required for Haar Cascade)
    gray = cv2.cvtColor(frame, cv2.COLOR_BGR2GRAY)

    # Detect faces in the image
    faces = face_cascade.detectMultiScale(gray, 1.1, 4)

    # Loop through the faces and draw rectangles around them
    for (x, y, w, h) in faces:
        # Draw a thin rectangle (face bounding box) around the detected face
        cv2.rectangle(frame, (x, y), (x + w, y + h), (0, 255, 0), 2)

    # Show the frame with the face(s) detected
    # Convert the frame to a simpler BGR format or grayscale
		frame = cv2.cvtColor(frame, cv2.COLOR_BGR2RGB)  # Convert to RGB
    cv2.imshow("Face Detection", frame)

    # If the 'q' key is pressed, exit the loop
    if cv2.waitKey(1) & 0xFF == ord('q'):
        break

# Clean up
picam2.stop()  # Stop the camera
cv2.destroyAllWindows()  # Close all OpenCV windows
How to do Basic Commands in Terminal
Raspberry Pi Terminal Command Cheat Sheet
| Command | Description |
|---|---|
ls |
List all files and directories in the current folder |
cd foldername |
Change to a specific directory |
cd .. |
Go up one directory |
mkdir myfolder |
Create a new directory called myfolder |
rm myfile.txt |
Delete a file called myfile.txt |
rm -r myfolder |
Delete a folder and its contents |
cp file1.txt file2.txt |
Copy file1.txt to file2.txt |
mv file.txt folder/ |
Move file.txt into the folder |
nano script.py |
Edit a Python script using the built-in text editor |
python3 script.py |
Run a Python 3 script |
chmod +x script.sh |
Make a shell script executable |
./script.sh |
Run an executable shell script |
sudo shutdown now |
Shutdown the Raspberry Pi immediately |
sudo reboot |
Reboot the Raspberry Pi |
clear |
Clear the terminal screen |
sudo apt update |
Update the list of available packages |
sudo apt upgrade |
Upgrade installed packages to the latest version |
sudo apt install package-name |
Install a software package (e.g., python3-opencv) |
git clone https://github.com/user/repo.git |
Download a GitHub repository to your local Pi |