Combining codes & circuits
1. Combining the Code
Arduino can only accept one code at one time. If we want it to do multiple things at the same time, we have to combine everything into one single code.
- only 1
void setup()andvoid loop(), that means we have to copy everything from 1setupto anothersetup, from 1loopto anotherloop.
void setup () {
    Serial.begin(9600);  // We initialize serial connection so that we could print values from sensor.
    pinMode(LED_BUILTIN, OUTPUT);
}
-
Variables are very useful for storing data and making our code tidy and accessible. For example, in
Serial.println(distanceSensor.measureDistanceCm());,distanceSensor.measureDistanceCm()is the distance value, and if we want to use the data, we will need to retype this long string of text multiple time. To make things easier, we can create a variable, like thisfloat distance = distanceSensor.measureDistanceCm();, float indicate distance will be a number with decimal place. -
if(){ }else{ }If statement is the most common way to make simple interaction between two components. For example:
    if(distance < 10){
      digitalWrite(led, HIGH);
      delay(100);
      }else{
        digitalWrite(led, LOW);
        delay(100);
        }
This is the full code of combining the Blink code and the distance sensor simple code, the orange light will turn on when something is near and off when not.
#include <HCSR04.h>

UltraSonicDistanceSensor distanceSensor(13, 12);  // Initialize sensor that uses digital pins 13 and 12.

void setup () {
    Serial.begin(9600);  // We initialize serial connection so that we could print values from sensor.
    pinMode(LED_BUILTIN, OUTPUT);
}

void loop () {
    // Every 500 miliseconds, do a measurement using the sensor and print the distance in centimeters.
    float distance = distanceSensor.measureDistanceCm();
    Serial.println(distance);

    if(distance < 10 && distance > 0){
      digitalWrite(led, HIGH);
      delay(100);
      }else{
        digitalWrite(led, LOW);
        delay(100);
        }
}
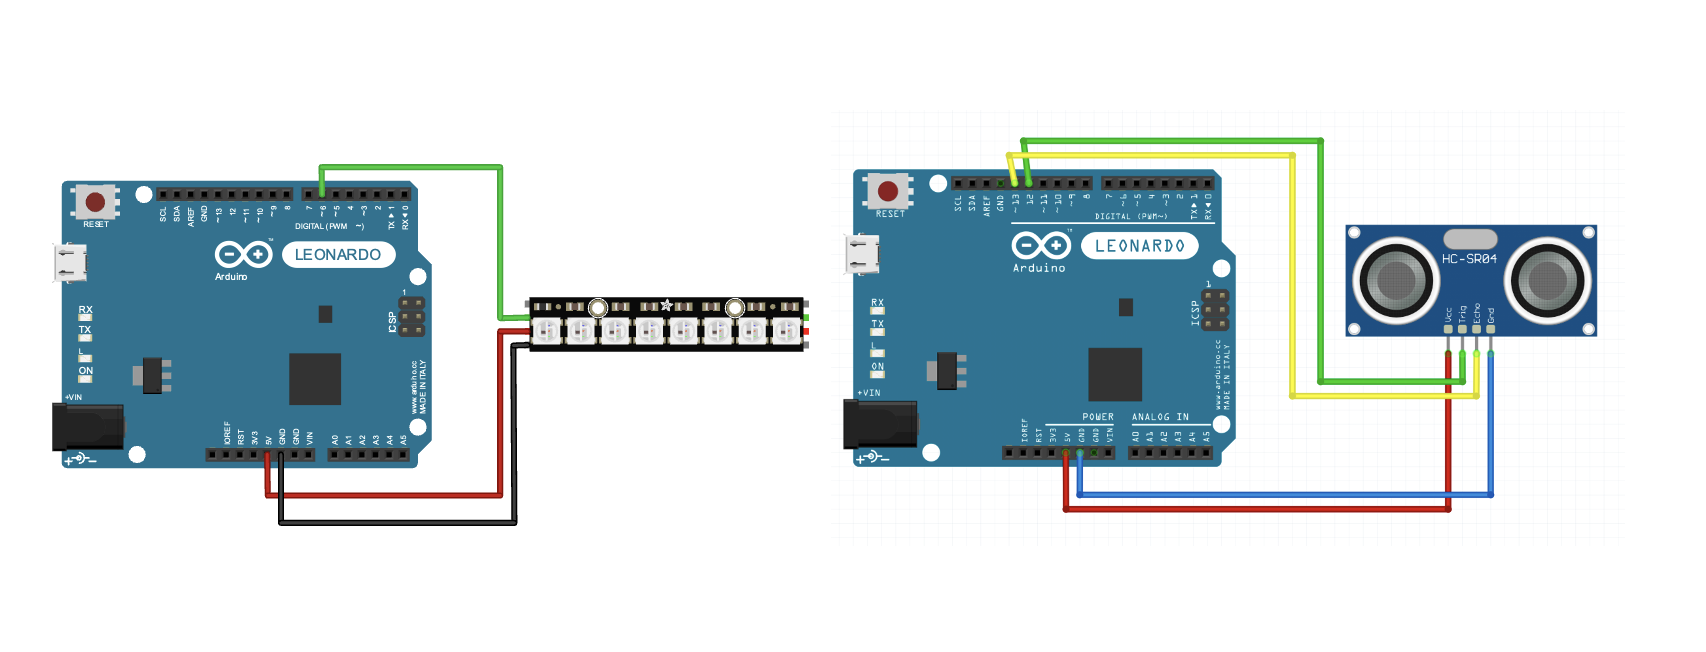
2. Combining the Circuit
And of course, we will need to merge the circuit as well. But you may notice there is only one 5V and both components need it.
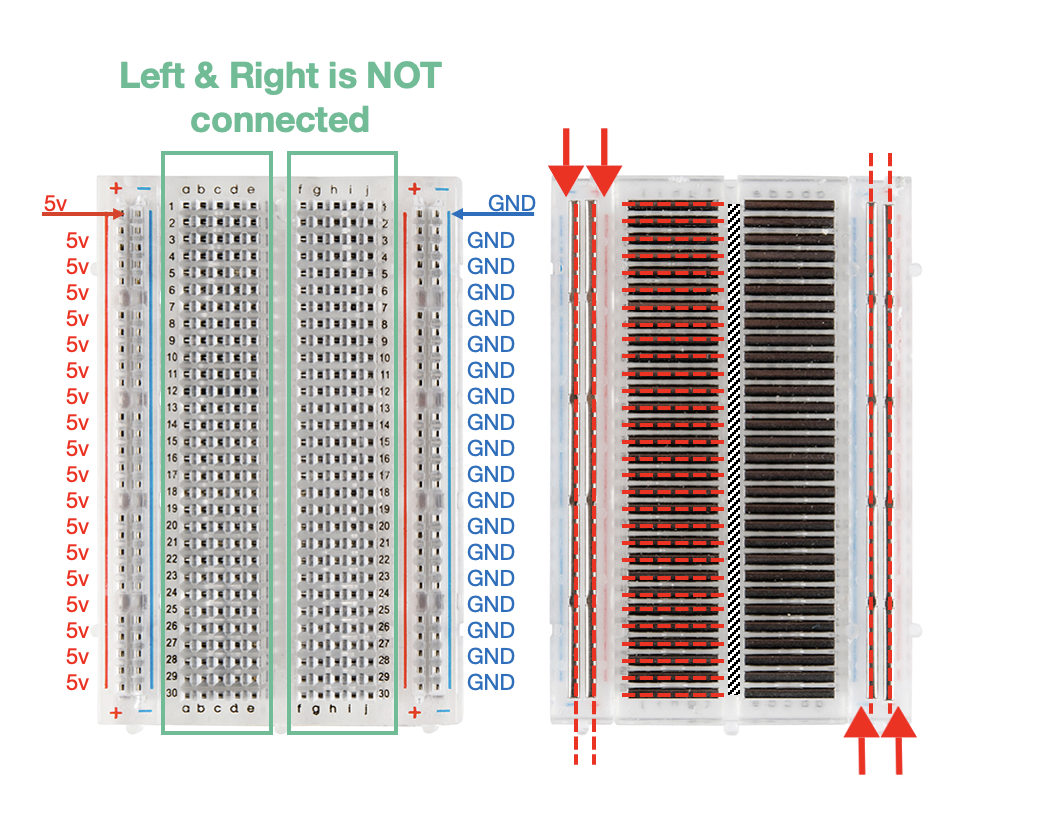
3. Using the Breadboard
A breadboard is the extension lead for electronics. The two columns at each side are connected vertically. The inner rows are connected horizontally. You can see a tiny gap right down the middle of the breadboard, which acts like a river, separating the left side and the right side.
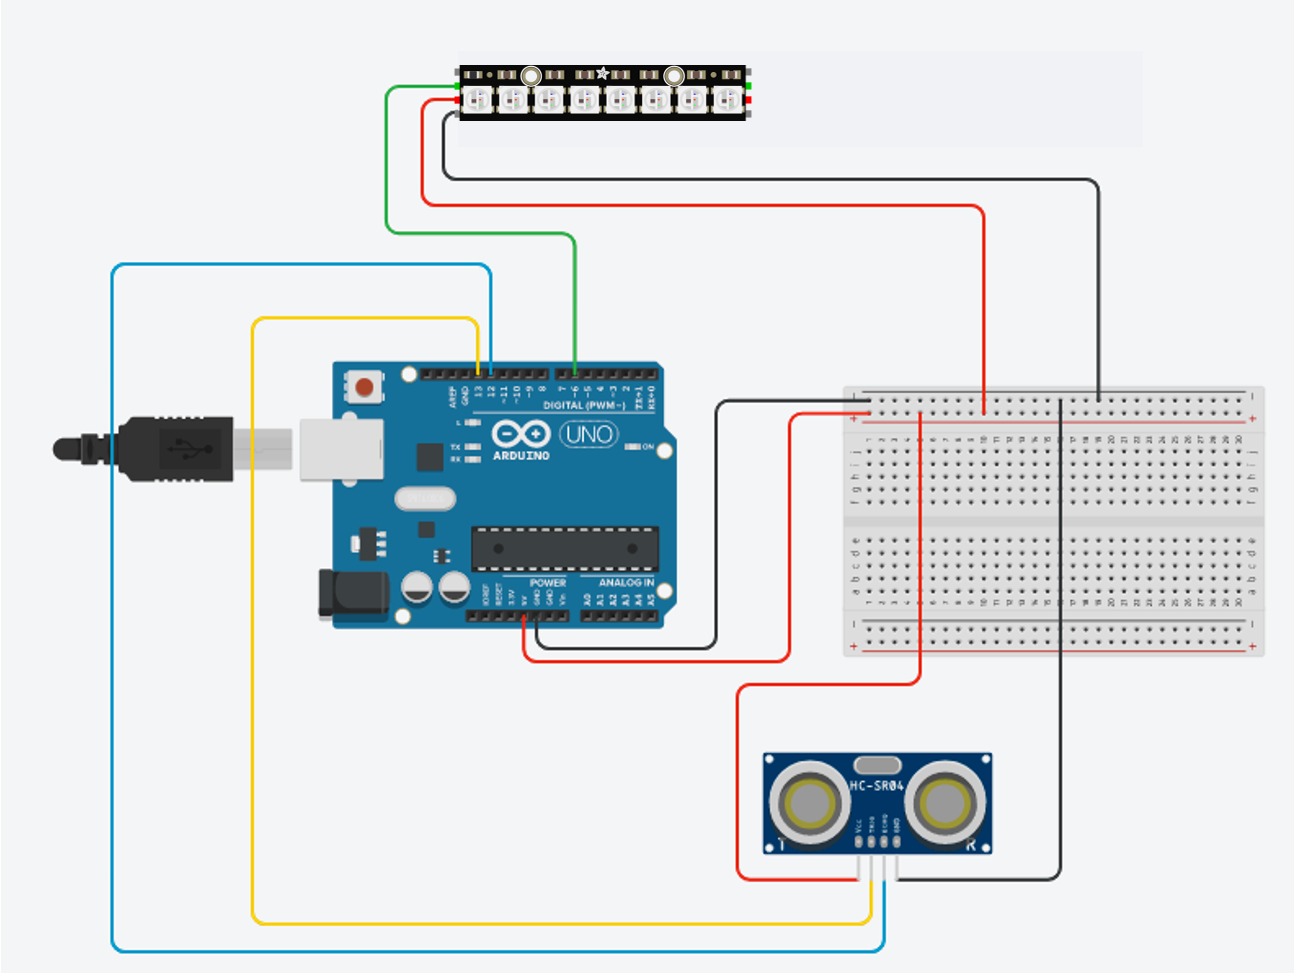
4. Building the Circuit
Extending the 5V and GND to the Breadboard:
- 5v –> (+) column
- GND –> (-) column
Neopixels:
- 5VDC -> (+) column
- GND -> (-) column
- DIN -> 6
Distance Sensor
- VCC -> (+) column
- GND -> (-) column
- TRIG -> 13
- ECHO -> 12
4. Uploading the code
We have prepared a code for this setup. The main goal of this workshop is understanding the logic of the code. So, if you somewhat understand what is going on in the below code, Congrats!
#include <HCSR04.h>
UltraSonicDistanceSensor distanceSensor(13, 12);

#include <Adafruit_NeoPixel.h>
#ifdef __AVR__
 #include <avr/power.h> // Required for 16 MHz Adafruit Trinket
#endif

// Which pin on the Arduino is connected to the NeoPixels?
// On a Trinket or Gemma we suggest changing this to 1:
#define LED_PIN    6

// How many NeoPixels are attached to the Arduino?
#define LED_COUNT 8

// Declare our NeoPixel strip object:
Adafruit_NeoPixel strip(LED_COUNT, LED_PIN, NEO_GRB + NEO_KHZ800);
// Argument 1 = Number of pixels in NeoPixel strip
// Argument 2 = Arduino pin number (most are valid)
// Argument 3 = Pixel type flags, add together as needed:
//   NEO_KHZ800  800 KHz bitstream (most NeoPixel products w/WS2812 LEDs)
//   NEO_KHZ400  400 KHz (classic 'v1' (not v2) FLORA pixels, WS2811 drivers)
//   NEO_GRB     Pixels are wired for GRB bitstream (most NeoPixel products)
//   NEO_RGB     Pixels are wired for RGB bitstream (v1 FLORA pixels, not v2)
//   NEO_RGBW    Pixels are wired for RGBW bitstream (NeoPixel RGBW products)


void setup() {
  Serial.begin(9600);
 //pinMode(3, OUTPUT);

  #if defined(__AVR_ATtiny85__) && (F_CPU == 16000000)
  clock_prescale_set(clock_div_1);
#endif
  // END of Trinket-specific code.

  strip.begin();           // INITIALIZE NeoPixel strip object (REQUIRED)
  strip.show();            // Turn OFF all pixels ASAP
  strip.setBrightness(50);


}

void loop() {

  float distance = distanceSensor.measureDistanceCm() ;
  Serial.println(distance);

if (distance > 0){
  if (distance>=10 && distance < 30 ){
    //digitalWrite(3, LOW);
    strip.clear();
    int j = map(distance,10, 30, 0, strip.numPixels());
    Serial.println(j);
    for(long firstPixelHue = 0; firstPixelHue < 3072; firstPixelHue += 256) {
    for(int i=0; i<=j; i++) { // For each pixel in strip...
    int pixelHue = firstPixelHue + (i * 65536L / strip.numPixels());
    strip.setPixelColor(i, strip.gamma32(strip.ColorHSV(pixelHue)));         //  Set pixel's color (in RAM)

     }
    strip.show();
    delay(10);
  }

}else if (distance >= 30){
    for(long firstPixelHue = 0; firstPixelHue < 3072; firstPixelHue += 256) {
    for (int i=0; i<strip.numPixels(); i++){
    int pixelHue = firstPixelHue + (i * 65536L / strip.numPixels());
    strip.setPixelColor(i, strip.gamma32(strip.ColorHSV(pixelHue)));         //  Set pixel's color (in RAM)

      }
       strip.show();
       delay(1);
    }

}else {
    //digitalWrite(3, HIGH);
    for (int i=0; i<strip.numPixels(); i++){
     strip.clear();
     strip.show();
    }
  }
}
}