Controlling an actuator with TinkerKit Mosfet
What is the TinkerKit Mosfet?
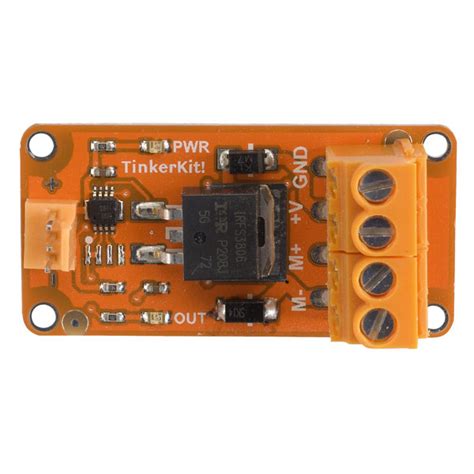
The TinkerKit Mosfet is a simple module for controlling devices like motors, solenoids, LED strips and electromagnets which require higher voltages and currents than the Arduino can handle alone.
Typically you might find an example of a mosfet circuit online when trying to solve this problem, however high current circuits can melt breadboards, and accidentally wiring up the 12 or 24 volt power supply to your Arduino is a easily made mistake that will damage the Arduino and potentially your computer.
For this reason we use a small, cheap module which takes away all these headaches, on the Arduino side you have three header pins and on the actuator side you've got your power in, and switched power out.
In effect TinkerKit Mosfet is an electronic switch that can turn your actuator on and off using an Arduino.
Wiring
There are three wires to connect on the Arduino side:
- Ground (
-connects toGND) - Power (
+connects to 5V) - Signal (The middle pin connects to your Arduino pin e.g. pin 6)
On the other side there are four screw terminals, labeled:
- GND (Connects to your power supply ground)
- +V (Connects to your power supply positive)
- M+ (Connects to one side of your actuator)
- M- (Connects to the other side of your actuator)
**Warning**
The TinkerKit Mosfet can only drive up to 24V DC.
Getting started
After wiring up the board it can be controlled via digitalWrite just like an LED. There are some quick examples below:
Basic Example
This basic example is effectively the blink sketch, the TinkerKit Mosfet operates just like any other digital device.
#define actuatorPin 6

void setup() {
  pinMode( actuatorPin, OUTPUT );
}

void loop() {
  digitalWrite( actuatorPin, HIGH );
  delay( 1000 );

  digitalWrite( actuatorPin, LOW );
  delay( 1000 );
}
Advanced Example
You can also control the speed of some actuators, normally this is only useful for motors, this is accomplished using analogWrite (PWM) this is effectively the same as setting the brightness of an LED.
**Danger**
Below a certain voltage/PWM value most actuators such as motors will stall (won't turn), this will cause the motor to become extremely hot potentially causing a fire damaging the motor, or burning you.
Always make sure your code prevents the speed of the motor going below the stall speed,
you can find the stall speed by testing different values until the motor is only just turning, this should be your minimum.
#define actuatorPin 6

void setup() {
  pinMode( actuatorPin, OUTPUT );
}

void loop() {
  // This example uses 128 as an example of the minimum motor speed to protect the motor
  for ( int i = 128; i < 255; i++ ) {
    analogWrite( actuatorPin, i );
    delay( 10 );
  }
}