How to control Arduino without using delay()
What is a delay()?
delay() is a function that pauses the program for the amount of time (in milliseconds) specified as a parameter. (1000 milliseconds = 1 second.) delay() is very commonly used but it has its drawbacks. It does not just pause one sensor or actuator that you wish but pausepauses everything controlled by the same Arduino and the same code. This often leads to the slow down of sensors and thus is not actcuateaccurate anymore.
read more
Getting started
There is a built-in example called BlinkWithoutDelay which demonstratedemonstrates controlling timing without using delay(). Rather than pausing everything to keep the light on/off for a specific amount of time, we are setting up a timer to count the time for the actuator to action. In this example, you can see the value of the variable interval is actually equal to the same amount of delay() you will need to get the same result of blinking every 1 second.
// constants won't change. Used here to set a pin number:
const int ledPin = LED_BUILTIN;  // the number of the LED pin

// Variables will change:
int ledState = LOW;  // ledState used to set the LED

// Generally, you should use "unsigned long" for variables that hold time
// The value will quickly become too large for an int to store
unsigned long previousMillis = 0;  // will store last time LED was updated

// constants won't change:
const long interval = 1000;  // interval at which to blink (milliseconds)

void setup() {
  // set the digital pin as output:
  pinMode(ledPin, OUTPUT);
}

void loop() {

  // check to see if it's time to blink the LED; that is, if the difference
  // between the current time and last time you blinked the LED is bigger than
  // the interval at which you want to blink the LED.
  unsigned long currentMillis = millis();

  if (currentMillis - previousMillis >= interval) {
    // save the last time you blinked the LED
    previousMillis = currentMillis;

    // if the LED is off turn it on and vice-versa:
    if (ledState == LOW) {
      ledState = HIGH;
    } else {
      ledState = LOW;
    }

    // set the LED with the ledState of the variable:
    digitalWrite(ledPin, ledState);
  }
}
Multiple Actuators and Multiple Timers
You can set up multiple timers for multiple actuators, like giving each person a watch and ask them to action based on their own watches.
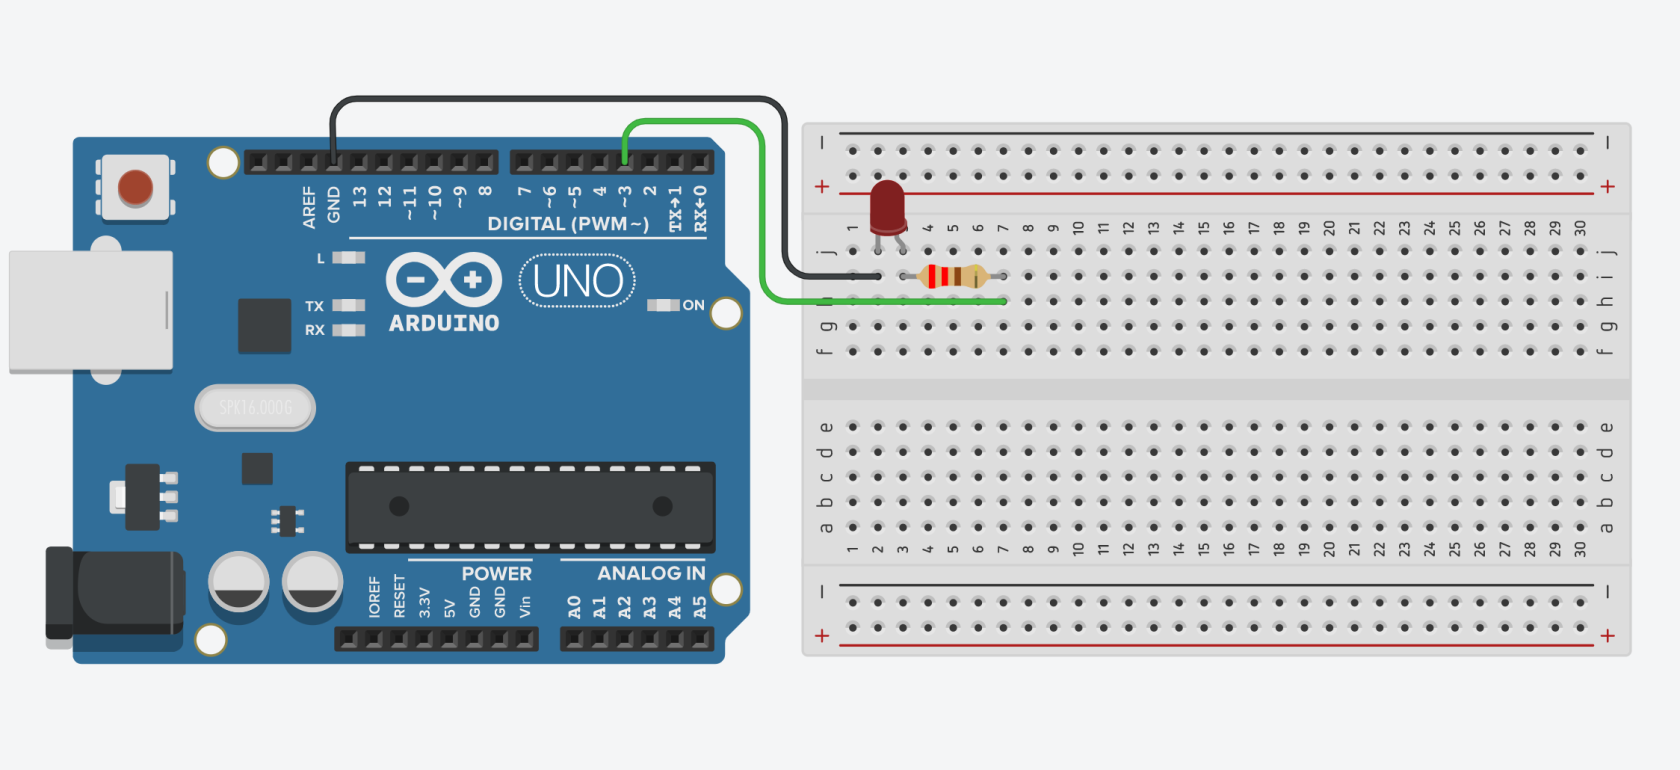
Wiring
There are three wires to connect on the Arduino side:
- LED short pin (-) to Ground
- LED long pin (+) to PWM Digital pin (D3), via 220Ω resistor
Code
In this code we are adding one more LED to the circuit. The built-in LED will stay the same, on and off every 1 second. The second LED will be one for 1 second and off for 5 second.
const int ledPin =  LED_BUILTIN;
const int ledPin2 = 3;

unsigned long previousMillis = 0;
unsigned long previousMillis2 = 0;

void setup()
{
  pinMode(ledPin, OUTPUT);
  pinMode(ledPin2, OUTPUT);
}

void loop()
{
  ledPattern();
  ledPattern2();
}

void ledPattern(){

   unsigned long currentMillis = millis();
   digitalWrite(ledPin, LOW); //turn off at the beginning

   //after 1s, light up, ie 1000
   if (currentMillis - previousMillis >= 1000) {
    digitalWrite(ledPin, HIGH);
    }

    //after light up for 1s, off, ie 1000+1000 = 2000
   if (currentMillis - previousMillis >= 2000){
    digitalWrite(ledPin, LOW);

    //reset timer
    previousMillis = currentMillis;
  }
}

void ledPattern2(){

   unsigned long currentMillis2 = millis();
   digitalWrite(ledPin2, LOW); //turn off at the beginning

   //after 5s, vibrate, ie 5000
   if (currentMillis2 - previousMillis2 >= 5000) {
    digitalWrite(ledPin2, HIGH);
    }

    //after vibrating for 1s, stop, ie 5000+1000 = 6000
   if (currentMillis2 - previousMillis2 >= 6000){
    digitalWrite(ledPin2, LOW);

    //reset timer
    previousMillis2 = currentMillis2;
  }
}

