How to use a Bone Conductor Transducer
What is aBone Heart Rate Sensor?Conduction?
HeartBone Rateconduction Sensoris a plug-and-playway sensorof transmitting sound to the inner ear through the bones of the skull instead of through the air and eardrum. In normal hearing, sound waves travel through the air, vibrate the eardrum, and are then passed to the inner ear. With bone conduction, vibrations are sent directly through the skull bones to the cochlea (the hearing organ), bypassing the eardrum entirely.
The Bone Conductor Transducer can create the vibration, and hence sounds, making everything (?!) into a speaker. It can work on several different surfaces, including Acrylic, Wood, Plastic and Glass! Hollow objects perform better than objects that canare easilydenser. incorporateThe livebone heart-rateconductor datatransducer into projects. Inproduces the lab,best wequality offersound thewhen Ear-clip/Finger-clipit's Heartpressed Rateup Sensoragainst froma Seeed Studio.
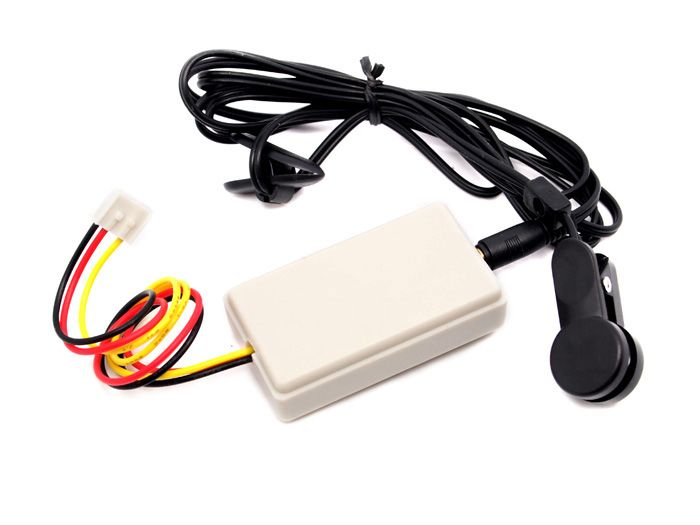
For other popular heart rate sensors that look like below, we found it to be tricky to use. The user cannot press on the sensor too hard or too soft, otherwise you will get very unstable reading.


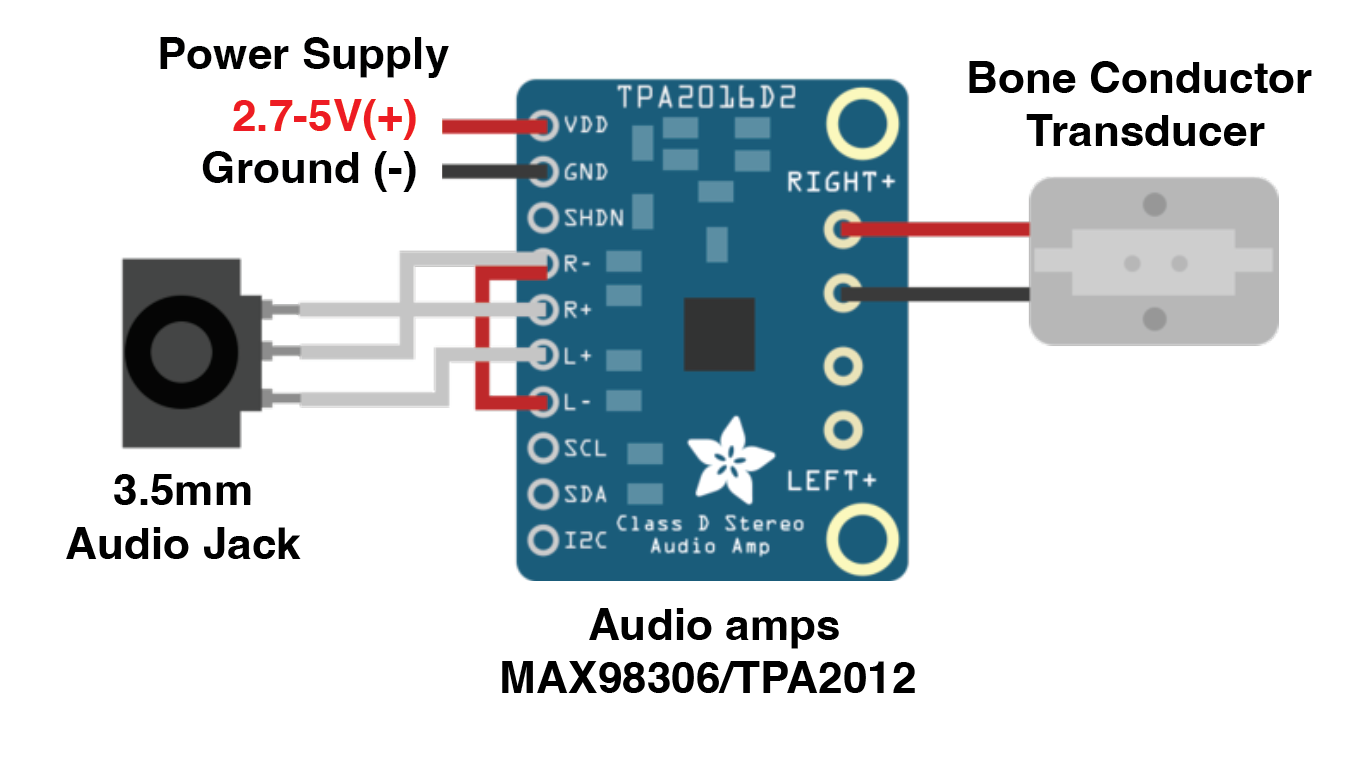
WiringCircuit
You will need the following components to make the circuit.
RedPower Supply (For testing, you can use the 3.3V and GND from Arduino if you have one.)- 3.5mm audio jack
- Audio Amplifier (We have MAX98306 in CTH, you can use other similar models.)
- 3.5mm Audio cable (to connect to
5Vthe(Power)computers/phones) YellowBonetoConductorA0 (Signal)Black to GND (Ground)Transducer
Get
If Startedyou
Thisare exampleusing willMAX98306, printyou can use the BPMjumper onto change the serialamplifier monitorgain and blinkat the builtinbottom.
LED to indicate each beat.
int PulseSensorPurplePin = A0;    // Pulse Sensor connected to analog pin A0
int LED = LED_BUILTIN;            // On-board LED
int Threshold = 550;              // Threshold for detecting a heartbeat

int Signal;                       // Holds raw analog reading
bool PulseDetected = false;       // True when a beat is detected
unsigned long lastBeatTime = 0;   // Time (ms) of the last beat
float BPM = 0;                    // Calculated Beats Per Minute

void setup() {
  pinMode(LED, OUTPUT);
  Serial.begin(115200);
}

void loop() {
  // Read the sensor
  Signal = analogRead(PulseSensorPurplePin);

  // Check if signal crosses the threshold upward (beat detected)
  if (Signal > Threshold && !PulseDetected) {
    PulseDetected = true;  // mark that we’re in a beat

    unsigned long currentTime = millis();
    unsigned long delta = currentTime - lastBeatTime;

    if (lastBeatTime > 0) {  // skip first beat (no interval yet)
      BPM = 60000.0 / delta;  // 60000 ms per minute
      Serial.print("BPM: ");
      Serial.println(BPM);
    }

    lastBeatTime = currentTime;
    digitalWrite(LED, HIGH);  // flash LED on beat
  }

  // When signal goes back below threshold, reset for next detection
  if (Signal < Threshold && PulseDetected) {
    PulseDetected = false;
    digitalWrite(LED, LOW);
  }

  // Small non-blocking pause (optional for stability)
  // Just ensures serial output isn’t too fast
  static unsigned long lastPrint = 0;
  if (millis() - lastPrint > 20) {
    //Serial.print("Signal: ");
    //Serial.println(Signal);
    lastPrint = millis();
  }
}
This example will print your heart rate on the Serial Potter, you will see somthing similar to the hospital machine.
//  Variables
int PulseSensorPurplePin = 0;        // Pulse Sensor PURPLE WIRE connected to ANALOG PIN 0
int LED = LED_BUILTIN;   //  The on-board Arduion LED


int Signal;                // holds the incoming raw data. Signal value can range from 0-1024
int Threshold = 540;       // Determine which Signal to "count as a beat", and which to ingore.


// The SetUp Function:
void setup() {
  pinMode(LED,OUTPUT);         // pin that will blink to your heartbeat!
   Serial.begin(115200);       // Set's up Serial Communication at certain speed.

}

// The Main Loop Function
void loop() {

  Signal = analogRead(PulseSensorPurplePin);  // Read the PulseSensor's value.
                                              // Assign this value to the "Signal" variable.

   Serial.println("Signal " + String(Signal)); // Send "reading " followed by the Signal value to Serial Plotter.


   if(Signal > Threshold){                          // If the signal is above "550", then "turn-on" Arduino's on-Board LED.
     digitalWrite(LED,HIGH);
   } else {
     digitalWrite(LED,LOW);                //  Else, the sigal must be below "550", so "turn-off" this LED.
   }


delay(20);


}