How to use a Heart Beat Sensor
What is a DFPlayer?Heart Rate Sensor?
Heart 11/2024Rate Update
Sensor Aa newplug-and-play librarysensor addedthat below.can Foreasily peopleincorporate tryinglive toheart-rate avoiddata delay(),into pleaseprojects. useIn the DFPlayerMini_Fastlab, librarywe instead.
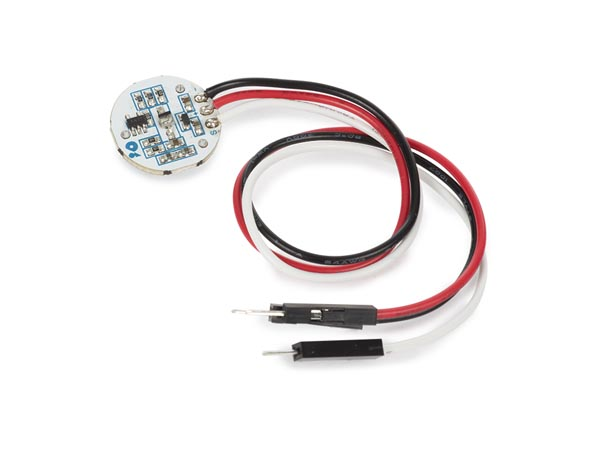
The DFPlayer Mini MP3 Player For Arduino is a small and low-priced MP3 module with a simplified output directly tooffer the speaker.one Thefrom moduleWhadda, canbut bethis usedtutorial will work for Adafruit Pulse Sensor Amped as a stand-alone module with an attached battery, speaker and push buttons or used in combination with an Arduino UNO or any other with RX/TX capabilities.well. Know Moremore about Pulse Sensor
Wiring
Wiring up the sensor is quite complex, the pins are not labelled so you will have to refer to the pinout.
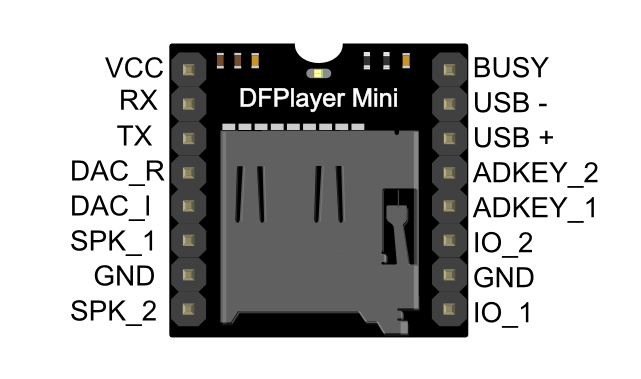
DFplayer Mini Wiring
VCC to 5V (Power)RX to D2 via 1K resistorTX to D3SPK_1 to Speaker(+)red wireGND to GND (Ground)SPK_2 to Speaker(-)black wire
potentiometer Wiring
rightpin to 5V (Power)middleS pin to A0 (Signal)left-pin to GND (Ground)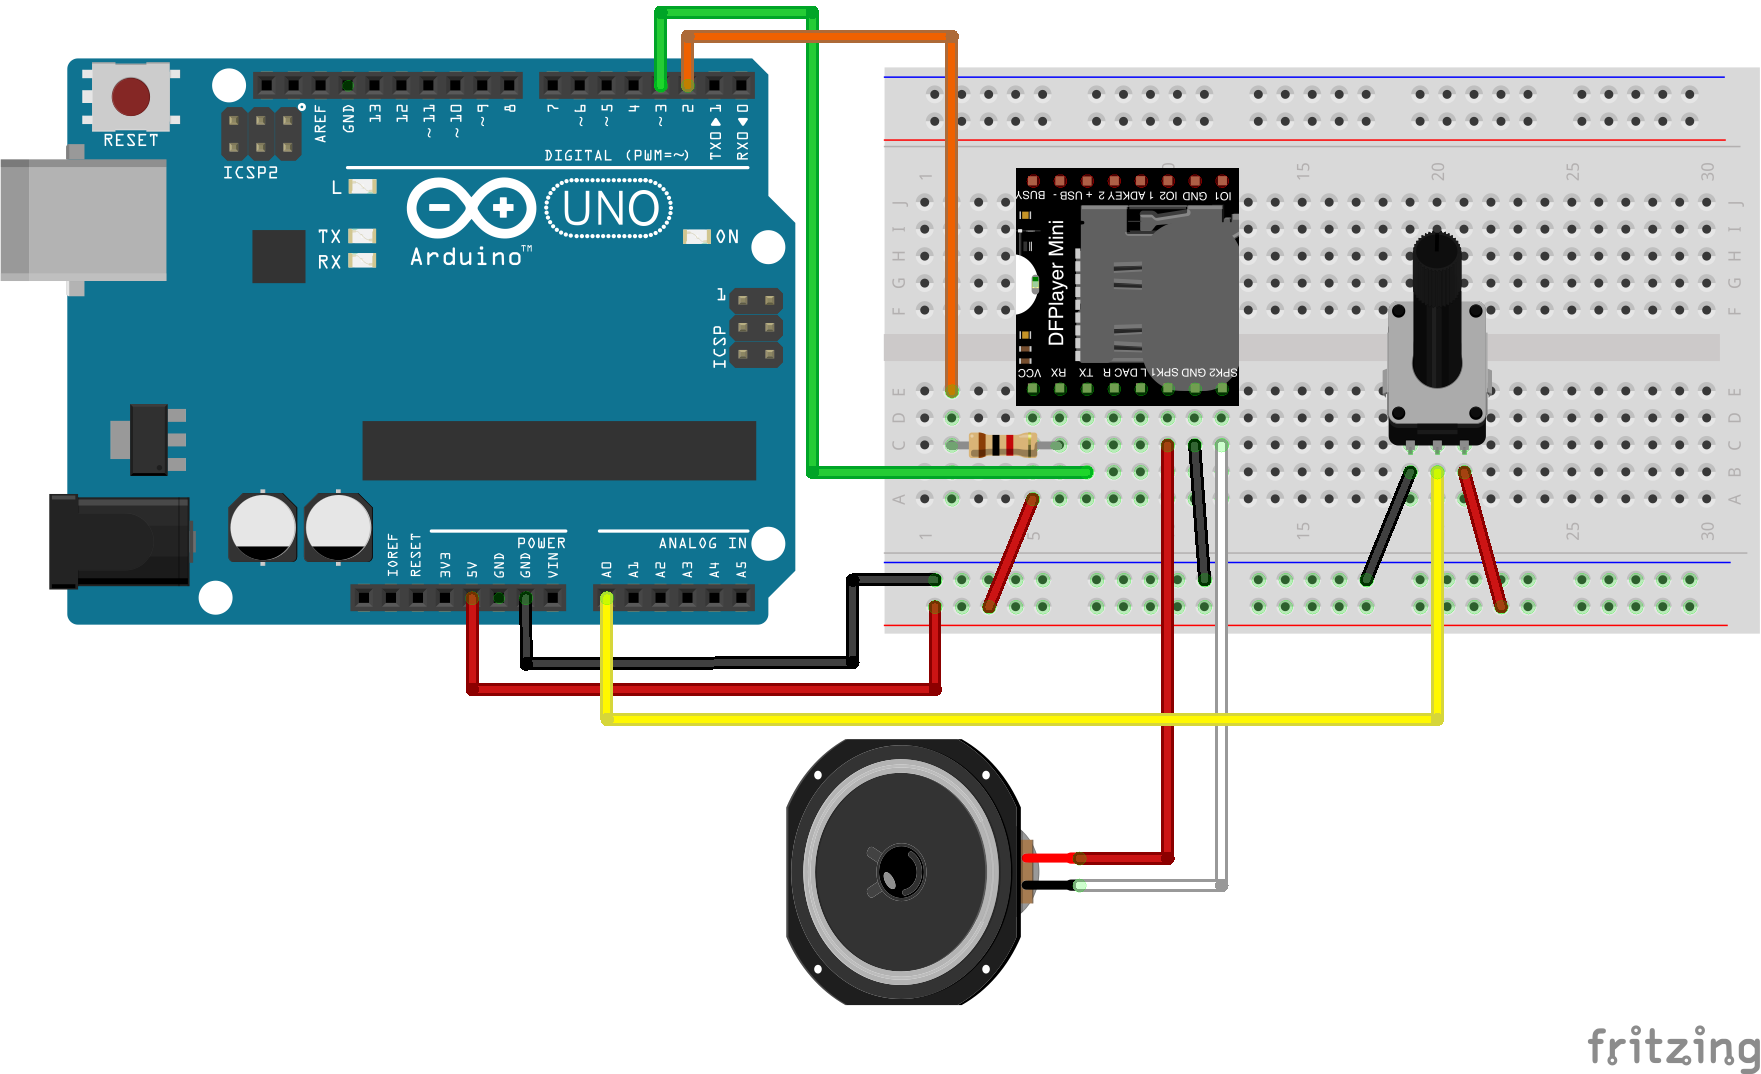

File handling
The order you copy the mp3 onto the micro SD card will affect the order mp3 played, which means the play(1) function will play the first mp3 copied into the micro SD card.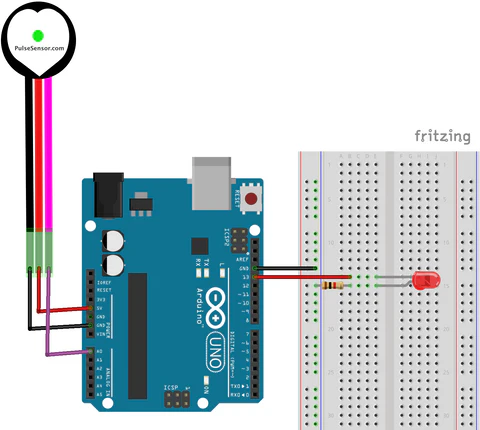
MAC User Attention! If you are using Mac OS X to copy the mp3, the file system will automatically add hidden files like: "._0001.mp3" for index, which this module will handle as valid mp3 files.
It is really annoying. To remove them, follow the below steps:
Finder - Go to your USB drivePressShift+Command+.to reveal all hidden filesSelect all.XXXXXXfiles and directories and deleteEmpty BinEject your USB drive
Library
DFRobotDFPlayerMiniPulseSensor Playground
Get Started
InThis thisexample example,Getting_BPM_to_Monitor wewill are usingprint the potentiometerBPM to control two audios. It will playon the firstserial audio when the potentiometer turns to the right and play the second when it turns to the left.
DF layer will not initiate! If you didn't put in the SD card, or have no MP3 files in the SD card, the module will not work. Make sure you are using .mp3, not .wav or any other audio formats.
monitor.
#include "SoftwareSerial.h"
#include "DFRobotDFPlayerMini.h"<PulseSensorPlayground.h>     // UseIncludes pinsthe 2PulseSensorPlayground and 3 to communicate with DFPlayer Mini
static const uint8_t PIN_MP3_TX = 2;Library.

//  Connects to module's RX
static const uint8_t PIN_MP3_RX = 3; // Connects to module's TX
SoftwareSerial softwareSerial(PIN_MP3_RX, PIN_MP3_TX);Variables
const int pot = A0;
int potValuePulseWire = 0;       // CreatePulseSensor thePURPLE PlayerWIRE objectconnected DFRobotDFPlayerMinito player;ANALOG voidPIN setup()0
{const pinMode(pot,int INPUT);LED = LED_BUILTIN;          // InitThe USBon-board serialArduino portLED, forclose debuggingto Serial.begin(9600);PIN 13.
int Threshold = 550;           // InitDetermine serialwhich portSignal forto DFPlayer"count Minias softwareSerial.begin(9600);a beat" and which to ignore.
                               // StartUse communicationthe with"Gettting DFPlayerStarted MiniProject" ifto (player.begin(softwareSerial))fine-tune {Threshold Serial.println("OK");Value beyond default setting.
                               // SetOtherwise volumeleave tothe maximumdefault (0"550" tovalue.

30).PulseSensorPlayground player.volume(30);
  } else {
    Serial.println("Connecting to DFPlayer Mini failed!");
  }
}

void loop() {

	potValue = analogRead(pot);

	if(potValue > 500 ){

	 static unsigned long timer = millis();
 	 if (millis() - timer > 2000) {pulseSensor;  //2000 isCreates thean durationinstance of the audio(1)PulseSensorPlayground timerobject =called millis();

   		//(2) is the 2rd file in the sd card, the order = the order you copied the file to it
   		player.play(2);
  }

	}else {
  	  static unsigned long timer = millis();

 	 if (millis() - timer > 3000) { //3000 is the duration of the audio(2)
  	  	timer = millis();
   		player.play(1);
  		}
	}
}
Better Library
Since the official library uses delay() in the code, it can be problematic when the code is used with other components or sensors.
DFRobotDFPlayerMini_Fast library will be used for this module. You will need to do a manual install for this library. FireTimer library is also needed.
We have a tutorial on how to install a library here.
Example code
The wiring will be the same as above. For further details of this library API, please visit their github page.
#include <DFPlayerMini_Fast.h>
#include <SoftwareSerial.h>
SoftwareSerial mySerial(3, 2); // RX, TX

DFPlayerMini_Fast myMP3;"pulseSensor"


void setup() {

  Serial.begin(115200);          mySerial.begin(9600)// For Serial Monitor

  // Configure the PulseSensor object, by assigning our variables to it.
  pulseSensor.analogInput(PulseWire);
  myMP3.begin(mySerial, true)pulseSensor.blinkOnPulse(LED);       delay(1000)//auto-magically blink Arduino's LED with heartbeat.
  pulseSensor.setThreshold(Threshold);

  // Double-check the "pulseSensor" object was created and "began" seeing a signal.
   if (pulseSensor.begin()) {
    Serial.println("SettingWe volumecreated toa max"pulseSensor Object !");  myMP3.volume(30);//This Serial.println("Loopingprints trackone 1");time myMP3.loop(1);at Arduino power-up,  or on Arduino reset.
  }
}


void loop() {


if (pulseSensor.sawStartOfBeat()) {            //do nothingConstantly test to see if "a beat happened".
int myBPM = pulseSensor.getBeatsPerMinute();  // Calls function on our pulseSensor object that returns BPM as an "int".
                                               // "myBPM" hold this BPM value now.
 Serial.println("♥  A HeartBeat Happened ! "); // If test is "true", print a message "a heartbeat happened".
 Serial.print("BPM: ");                        // Print phrase "BPM: "
 Serial.println(myBPM);                        // Print the value inside of myBPM.
}

  delay(20);                    // considered best practice in a simple sketch.

}
This example GettingStartedProject will print your heart rate on the Serial Potter, you will see somthing similar to the hospital machine.
//  Variables
int PulseSensorPurplePin = 0;        // Pulse Sensor PURPLE WIRE connected to ANALOG PIN 0
int LED = LED_BUILTIN;   //  The on-board Arduion LED


int Signal;                // holds the incoming raw data. Signal value can range from 0-1024
int Threshold = 580;       // Determine which Signal to "count as a beat", and which to ingore.


// The SetUp Function:
void setup() {
  pinMode(LED,OUTPUT);         // pin that will blink to your heartbeat!
   Serial.begin(115200);       // Set's up Serial Communication at certain speed.

}

// The Main Loop Function
void loop() {

  Signal = analogRead(PulseSensorPurplePin);  // Read the PulseSensor's value.
                                              // Assign this value to the "Signal" variable.

   Serial.println("Signal " + String(Signal)); // Send "reading " followed by the Signal value to Serial Plotter.


   if(Signal > Threshold){                          // If the signal is above "550", then "turn-on" Arduino's on-Board LED.
     digitalWrite(LED,HIGH);
   } else {
     digitalWrite(LED,LOW);                //  Else, the sigal must be below "550", so "turn-off" this LED.
   }


delay(20);


}