How to use a Heart Beat Sensor
What is a Heart Rate Sensor?
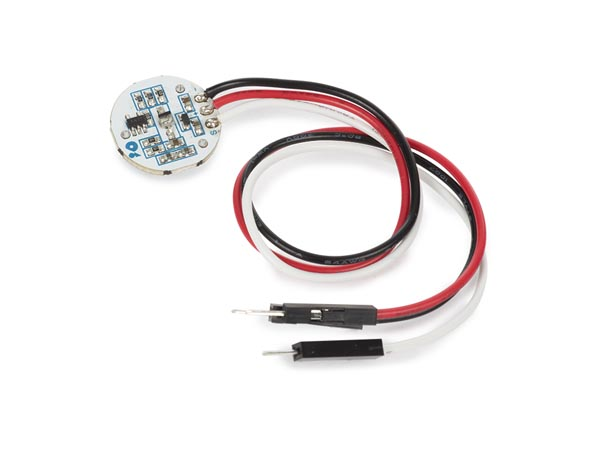
Heart Rate Sensor a plug-and-play sensor that can easily incorporate live heart-rate data into projects. In the lab, we offer the one from Whadda, but this tutorial will work for Adafruit Pulse Sensor Amped as well. Know more about Pulse Sensor
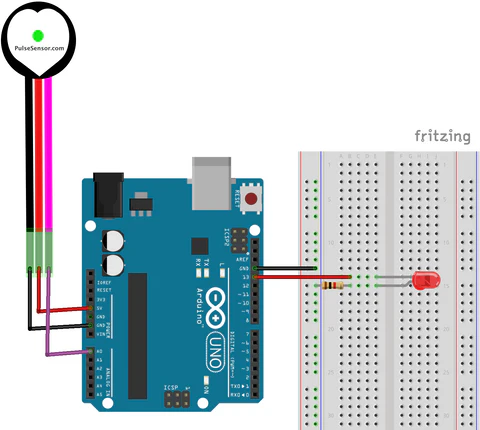
Wiring
+pin to 5V (Power)- S pin to A0 (Signal)
-pin to GND (Ground)
Library
PulseSensor Playground library will be used for this module. We have a tutorial on how to install a library here. This is by far the most reliable library for heart rate sensors.
Get Started
This example Getting_BPM_to_Monitormonitor.monitor and blink the builtin LED to indicate each beat.
#includeint <PulseSensorPlayground.h>PulseSensorPurplePin = A0;    // IncludesPulse the PulseSensorPlayground Library.

//  Variables
const int PulseWire = 0;       // PulseSensor PURPLE WIRESensor connected to ANALOGanalog PINpin 0
constA0
int LED = LED_BUILTIN;            // The on-On-board Arduino LED, close to PIN 13.LED
int Threshold = 540;550;              // DetermineThreshold whichfor Signal to "count asdetecting a beat"heartbeat

andint which to ignore.Signal;                       // UseHolds theraw "Getttinganalog Startedreading
Project"bool toPulseDetected fine-tune= Threshold Value beyond default setting.false;       // OtherwiseTrue leavewhen thea defaultbeat "550"is value.detected
PulseSensorPlaygroundunsigned pulseSensor;long lastBeatTime = 0;   // CreatesTime an instance(ms) of the PulseSensorPlaygroundlast objectbeat
calledfloat "pulseSensor"BPM = 0;                    // Calculated Beats Per Minute

void setup() {
  pinMode(LED, OUTPUT);
  Serial.begin(115200);          // For Serial Monitor

  // Configure the PulseSensor object, by assigning our variables to it.
  pulseSensor.analogInput(PulseWire);
  pulseSensor.blinkOnPulse(LED);       //auto-magically blink Arduino's LED with heartbeat.
  pulseSensor.setThreshold(Threshold);

  // Double-check the "pulseSensor" object was created and "began" seeing a signal.
   if (pulseSensor.begin()) {
    Serial.println("We created a pulseSensor Object !");  //This prints one time at Arduino power-up,  or on Arduino reset.
  }
}

void loop() {
  // Read the sensor
  Signal = analogRead(PulseSensorPurplePin);

  // Check if signal crosses the threshold upward (beat detected)
  if (pulseSensor.sawStartOfBeat(Signal > Threshold && !PulseDetected) {
    PulseDetected = true;  // mark that we’re in a beat

    unsigned long currentTime = millis());
    unsigned long delta = currentTime - lastBeatTime;

    if (lastBeatTime > 0) {  // Constantlyskip test to see if "afirst beat happened".(no intinterval myBPMyet)
      BPM = pulseSensor.getBeatsPerMinute();60000.0 / delta;  // Calls60000 functionms onper our pulseSensor object that returns BPM as an "int".
                                               // "myBPM" hold this BPM value now.
 Serial.println("A HeartBeat Happened ! "); // If test is "true", print a message "a heartbeat happened".minute
      Serial.print("BPM: ");
      // Print phrase "BPM: "
 Serial.println(myBPM)BPM);
    }

    lastBeatTime = currentTime;
    digitalWrite(LED, HIGH);  // Printflash theLED valueon inside of myBPM.beat
  }

  delay(20);

  // consideredWhen bestsignal practicegoes inback abelow simplethreshold, sketch.reset for next detection
  if (Signal < Threshold && PulseDetected) {
    PulseDetected = false;
    digitalWrite(LED, LOW);
  }

  // Small non-blocking pause (optional for stability)
  // Just ensures serial output isn’t too fast
  static unsigned long lastPrint = 0;
  if (millis() - lastPrint > 20) {
    Serial.print("Signal: ");
    Serial.println(Signal);
    lastPrint = millis();
  }
}
This example GettingStartedProject will print your heart rate on the Serial Potter, you will see somthing similar to the hospital machine.
//  Variables
int PulseSensorPurplePin = 0;        // Pulse Sensor PURPLE WIRE connected to ANALOG PIN 0
int LED = LED_BUILTIN;   //  The on-board Arduion LED


int Signal;                // holds the incoming raw data. Signal value can range from 0-1024
int Threshold = 540;       // Determine which Signal to "count as a beat", and which to ingore.


// The SetUp Function:
void setup() {
  pinMode(LED,OUTPUT);         // pin that will blink to your heartbeat!
   Serial.begin(115200);       // Set's up Serial Communication at certain speed.

}

// The Main Loop Function
void loop() {

  Signal = analogRead(PulseSensorPurplePin);  // Read the PulseSensor's value.
                                              // Assign this value to the "Signal" variable.

   Serial.println("Signal " + String(Signal)); // Send "reading " followed by the Signal value to Serial Plotter.


   if(Signal > Threshold){                          // If the signal is above "550", then "turn-on" Arduino's on-Board LED.
     digitalWrite(LED,HIGH);
   } else {
     digitalWrite(LED,LOW);                //  Else, the sigal must be below "550", so "turn-off" this LED.
   }


delay(20);


}