Pi War 2024 Log
Documentation of Pi War 2024
Pi Wars is an international, challenge-based robotics competition in which teams build Raspberry Pi-controlled robots and then compete in various non-destructive challenges to earn points.
Planning
We planned to build a four-wheel robot car which is driven by two TT motors and Raspberry Pi Pico W. We will use a second Raspberry Pi Pico W and two joysticks for the remote controller. The car and the controller will communicate via WiFi.
Circuit
Car Circuit
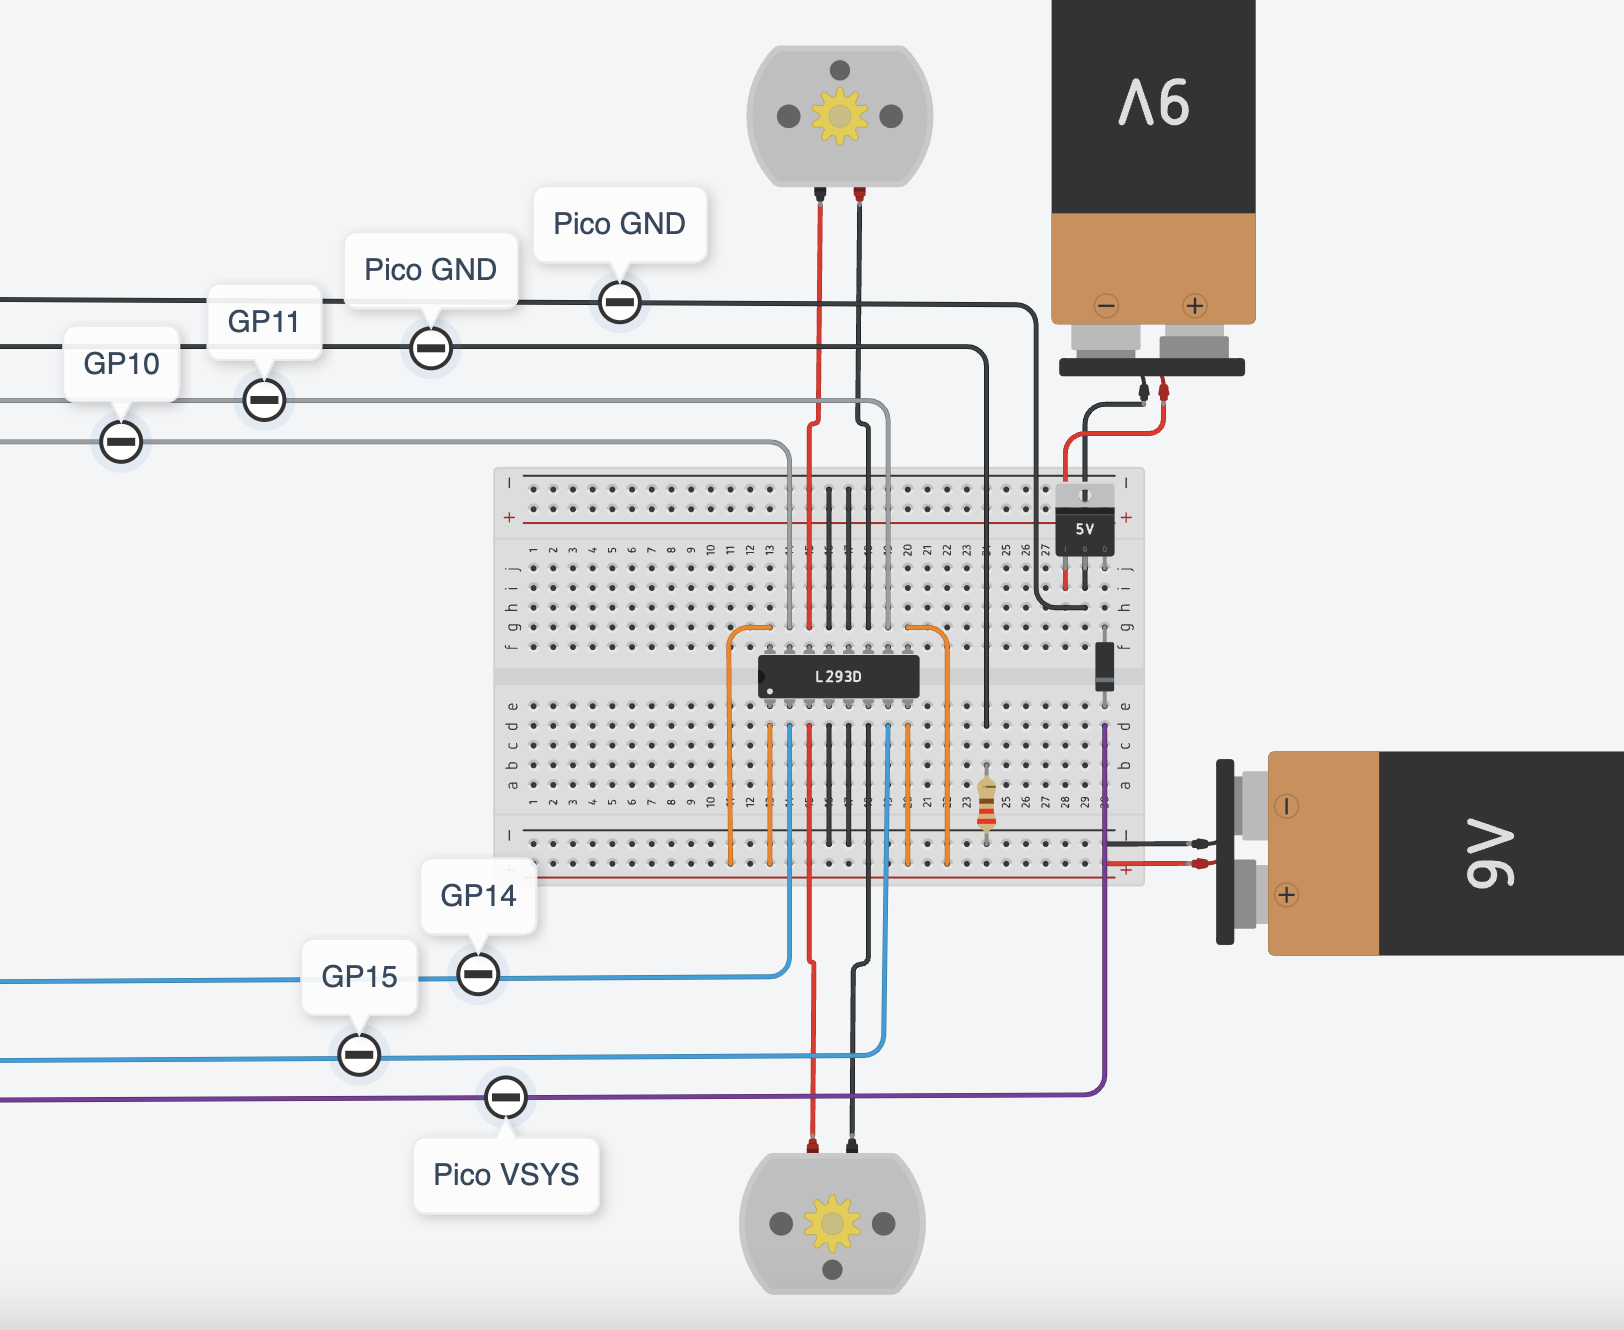
We used a 5V regulator LM7805 to regulate 9V from the 9V battery to 5V to power up the Raspberry Pico via the VSYS and GND pins. A diode between VSYS and 5V output to present backfeeding. More about powering Pico.
We used a second 9V battery to power up two TT motors, both power sources share the same ground.
We used an L293D IC for controlling two motors. GPIO10 and GPIO11 pins control the directions of the left motor and GPIO14 and GPIO15 pins control the directions of the right motor. More about L293D IC.
Controller Circuit
We use the same 5V regulator LM7805 to regulate the power supply for Raspberry Pico, and connect two joysticks's data pins with pins GPIO26 and GPIO27. One joystick controls left and right, and the other controls forward and backwards.
Problems with batteries
This is a remote-controlled robot car so it needs to be wireless and must use battery as its power supply. However, the battery is not a stable power supply which cannot supply a constant stable 9V to both the motors and Pico. Even when the battery is not completely dry, it may become insufficient to turn on the Pico when the voltage drops below a certain point. The same problem goes for the motors but is less fatal, as the motors can still run, just slower.
This time, we just decided to change batteries more often, but it is not environmentally friendly or efficient. We will look into power banks with a low-current charging mode.
Python Code
All codes can be found on our Github page.
Testing two motors
import time

from machine import Pin

motor1a = Pin(14, Pin.OUT)
motor1b = Pin(15, Pin.OUT)

motor2a = Pin(10, Pin.OUT)
motor2b = Pin(11, Pin.OUT)

print("Hello.")


def right_forward():
    motor1a.value(0)
    motor1b.value(0)
    motor2a.value(0)
    motor2b.value(1)


def left_forward():
    motor2a.value(0)
    motor2b.value(0)
    motor1a.value(1)
    motor1b.value(0)


def right_backward():
    motor1a.value(0)
    motor1b.value(0)
    motor2a.value(1)
    motor2b.value(0)


def left_backward():
    motor2a.value(0)
    motor2b.value(0)
    motor1a.value(0)
    motor1b.value(1)


def forward():
    motor1a.value(1)
    motor1b.value(0)
    motor2a.value(0)
    motor2b.value(1)


def backward():
    motor1a.value(0)
    motor1b.value(1)
    motor2a.value(1)
    motor2b.value(0)


def stop():
    motor1a.value(0)
    motor1b.value(0)
    motor2a.value(0)
    motor2b.value(0)
Testing two joysticks
import time

from machine import ADC, Pin

HIGH = 35000
LOW = 30000


def is_still(val):
    return val > LOW and val < HIGH


def increase(val):
    return val > HIGH


def decrease(val):
    return val < LOW


joystick_y = ADC(Pin(26))
joystick_x = ADC(Pin(27))

STOP = 1
STRAIGHT_FORWARD = 2
RIGHT_FORWARD = 3
LEFT_FORWARD = 4
RIGHT_BACKWARD = 5
LEFT_BACKWARD = 6
STRAIGHT_BACKWARD = 7


while True:
    x_val = joystick_x.read_u16()
    y_val = joystick_y.read_u16()

    x_still = is_still(x_val)
    y_still = is_still(y_val)

    x_increase = increase(x_val)
    y_increase = increase(y_val)

    x_decrease = decrease(x_val)
    y_decrease = decrease(y_val)

    if x_still and y_still:
        print(STOP)

    if y_increase and x_still:
        print(STRAIGHT_FORWARD)

    if y_decrease and x_still:
        print(STRAIGHT_BACKWARD)

    if y_increase and x_increase:
        print(LEFT_FORWARD)

    if y_increase and x_decrease:
        print(RIGHT_FORWARD)

    if y_decrease and x_increase:
        print(LEFT_BACKWARD)

    if y_decrease and x_decrease:
        print(RIGHT_BACKWARD)

    time.sleep(0.1)
When using wifi communication, the controller will be the server and the car will be the client.
Testing wifi communication - SERVER
import random
import socket
import time

import network
from machine import ADC, Pin

ssid = "WIFI_NAME"
password = "WIFI_PASSWORD"

wlan = network.WLAN(network.STA_IF)
wlan.active(True)
wlan.connect(ssid, password)

# Wait for connect or fail
max_wait = 10
while max_wait > 0:
    if wlan.status() < 0 or wlan.status() >= 3:
        break
    max_wait -= 1
    print("waiting for connection...")
    time.sleep(1)
# Handle connection error
if wlan.status() != 3:
    raise RuntimeError("network connection failed")
else:
    print("connected")
    status = wlan.ifconfig()
    # print('ip = ' + status[0])

# Open socket
addr = socket.getaddrinfo("0.0.0.0", 80)[0][-1]

s = socket.socket()
s.bind(addr)
s.listen(1)

print("listening on", addr)

# Listen for connections
while True:
    try:
        cl, addr = s.accept()
        request = cl.recv(1024)
        print(request)
        # No need to unpack request in this example
        ran_num = str(random.randint(0, 100))
        cl.send(ran_num)
        print("Sent: " + ran_num)
        cl.close()

    except OSError as e:
        cl.close()
        print("connection closed")
Testing wifi communication - CLIENT
Make sure you change the IP address of your pi, which you can find in the console when you run the above server code.
import random
import socket
import time

import network
from machine import ADC, Pin

ssid = "WIFI_NAME"
password = "WIFI_PASSWORD"

wlan = network.WLAN(network.STA_IF)
wlan.active(True)
wlan.connect(ssid, password)

# Wait for connect or fail
max_wait = 10
while max_wait > 0:
    if wlan.status() < 0 or wlan.status() >= 3:
        break
    max_wait -= 1
    print("waiting for connection...")
    time.sleep(1)
# Handle connection error
if wlan.status() != 3:
    raise RuntimeError("network connection failed")
else:
    print("connected")
    status = wlan.ifconfig()
    # print('ip = ' + status[0])

while True:
    ai = socket.getaddrinfo("192.168.1.115", 80)  # Address of Web Server
    addr = ai[0][-1]

    # Create a socket and make a HTTP request
    s = socket.socket()  # Open socket
    s.connect(addr)
    s.send(b"Anything")  # Send request
    ss = str(s.recv(512))  # Store reply
    # Print what we received
    print(ss)
    # Set RGB LED here
    s.close()  # Close socket
    time.sleep(0.2)  # wait
Final code for controller - SERVER
import socket
import time

import network
from machine import ADC, Pin

HIGH = 35000
LOW = 30000


def is_still(val):
    return val > LOW and val < HIGH


def increase(val):
    return val > HIGH


def decrease(val):
    return val < LOW


joystick_y = ADC(Pin(26))
joystick_x = ADC(Pin(27))
led = Pin("LED", Pin.OUT)

STOP = 1
STRAIGHT_FORWARD = 2
RIGHT_FORWARD = 3
LEFT_FORWARD = 4
RIGHT_BACKWARD = 5
LEFT_BACKWARD = 6
STRAIGHT_BACKWARD = 7

ssid = "WIFI_NAME"
password = "WIFI_PASSWORD"

wlan = network.WLAN(network.STA_IF)
wlan.active(True)
wlan.connect(ssid, password)

# Wait for connect or fail
max_wait = 10
while max_wait > 0:
    if wlan.status() < 0 or wlan.status() >= 3:
        break
    max_wait -= 1
    print("waiting for connection...")
    time.sleep(1)
# Handle connection error
if wlan.status() != 3:
    raise RuntimeError("network connection failed")
else:
    print("connected")
    status = wlan.ifconfig()
    print('ip = ' + status[0])
    led.on()


# Open socket
addr = socket.getaddrinfo("0.0.0.0", 80)[0][-1]

s = socket.socket()
s.bind(addr)
s.listen(1)

print("listening on", addr)

while True:
    try:
        cl, addr = s.accept()
        request = cl.recv(1024)
        print("request", request)

        # print("loop")
        x_val = joystick_x.read_u16()
        y_val = joystick_y.read_u16()

        x_still = is_still(x_val)
        y_still = is_still(y_val)

        x_increase = increase(x_val)
        y_increase = increase(y_val)

        x_decrease = decrease(x_val)
        y_decrease = decrease(y_val)

        if x_still and y_still:
            print(STOP)
            cl.send(str(STOP))

        if y_increase and x_still:
            print(STRAIGHT_FORWARD)
            cl.send(str(STRAIGHT_FORWARD))

        if y_decrease and x_still:
            print(STRAIGHT_BACKWARD)
            cl.send(str(STRAIGHT_BACKWARD))

        if y_increase and x_increase:
            print(LEFT_FORWARD)
            cl.send(str(LEFT_FORWARD))

        if y_increase and x_decrease:
            print(RIGHT_FORWARD)
            cl.send(str(RIGHT_FORWARD))

        if y_decrease and x_increase:
            print(LEFT_BACKWARD)
            cl.send(str(LEFT_BACKWARD))

        if y_decrease and x_decrease:
            print(RIGHT_BACKWARD)
            cl.send(str(RIGHT_BACKWARD))

        cl.close()

    except Exception as e:
        print(e)
        cl.close()
        print("connection closed")

    time.sleep(0.1)
Final code for car - CLIENT
import random
import socket
import time

import network
from machine import ADC, Pin

motor1a = Pin(14, Pin.OUT)
motor1b = Pin(15, Pin.OUT)

motor2a = Pin(10, Pin.OUT)
motor2b = Pin(11, Pin.OUT)

led = Pin("LED", Pin.OUT)

ssid = "WIFI_NAME"
password = "WIFI_PASSWORD"

wlan = network.WLAN(network.STA_IF)
wlan.active(True)
wlan.connect(ssid, password)

# Wait for connect or fail
max_wait = 10
while max_wait > 0:
    if wlan.status() < 0 or wlan.status() >= 3:
        break
    max_wait -= 1
    print("waiting for connection...")
    time.sleep(1)
# Handle connection error
if wlan.status() != 3:
    raise RuntimeError("network connection failed")
else:
    print("connected")
    status = wlan.ifconfig()
    print('ip = ' + status[0])
    led.on()


def right_forward():
    motor1a.value(0)
    motor1b.value(0)
    motor2a.value(0)
    motor2b.value(1)


def left_forward():
    motor2a.value(0)
    motor2b.value(0)
    motor1a.value(1)
    motor1b.value(0)


def right_backward():
    motor1a.value(0)
    motor1b.value(0)
    motor2a.value(1)
    motor2b.value(0)


def left_backward():
    motor2a.value(0)
    motor2b.value(0)
    motor1a.value(0)
    motor1b.value(1)


def forward():
    motor1a.value(1)
    motor1b.value(0)
    motor2a.value(0)
    motor2b.value(1)


def backward():
    motor1a.value(0)
    motor1b.value(1)
    motor2a.value(1)
    motor2b.value(0)


def stop():
    motor1a.value(0)
    motor1b.value(0)
    motor2a.value(0)
    motor2b.value(0)


commands = {
    "1": stop,
    "2": forward,
    "3": right_forward,
    "4": left_forward,
    "5": right_backward,
    "6": left_backward,
    "7": backward,
}

while True:
    ai = socket.getaddrinfo("192.168.0.100", 80)  # Address of Web Server
    addr = ai[0][-1]

    # Create a socket and make a HTTP request
    s = socket.socket()  # Open socket
    s.connect(addr)
    s.send(b"Anything")  # Send request
    ss = s.recv(512).decode()  # Store reply
    # Print what we received
    try:
        commands[ss]()
    except KeyError:
        commands["1"]()

    # Set RGB LED here
    s.close()  # Close socket
    time.sleep(0.2)  # wait
Router Setting
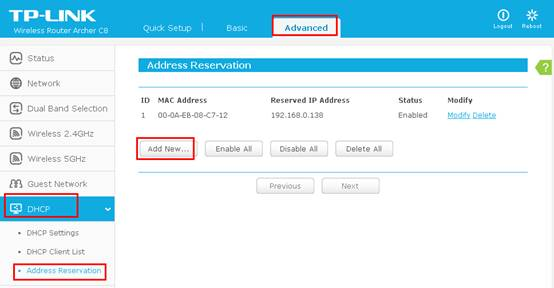
In general, if both the server pico and the client pico are connected to the same wifi network, they can communicate. However, most routers provide a dynamic IP address which may change every time, based on the number of devices connected and which device is connected to the network first. We only used the router for the controller and the car in the beginning, and we started to experience problems when there were other devices connected to our router.
Therefore, we need to reserve IP addresses for the controller and the car, to make sure they are listening to the right address. This process may be different based on what router you are using.
You may see something similar like this:
Car Design
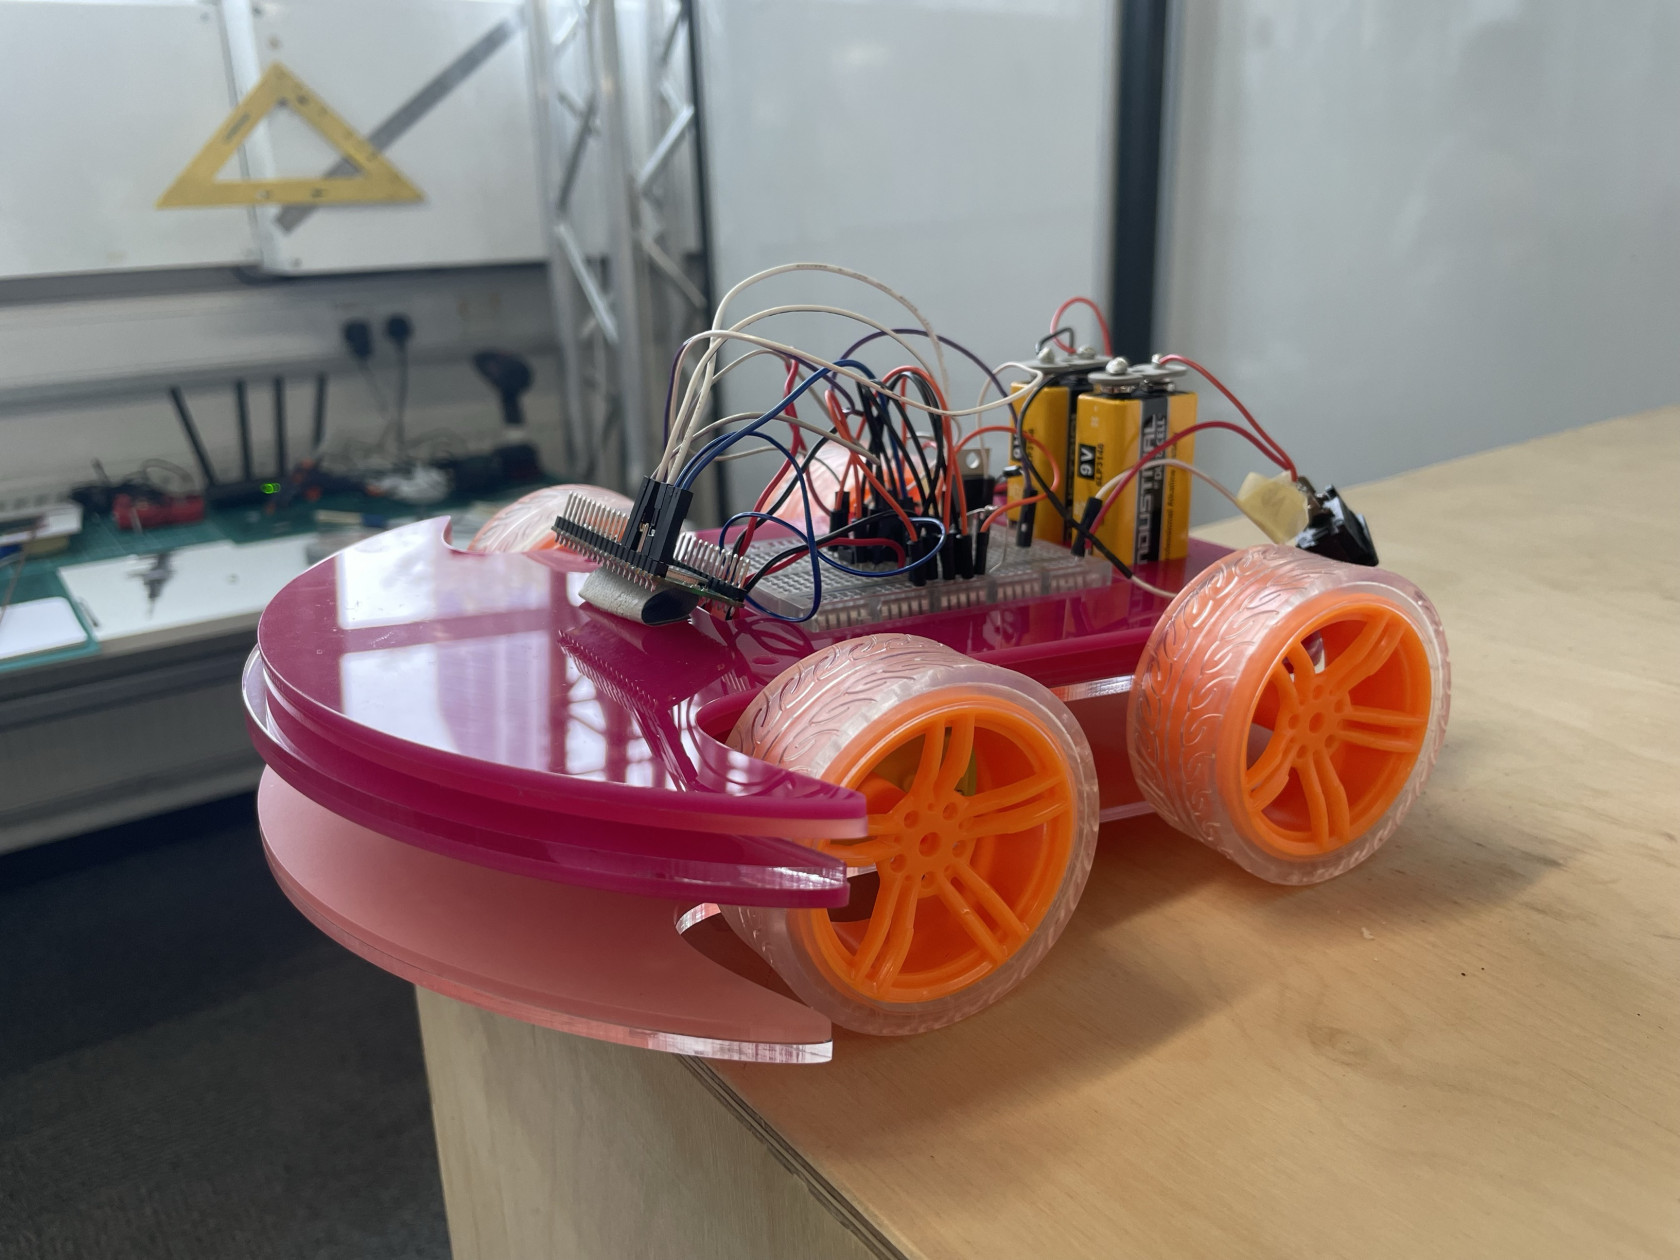
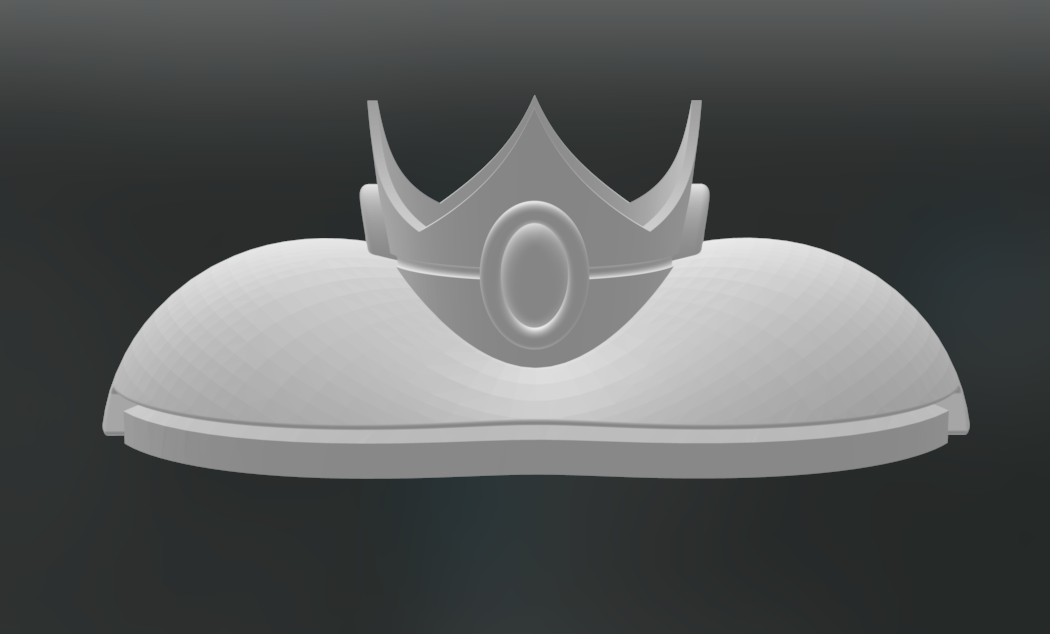
The car is Princess Peach-inspired, so very pink. We laser-cut serval layers to form the main body of the car.
Problems with back wheels
We have four identical wheels. However, the rubber surface of the back wheels has created too much friction which the front wheels are not powerful enough to pull. In the end, we needed to remove the rubber bit of the back wheels.
Controller Design
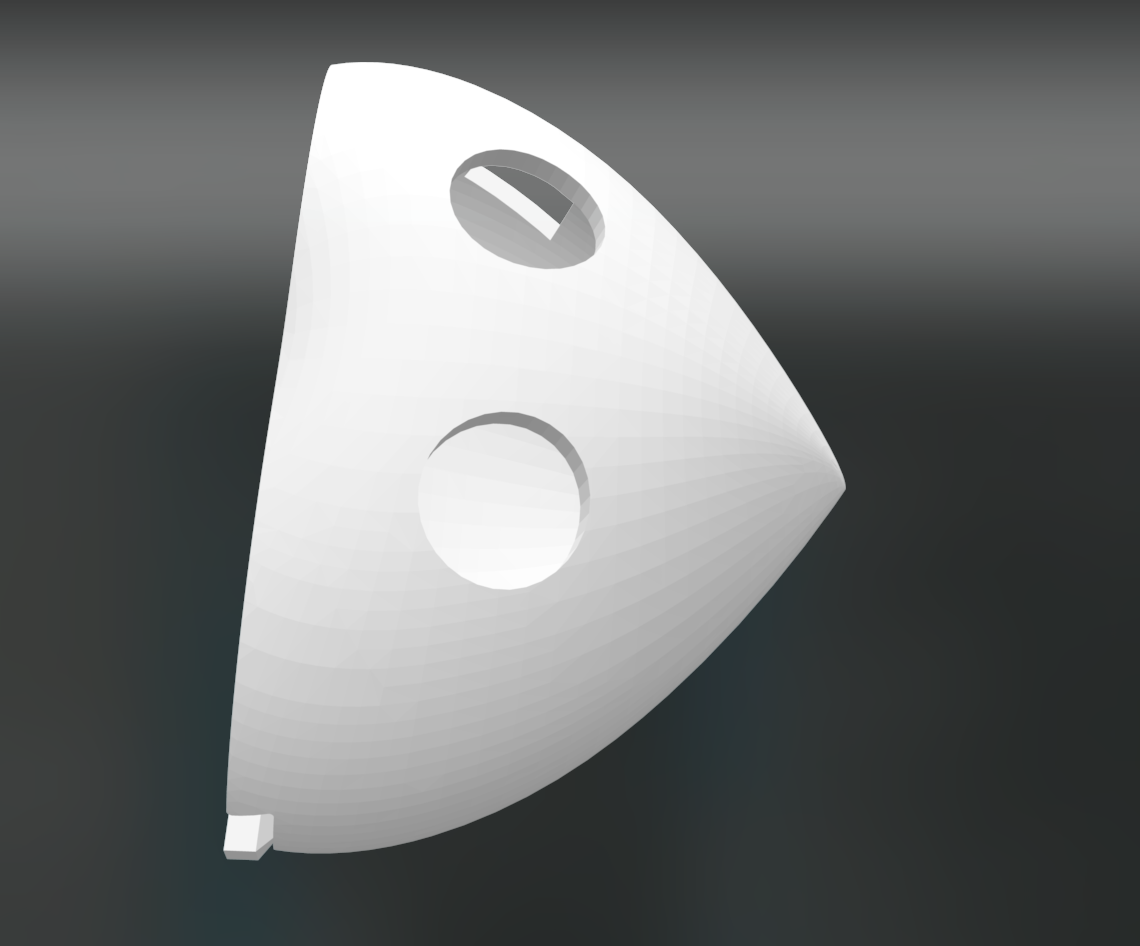
Continue with the Princess Peach theme, the controller is a heart-shaped box with holes for the on-off button and two joysticks.

