How to control Arduino without using delay()
What is a delay()?
We have a tutorial about delay() and how to code without using it. Here we will try to simplify the process using the FireTimer library.
Replace delay()
There is an example that is modified from the built-in example Blink code which demonstrates controlling timing without using delay().
#include "FireTimer.h"

// Create a FireTimer object
FireTimer ledTimer;

void setup() {
  // Initialize digital pin LED_BUILTIN as an output
  pinMode(LED_BUILTIN, OUTPUT);

  // Initialize the FireTimer with a delay of 1000 milliseconds
  ledTimer.begin(1000);
}

void loop() {
  // Check if the timer has fired
  if (ledTimer.fire()) {
    // Toggle the LED state
    static bool ledState = LOW;  // Keep track of the current LED state
    ledState = !ledState;        // Toggle the state
    digitalWrite(LED_BUILTIN, ledState);
  }
}
Change Timer in the loop()
This is the code to keep the LED on for 1 second and off for 2 seconds using the FireTimer library.
#include "FireTimer.h"

// Create a FireTimer object
FireTimer ledTimer;

void setup() {
  // Initialize digital pin LED_BUILTIN as an output
  pinMode(LED_BUILTIN, OUTPUT);

  // Start the FireTimer with an initial delay of 1 second (LED ON duration)
  ledTimer.begin(1000);
}

void loop() {
  // Check if the timer has fired
  if (ledTimer.fire()) {
    // Toggle the LED state
    static bool ledState = LOW;  // Keep track of the current LED state

    // Toggle the state
    ledState = !ledState;
    digitalWrite(LED_BUILTIN, ledState);

    // Update the timer for the next duration:
    // 1 second when LED is ON, 2 seconds when LED is OFF
    if (ledState == HIGH) {
      ledTimer.begin(1000); // LED is ON for 1 second
    } else {
      ledTimer.begin(2000); // LED is OFF for 2 seconds
    }
  }
}
Multiple Actuators and Multiple Timers
You can set up multiple timers for multiple actuators, like giving each person a watch and ask them to action based on their own watches.
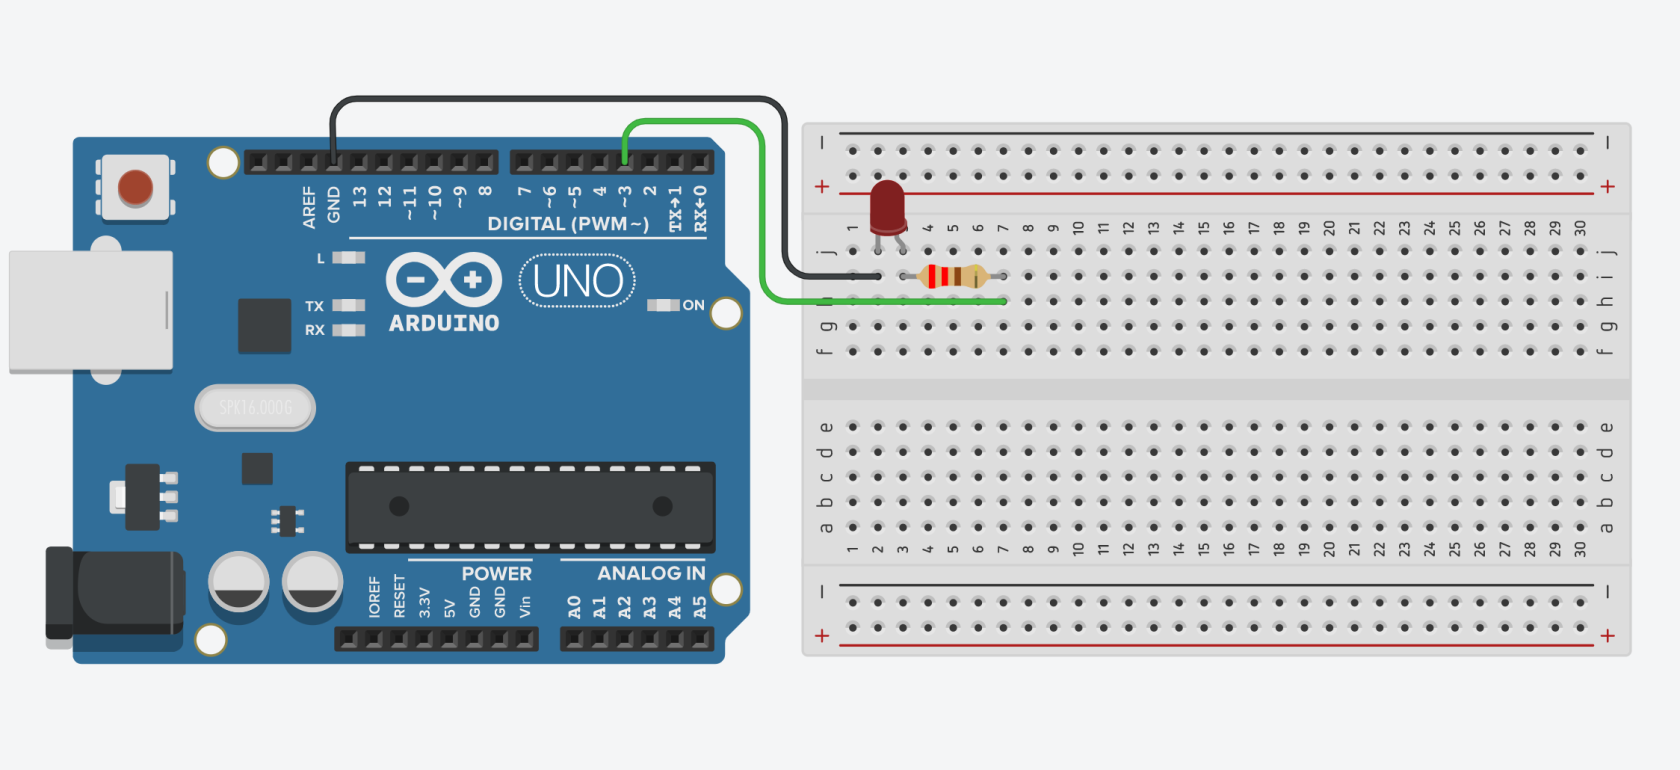
Wiring
There are three wires to connect on the Arduino side:
- LED short pin (-) to Ground
- LED long pin (+) to PWM Digital pin (D3), via 220Ω resistor
Code
In this code we are adding one more LED to the circuit. The built-in LED will stay the same, on and off every 1 second. The second LED will be one for 1 second and off for 5 second.
#include "FireTimer.h"

// Create FireTimer objects for two LEDs
FireTimer led1Timer; // Timer for LED1 (1-second interval)
FireTimer led2Timer; // Timer for LED2 (3-second interval)

const int LED1_PIN = 13; // Pin for the first LED
const int LED2_PIN = 3; // Pin for the second LED

void setup() {
  // Initialize the LED pins as outputs
  pinMode(LED1_PIN, OUTPUT);
  pinMode(LED2_PIN, OUTPUT);

  // Start the timers with their respective intervals
  led1Timer.begin(1000); // LED1 blinks every 1 second
  led2Timer.begin(3000); // LED2 blinks every 3 seconds
}

void loop() {
  // Check if the timer for LED1 has fired
  if (led1Timer.fire()) {
    static bool led1State = LOW; // Keep track of LED1 state
    led1State = !led1State;     // Toggle LED1 state
    digitalWrite(LED1_PIN, led1State);
  }

  // Check if the timer for LED2 has fired
  if (led2Timer.fire()) {
    static bool led2State = LOW; // Keep track of LED2 state
    led2State = !led2State;     // Toggle LED2 state
    digitalWrite(LED2_PIN, led2State);
  }
}

