How to use a Bare Conductive Touch Board with Arduino
What is the Bare Conductive Touch Board?
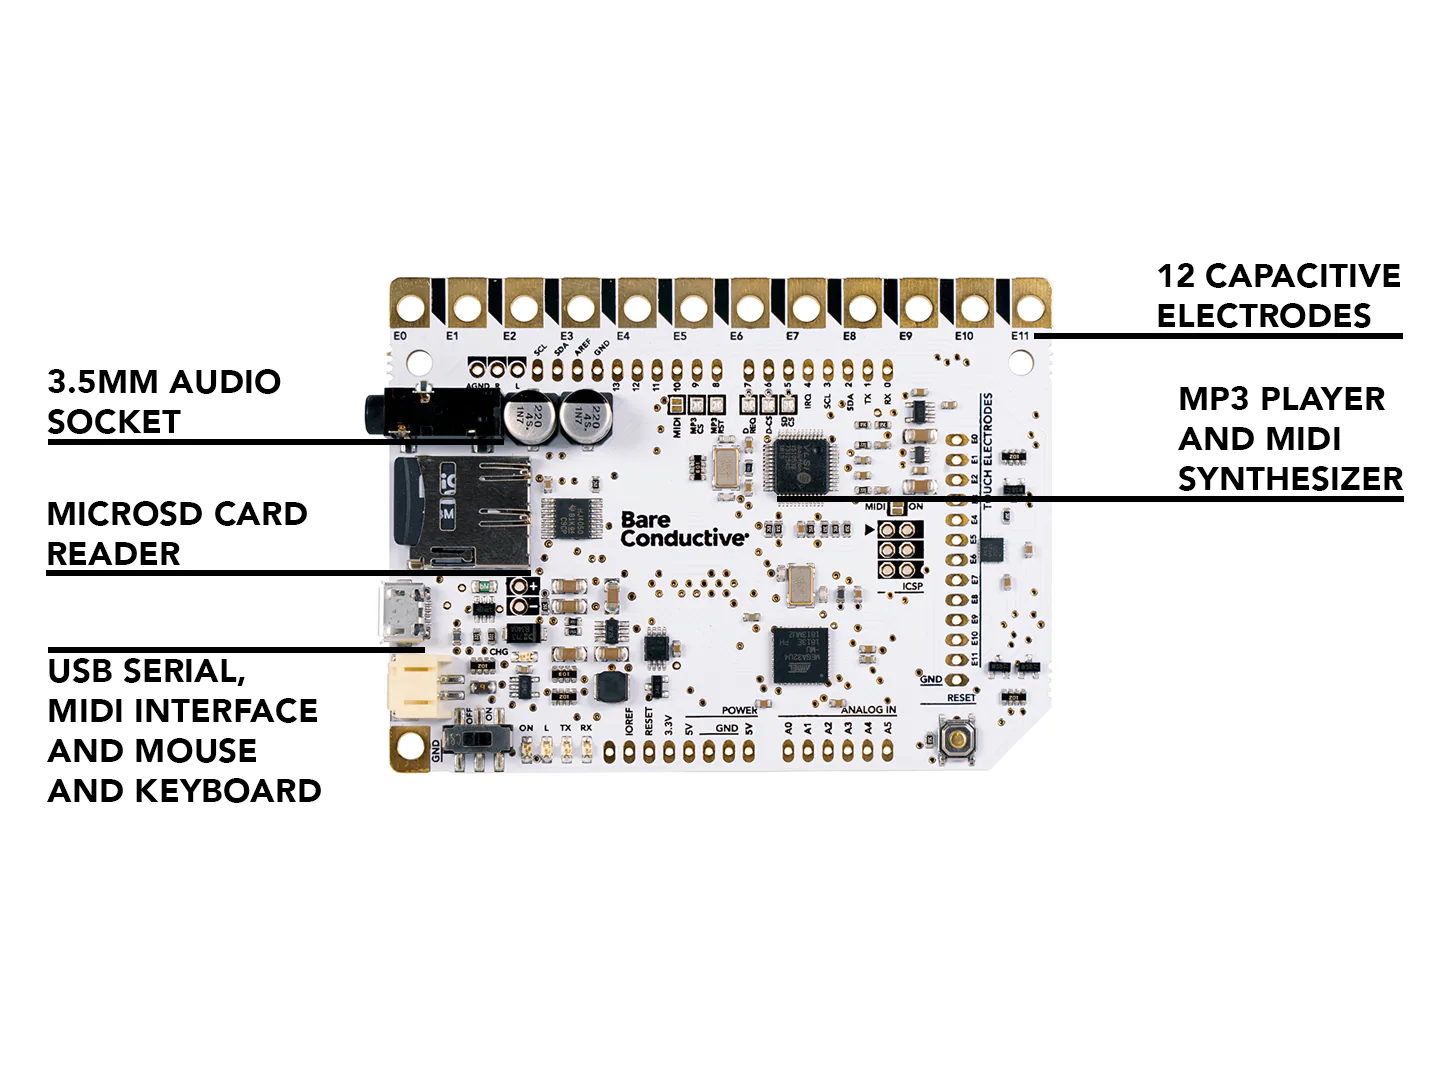
The Bare Conductive Touch Board is a board made by Bare Conductive. The Touch Board has 12 capacitive electrodes that respond to a touch. These electrodes can be extended with conductive materials, like Electric Paint or foil. The Touch Board has on-board MP3 playback and a MIDI synthesizer. This means you can either play MP3 files or simulate a MIDI instrument by touching the electrodes.
In short, the Touch Board is a pre-built Arduino that combines the functions of play MP3 and capacitive touch sensing, but you can do more than that. If you don't have the Touch Board, you can still do the same things following the above two tutorials.
Hardware Plugin
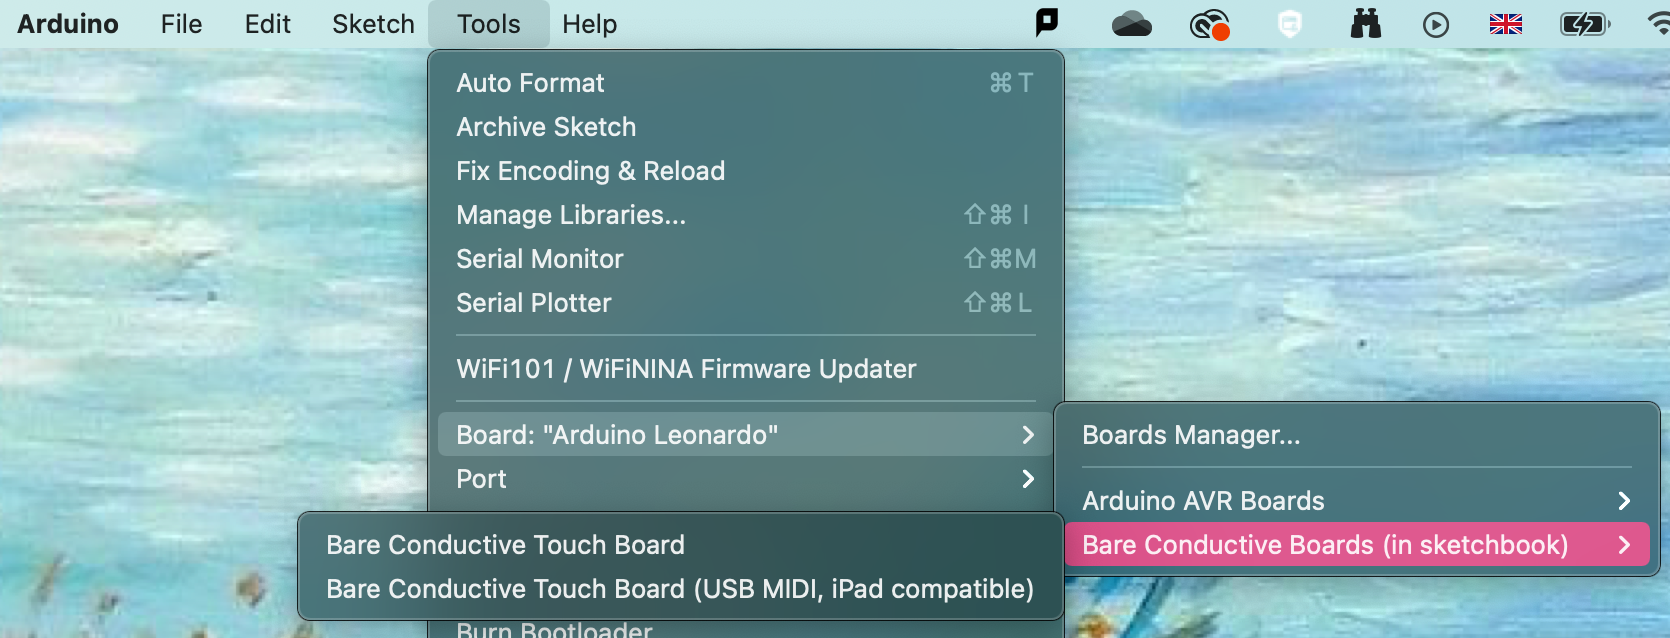
Whenever we use an Arduino, we have to tell the Arduino IDE which Arduino board we are using, whether it is an Arduino Leonardo or Arduino Mega. So we have to do the same here, telling Arduino IDE which board we are using. In this case, the Bare Conductive Touch Board. However, you cannot find the Touch Board from Tools - Boards. We have to download and put the plugin in place.
-
Quit Arduino if you have it opened.
-
Download the Hardware Plugin here: bare-conductive-arduino-public.zip
-
Create a
hardwarefolderWindows:
Libraries/Documents/Arduino/hardwareOR
My Documents/Arduino/hardwareMac:
Documents/Arduino/hardwareLinux (Ubuntu):
Home/Arduino/hardware -
Unzip and put the folder inside the hardware folder
Now open Arduino IDE, you will see the Touch Board from Tools - Boards - Bare Conductive Boards.
Library
The MPR121 is the capacitive touch chip on the Touch Board - this library allows us to access it. The VS1053 chip is the MP3 chip on the Touch Board. It uses two libraries, one for the chip and one for the onboard micro SD card.
-
Quit Arduino if you have it opened.
-
Download the MPR121 Library here: mpr121-public.zip
-
Download the VS1053 Library here: Sparkfun-MP3-Player-Shield-Arduino-Library-master.zip
-
Go to the
librariesfolderWindows: Libraries/Documents/Arduino/libraries
OR My Documents/Arduino/libraries
Mac: Documents/Arduino/libraries
Linux (Ubuntu): Home/Arduino/libraries
-
Unzip mpr121-public.zip and find the folder
MPR121 -
Unzip Sparkfun-MP3-Player-Shield-Arduino-Library-master.zip and find the folders:
SdFatandSFEMP3Shield. -
Copy
MPR121,SdFatandSFEMP3ShieldFolder to the libraries folder
Now the software Arduino IDE is ready, you will see the libraries from Sketch - Include Library.
File naming
Files saved in the Micro SD card should be named TRACK000.mp3 through TRACK011.mp3, and the Bare Conductive Board will match the file name to the E0 to E11 pins and play the according sound files.
The Touch Board will work with any size micro SD card up to 32GB.
Make sure your new SD card is formatted as FAT32.
Wiring
No wiring is needed. But you can extend each touch point with wires or connect them to any conductive materials, e.g. fruit.
Basic Example
This basic example will play TRACK000.mp3 to TRACK011.mp3 from the SD card when the according pin is touched. Download here: touch-mp3-public.zip
Sample MP3 files
To help you get up and running quickly there are some example MP3's you can use.