Machine Learning with Physical Computing - TensorFlow Lite & Arduino Nano 33
What is TensorFlow?
TensorFlow is an open-source machine learning framework developed by Google. It provides a comprehensive ecosystem of tools, libraries, and community resources for building and deploying machine learning models across a variety of platforms, from servers to mobile devices and embedded systems.
With TensorFlow, developers can easily design, train, and deploy machine learning models for various tasks such as image recognition, natural language processing, and more. TensorFlow offers high-level APIs for building and training models, as well as lower-level operations for fine-grained control and optimization.

How Machine Learning work with Physical Computing?
TensorFlow Lite for Microcontrollers is a lightweight version of TensorFlow designed specifically for microcontrollers and other resource-constrained devices. It enables developers to run small machine-learning models directly on microcontrollers, allowing for on-device inference without the need for network connectivity or reliance on cloud services.
TensorFlow Lite for Microcontrollers provides tools and libraries for converting trained TensorFlow models into a format suitable for microcontrollers, as well as APIs for integrating these models into embedded applications. It supports a variety of microcontroller platforms and architectures, making it accessible for a wide range of embedded development projects.
With TensorFlow Lite for Microcontrollers, developers can implement machine learning capabilities directly on devices such as sensors, wearables, and IoT devices, enabling intelligent edge computing and real-time inference without requiring constant communication with external servers.
What is Arduino Nano 33 BLE?
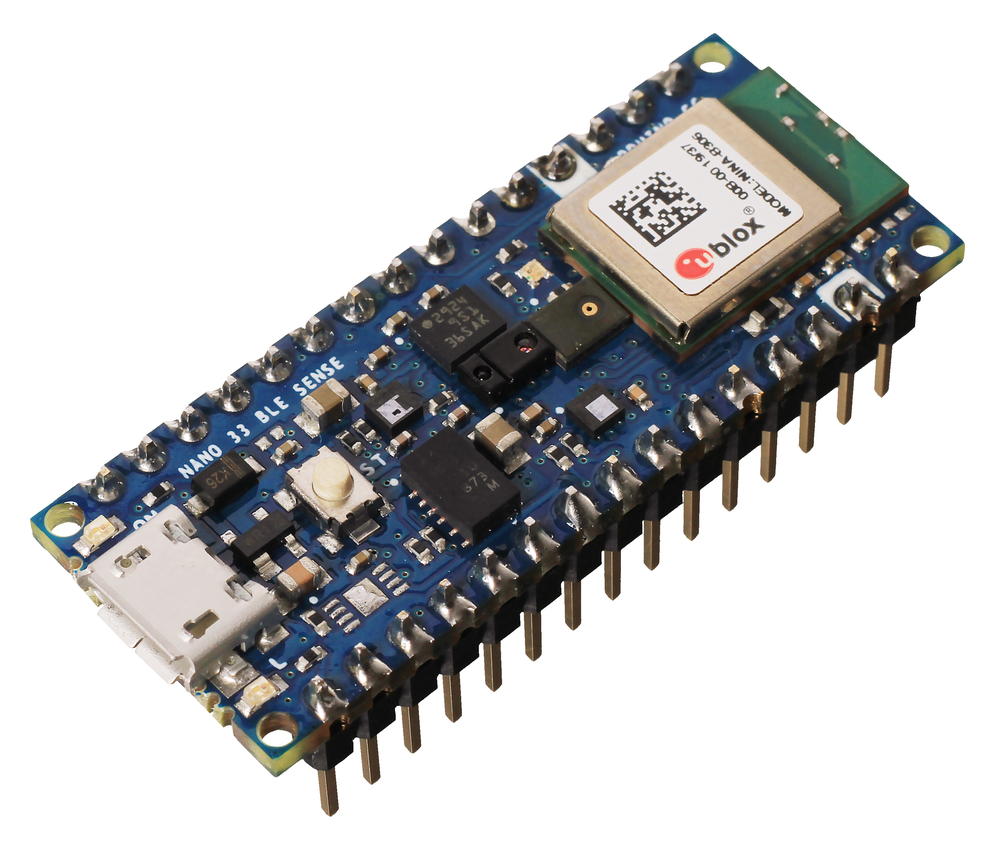 The Arduino Nano 33 BLE Series is a great choice to get started with embedded machine learning. It is built upon the nRF52840 microcontroller and runs on Arm® Mbed™ OS.
The Nano 33 BLE Series are tiny but come with a brunch of extras, including built-in connectivity options such as Wi-Fi, Bluetooth, or LoRa, enabling seamless communication with other devices, networks, or the internet, making them well-suited for IoT and wireless applications.
Some Nano 33 boards also feature integrated sensors such as accelerometers, gyroscopes, magnetometers, and environmental sensors, providing built-in sensing capabilities for motion detection, orientation tracking, environmental monitoring, and more. Know More
Gesture Classification
In this tutorial, we are going to use the IMU sensor on the SENSE REV2 to record some gestures data, train a model with the dataset and have Arduino classify movements based on the model.
This tutorial is developed based on the tutorial by Sandeep Mistry and Dominic Pajak. This tutorial is modified for NANO 33 SENSE REV2 board. If you are using other NANO boards, please refer to Mistry and Pajak's tutorial.
Warning
Versions of everything are important for this to work. Make sure you download and install the correct one AND have the right board!
Set up Arduino IDE
Software: Arduino IDE 1.8.19 [14/5/2024].
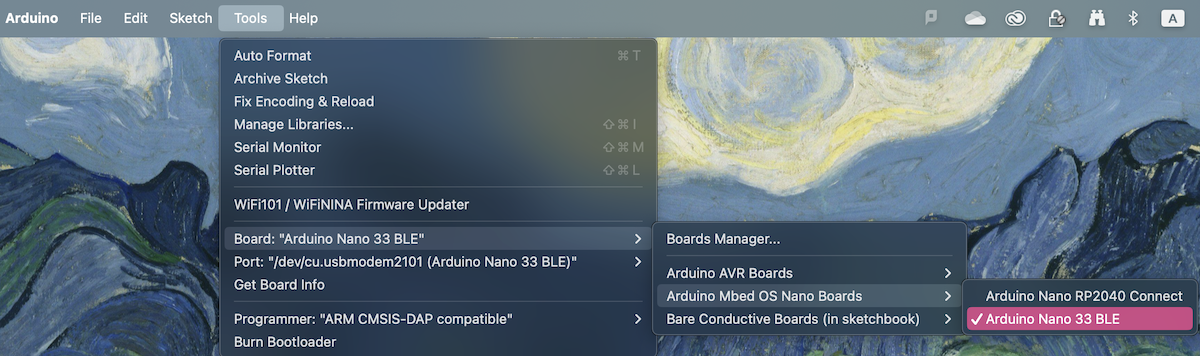
Install board packages
- Go to
Tools-Board-Board Management - Search for
Arduino Mbed OS Nano Boards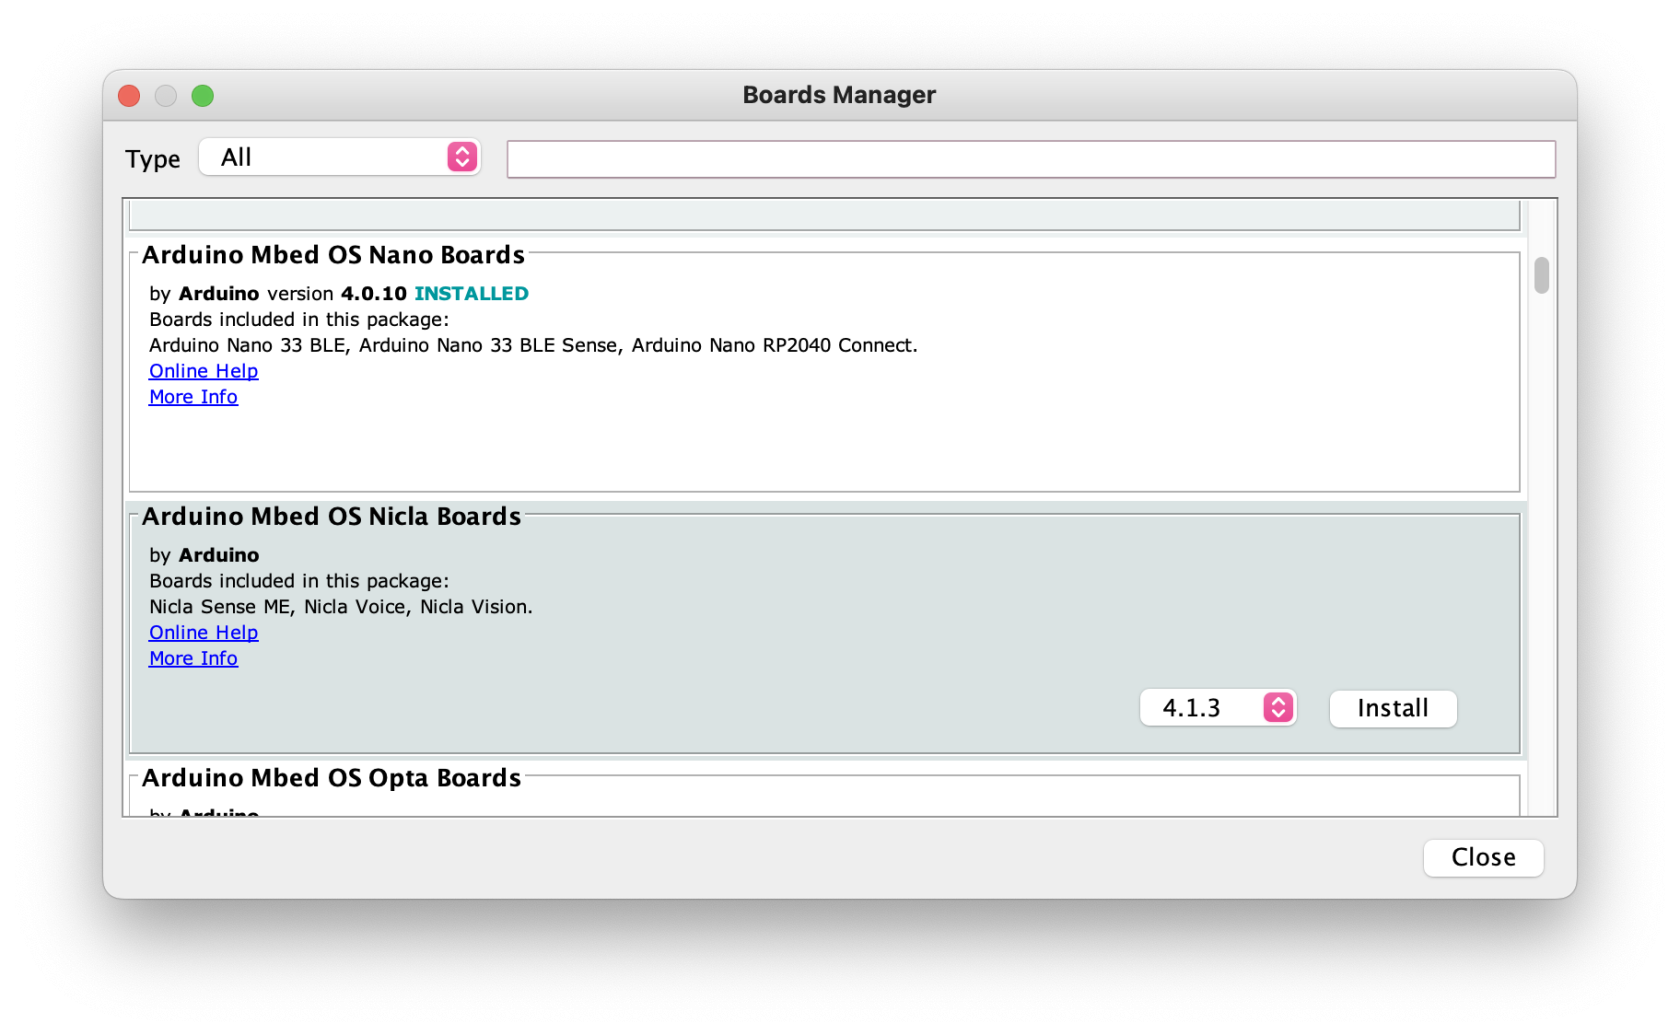
- Choose and install Version 4.0.10
- It may take a few minutes.
- When it's done, you should able to choose
Arduino Nano 33 BLE
Install TensorFlow library 2.4.0
TensorFlow library is not available from the library manager anymore, so you will need to do a manual install. We are using an older version for this tutorial [14/5/2024]. Download the zip here.
For other and latest versions, please visit the official github page.
Install IMU Library
To use the IMU (inertial measurement unit) in Nano 33 BLE Rev2 and Nano 33 BLE Sense Rev2, you need to use the Arduino_BMI270_BMM150 library instead of Arduino_LSM9DS1 which is used in all example code.
Replace #include <Arduino_LSM9DS1.h> with #include <Arduino_BMI270_BMM150.h> in all existing codes if you are using Rev2 boards.
For more information about libraries for NANO 33 SENSE REV2, please visit here.
Collect Data
First, upload the below code to your Arduino, and see if any data coming through from the Serial monitor.
/*
  IMU Capture
  This example uses the on-board IMU to start reading acceleration and gyroscope
  data from on-board IMU and prints it to the Serial Monitor for one second
  when the significant motion is detected.
  You can also use the Serial Plotter to graph the data.
  The circuit:
  - Arduino Nano 33 BLE or Arduino Nano 33 BLE Sense board.
  Created by Don Coleman, Sandeep Mistry
  Modified by Dominic Pajak, Sandeep Mistry
  This example code is in the public domain.
*/

#include <Arduino_BMI270_BMM150.h>

const float accelerationThreshold = 2.5; // threshold of significant in G's
const int numSamples = 119;

int samplesRead = numSamples;

void setup() {
  Serial.begin(9600);
  while (!Serial);

  if (!IMU.begin()) {
    Serial.println("Failed to initialize IMU!");
    while (1);
  }

  // print the header
  Serial.println("aX,aY,aZ,gX,gY,gZ");
}

void loop() {
  float aX, aY, aZ, gX, gY, gZ;

  // wait for significant motion
  while (samplesRead == numSamples) {
    if (IMU.accelerationAvailable()) {
      // read the acceleration data
      IMU.readAcceleration(aX, aY, aZ);

      // sum up the absolutes
      float aSum = fabs(aX) + fabs(aY) + fabs(aZ);

      // check if it's above the threshold
      if (aSum >= accelerationThreshold) {
        // reset the sample read count
        samplesRead = 0;
        break;
      }
    }
  }

  // check if the all the required samples have been read since
  // the last time the significant motion was detected
  while (samplesRead < numSamples) {
    // check if both new acceleration and gyroscope data is
    // available
    if (IMU.accelerationAvailable() && IMU.gyroscopeAvailable()) {
      // read the acceleration and gyroscope data
      IMU.readAcceleration(aX, aY, aZ);
      IMU.readGyroscope(gX, gY, gZ);

      samplesRead++;

      // print the data in CSV format
      Serial.print(aX, 3);
      Serial.print(',');
      Serial.print(aY, 3);
      Serial.print(',');
      Serial.print(aZ, 3);
      Serial.print(',');
      Serial.print(gX, 3);
      Serial.print(',');
      Serial.print(gY, 3);
      Serial.print(',');
      Serial.print(gZ, 3);
      Serial.println();

      if (samplesRead == numSamples) {
        // add an empty line if it's the last sample
        Serial.println();
      }
    }
  }
}
Create CSV files
- Stay in your neutral position with the sensor in your hand
- Press the reset button on Arduino
- Go to the terminal and type in the command
cat /dev/[serialPort] > [GESTURE].csv<- change [serialPort] and [GESTURE]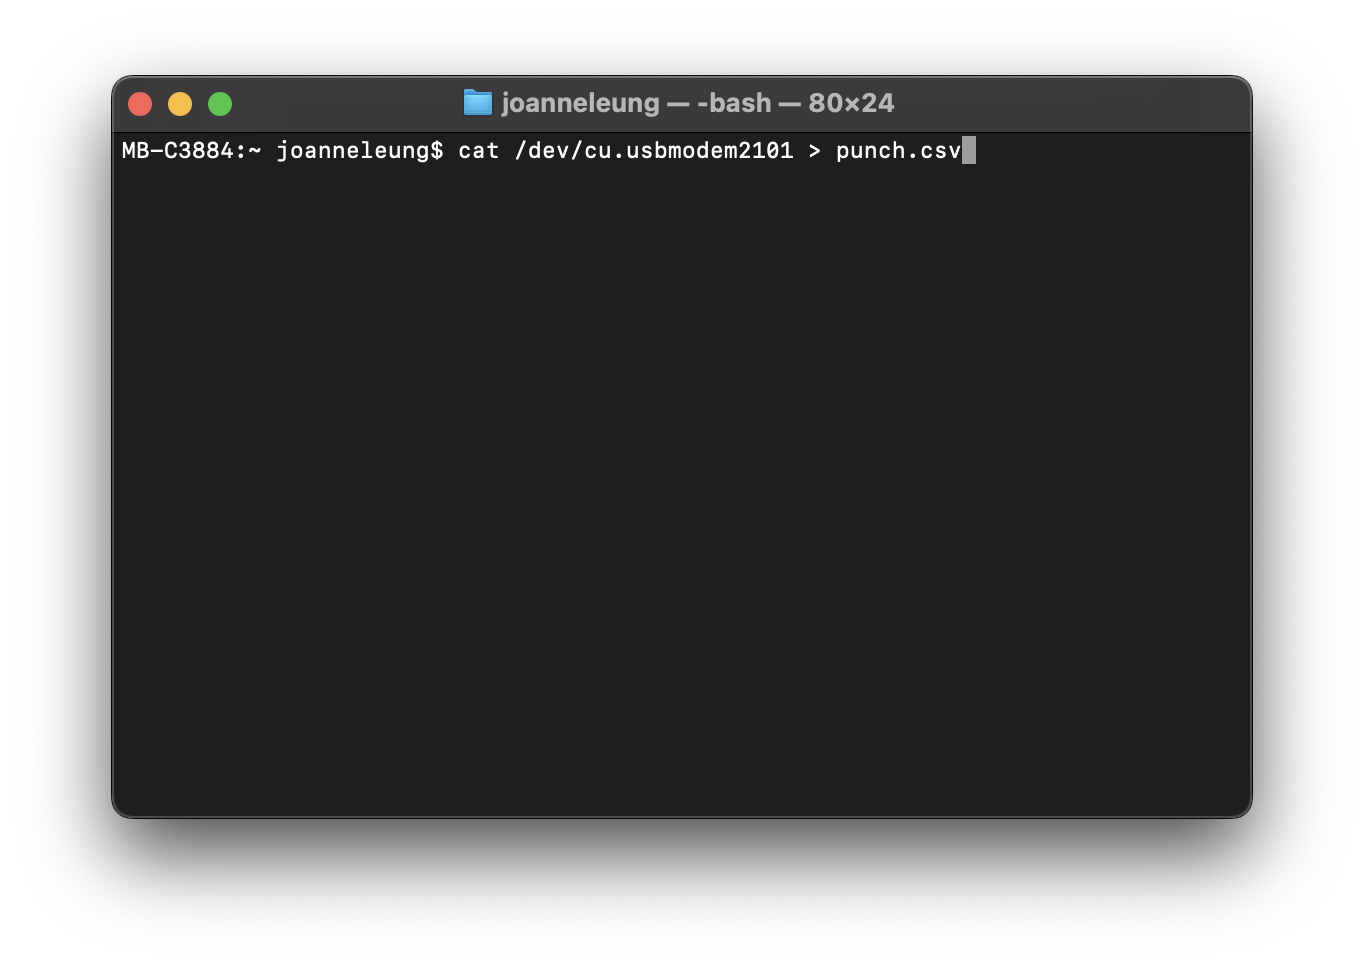
- Start moving with your sensor! Keep a 1-second interval and repeat the same movement at least 10+ times.
- When done, Press the reset button on Arduino.
- The CSV file is created.

Repeat #1 to #6 for second, third, fourth....movements. In this tutorial, I am only using two movements as data. Now I have my punch.csv and flex.csv ready, we can go to the browser.
Train a Model
We are going to use Google Colab to train our machine learning model with TensorFlow. Google Colab is a free cloud-based platform provided by Google that allows users to write, execute, and share Python code using a web-based interface. It provides a hosted Jupyter Notebook environment that requires no setup or installation, making it easy for individuals and teams to collaborate on Python projects, particularly in the fields of data science, machine learning, and artificial intelligence.
You will need a Google account and make a copy of the notebook, if you are not sure about Google Colab, please attend the GANs with Python workshop. It usually works better with Google Chrome.
Warning
Your Google account and Colab should be in English to avoid any broken file path errors.
-
Google Collab notebook: jo-arduino_tinyml.ipynb
-
TensorFlow Version supported by Google Colab: from 2.8.0rc0 to the latest [14/5/2024]
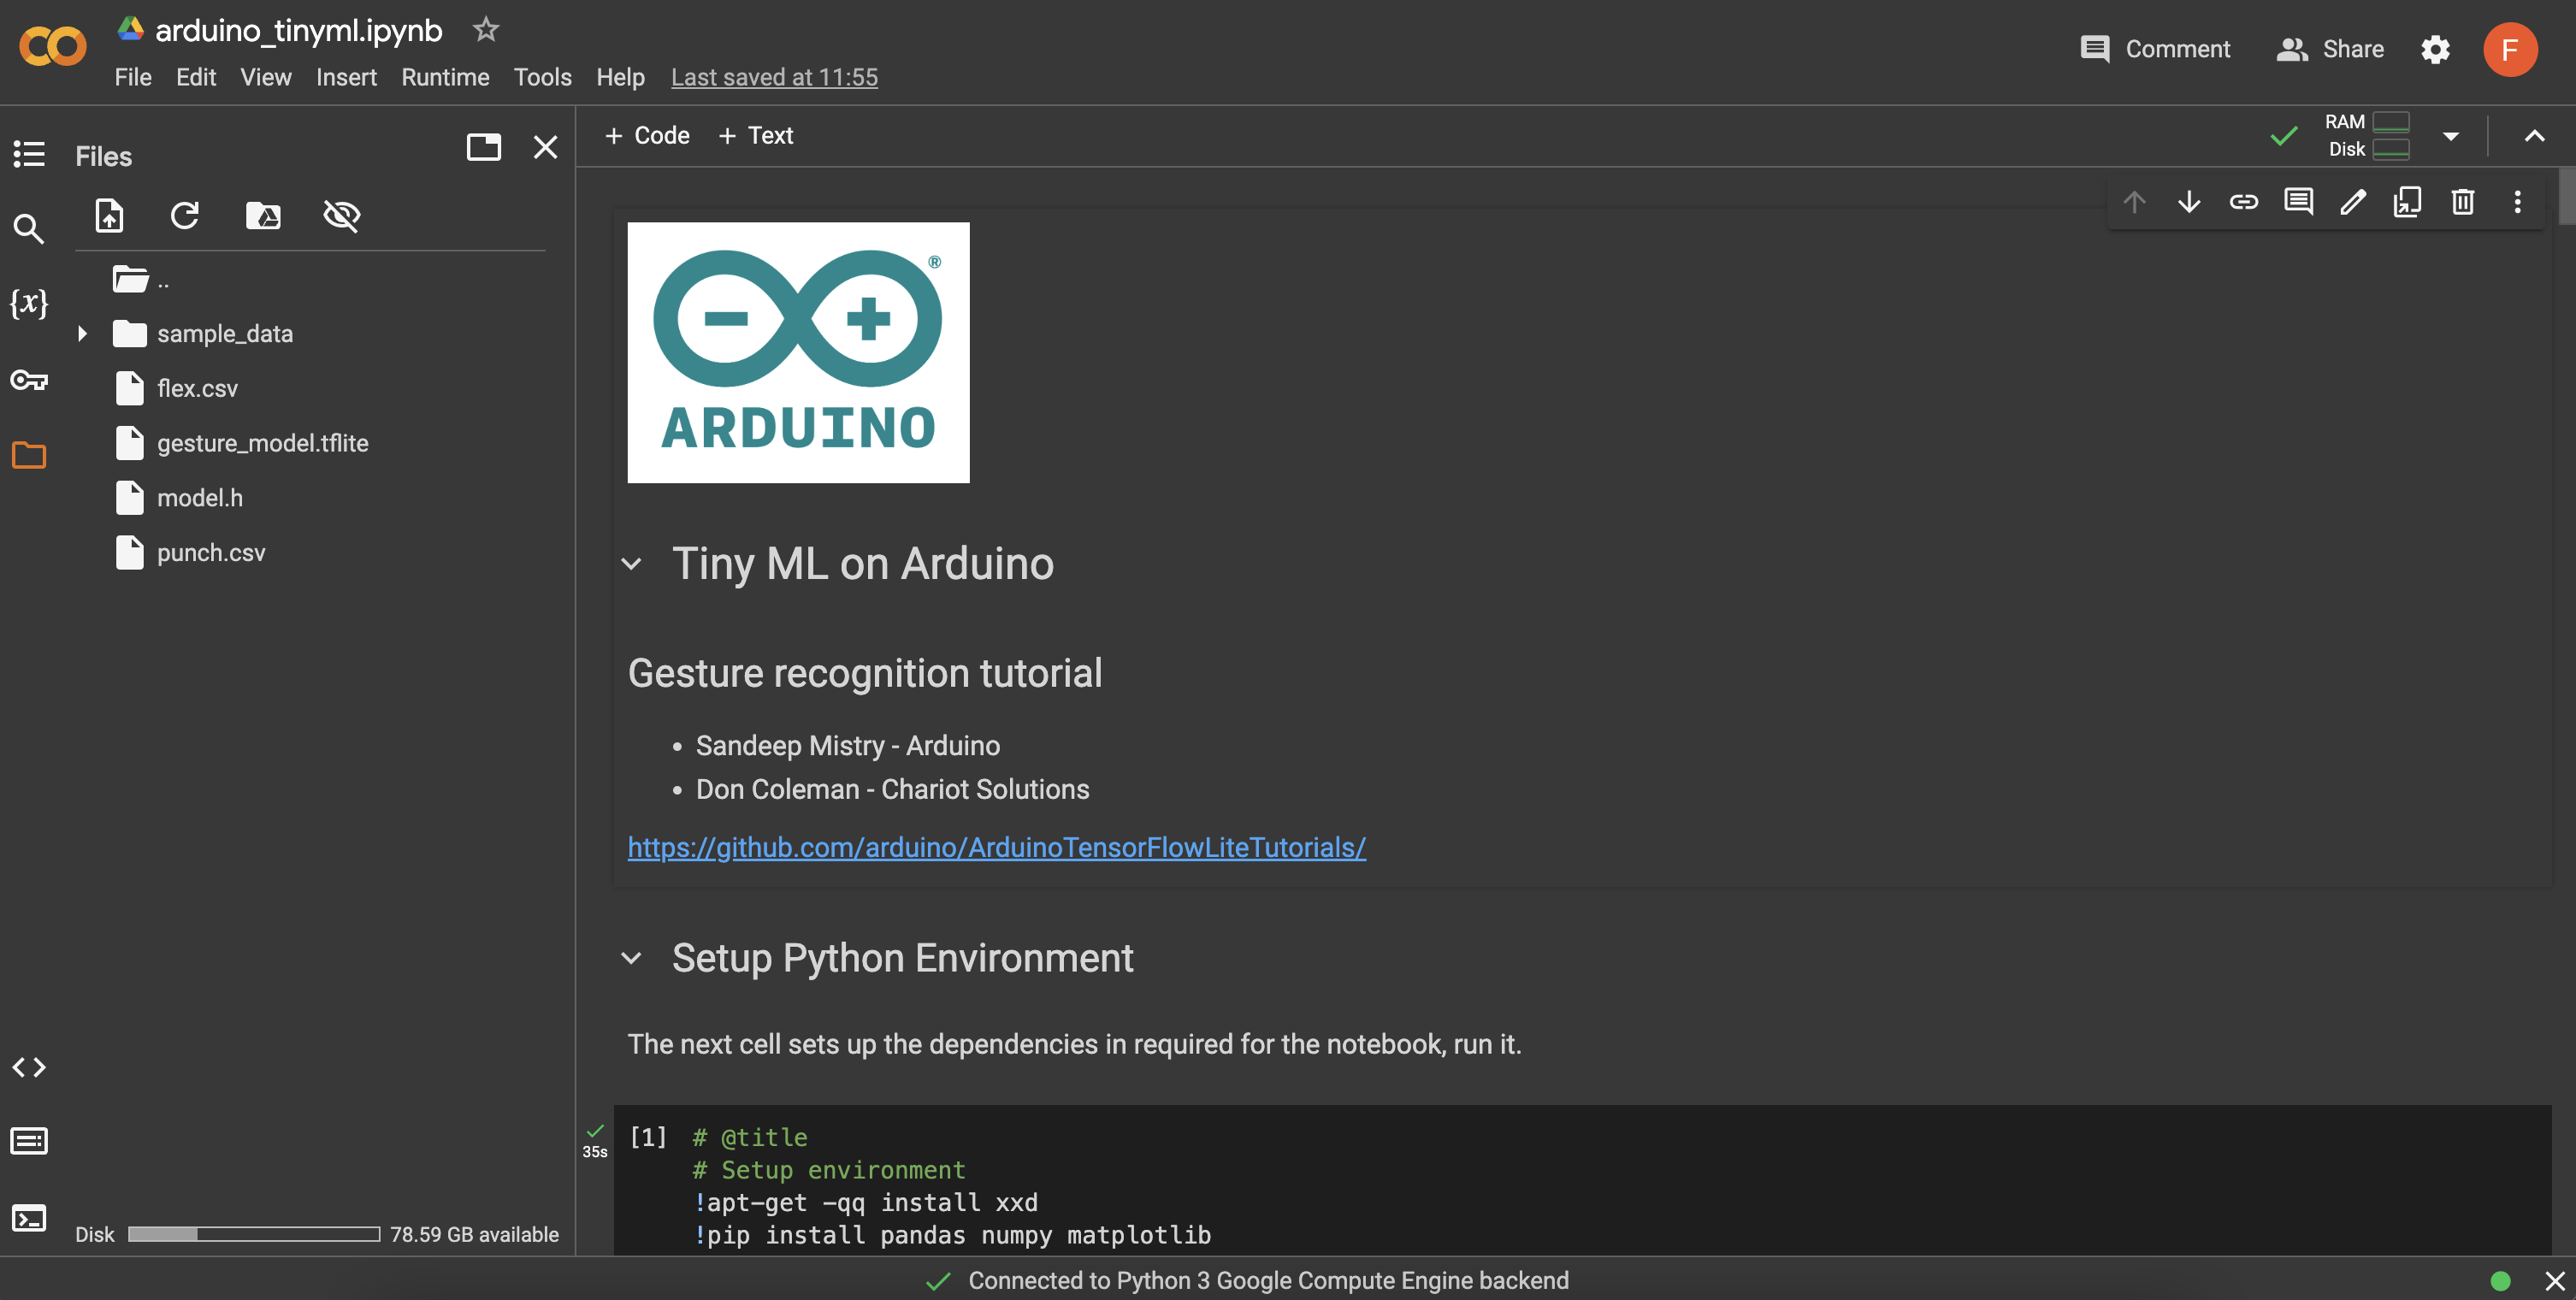
Click [#], you will see a green tick next to it once it's completed. Go through the whole notebook and get all of them completed one by one.

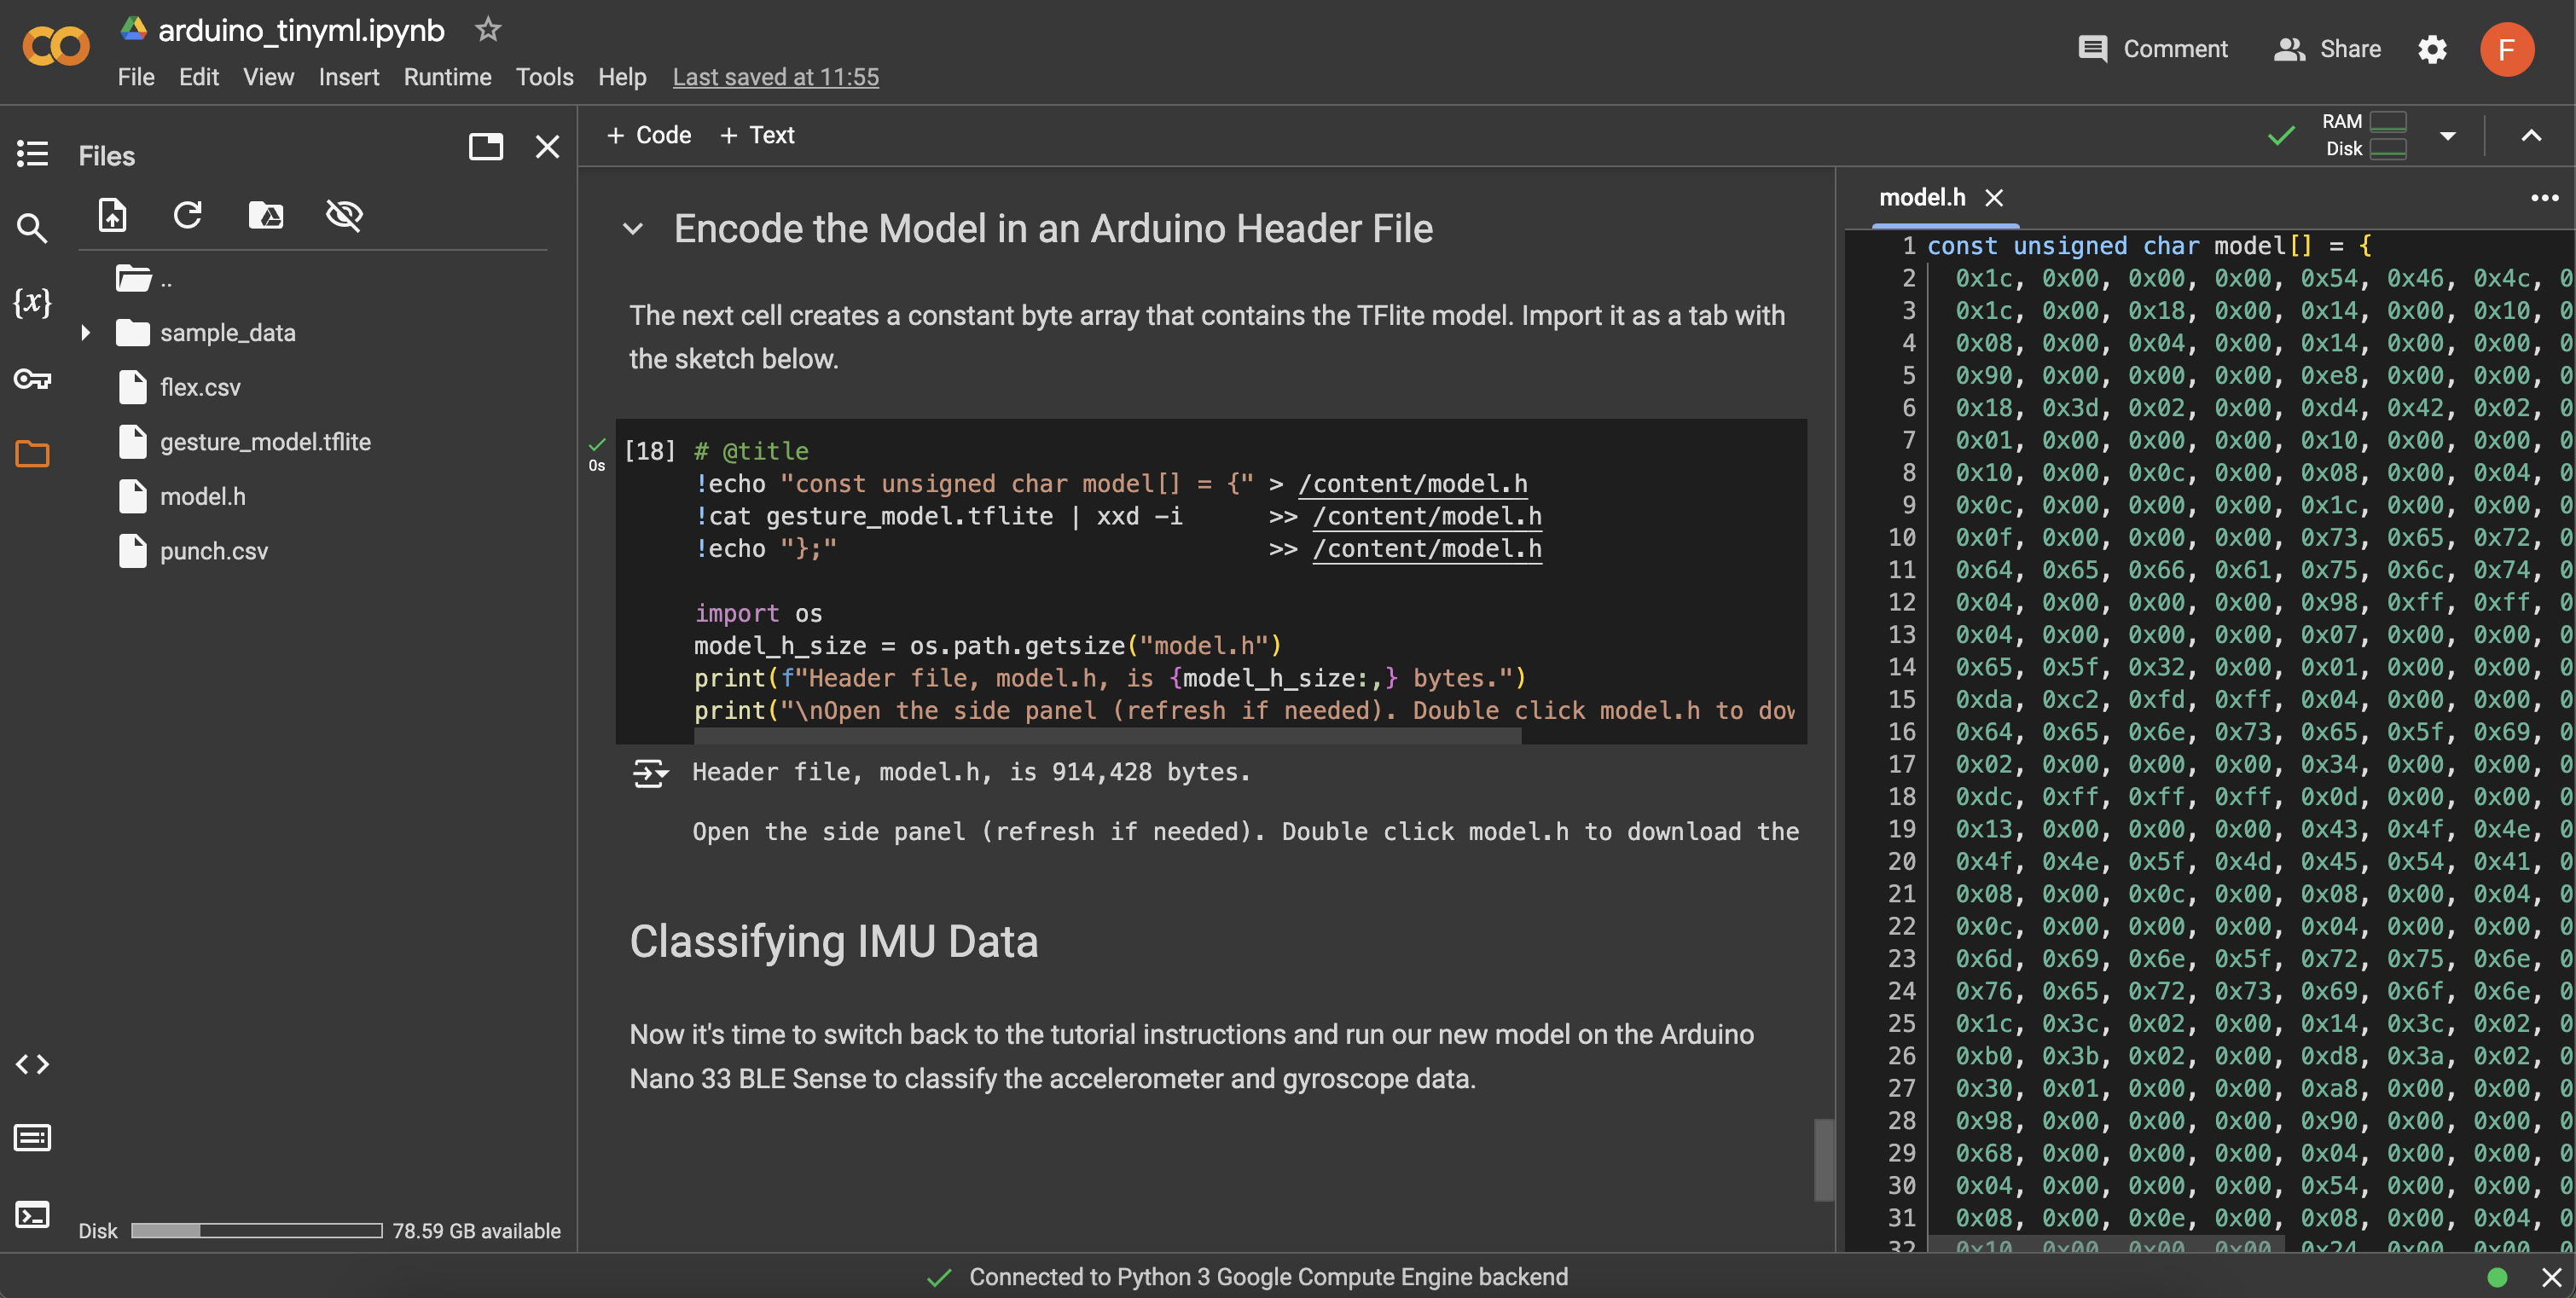
In the end, when you reached [18], you will see model.h created in the content folder. Double click and you will see the header file opened on the right-hand side.
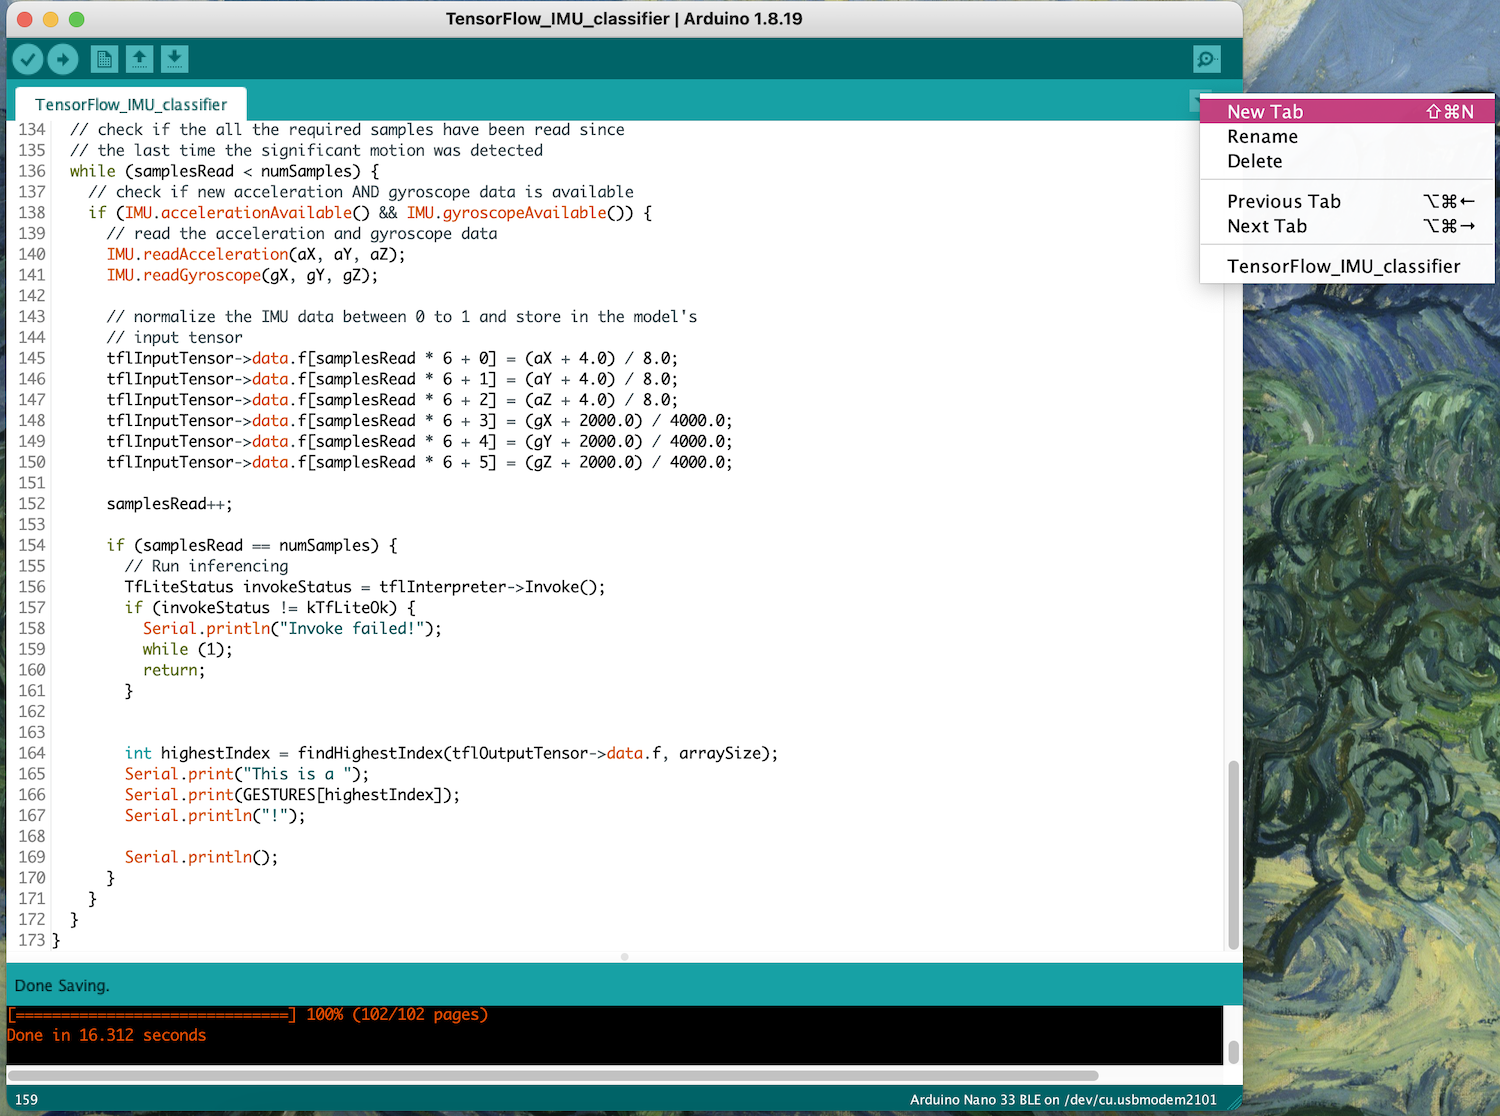
Start Classification!
Now go back to Arduino IDE.
/*
IMU Classifier
This example uses the on-board IMU to start reading acceleration and gyroscope
data from on-board IMU, once enough samples are read, it then uses a
TensorFlow Lite (Micro) model to try to classify the movement as a known gesture.
Note: The direct use of C/C++ pointers, namespaces, and dynamic memory is generally
discouraged in Arduino examples, and in the future the TensorFlowLite library
might change to make the sketch simpler.
The circuit:
- Arduino Nano 33 BLE or Arduino Nano 33 BLE Sense Rev2 board.
Created by Don Coleman, Sandeep Mistry
Modified by Dominic Pajak, Sandeep Mistry
This example code is in the public domain.
*/
#include "Arduino_BMI270_BMM150.h"
#include <TensorFlowLite.h>
#include <tensorflow/lite/micro/all_ops_resolver.h>
#include <tensorflow/lite/micro/micro_error_reporter.h>
#include <tensorflow/lite/micro/micro_interpreter.h>
#include <tensorflow/lite/schema/schema_generated.h>
#include <tensorflow/lite/version.h>
#include "model.h"
const float accelerationThreshold = 2.5; // threshold of significant in G's
const int numSamples = 119;
int samplesRead = numSamples;
// global variables used for TensorFlow Lite (Micro)
tflite::MicroErrorReporter tflErrorReporter;
// pull in all the TFLM ops, you can remove this line and
// only pull in the TFLM ops you need, if would like to reduce
// the compiled size of the sketch.
tflite::AllOpsResolver tflOpsResolver;
const tflite::Model* tflModel = nullptr;
tflite::MicroInterpreter* tflInterpreter = nullptr;
TfLiteTensor* tflInputTensor = nullptr;
TfLiteTensor* tflOutputTensor = nullptr;
// Create a static memory buffer for TFLM, the size may need to
// be adjusted based on the model you are using
constexpr int tensorArenaSize = 8 * 1024;
byte tensorArena[tensorArenaSize] __attribute__((aligned(16)));
// array to map gesture index to a name
const char* GESTURES[] = {
"punch",
"flex"
};
const int arraySize = 2;
#define NUM_GESTURES (sizeof(GESTURES) / sizeof(GESTURES[0]))
int findHighestIndex(float arr[], int size) {
if (size == 0) {
return -1; // Return -1 if the array is empty
}
int maxIndex = 0; // Initialize maxIndex with the index of the first element of the array
for (int i = 1; i < size; i++) {
if (arr[i] > arr[maxIndex]) {
maxIndex = i;
}
}
return maxIndex;
}
void setup() {
Serial.begin(9600);
while (!Serial);
// initialize the IMU
if (!IMU.begin()) {
Serial.println("Failed to initialize IMU!");
while (1);
}
// print out the samples rates of the IMUs
Serial.print("Accelerometer sample rate = ");
Serial.print(IMU.accelerationSampleRate());
Serial.println(" Hz");
Serial.print("Gyroscope sample rate = ");
Serial.print(IMU.gyroscopeSampleRate());
Serial.println(" Hz");
Serial.println();
// get the TFL representation of the model byte array
tflModel = tflite::GetModel(model);
if (tflModel->version() != TFLITE_SCHEMA_VERSION) {
Serial.println("Model schema mismatch!");
while (1);
}
// Create an interpreter to run the model
tflInterpreter = new tflite::MicroInterpreter(tflModel, tflOpsResolver, tensorArena, tensorArenaSize, &tflErrorReporter);
// Allocate memory for the model's input and output tensors
tflInterpreter->AllocateTensors();
// Get pointers for the model's input and output tensors
tflInputTensor = tflInterpreter->input(0);
tflOutputTensor = tflInterpreter->output(0);
}
void loop() {
float aX, aY, aZ, gX, gY, gZ;
// wait for significant motion
while (samplesRead == numSamples) {
if (IMU.accelerationAvailable()) {
// read the acceleration data
IMU.readAcceleration(aX, aY, aZ);
// sum up the absolutes
float aSum = fabs(aX) + fabs(aY) + fabs(aZ);
// check if it's above the threshold
if (aSum >= accelerationThreshold) {
// reset the sample read count
samplesRead = 0;
break;
}
}
}
// check if the all the required samples have been read since
// the last time the significant motion was detected
while (samplesRead < numSamples) {
// check if new acceleration AND gyroscope data is available
if (IMU.accelerationAvailable() && IMU.gyroscopeAvailable()) {
// read the acceleration and gyroscope data
IMU.readAcceleration(aX, aY, aZ);
IMU.readGyroscope(gX, gY, gZ);
// normalize the IMU data between 0 to 1 and store in the model's
// input tensor
tflInputTensor->data.f[samplesRead * 6 + 0] = (aX + 4.0) / 8.0;
tflInputTensor->data.f[samplesRead * 6 + 1] = (aY + 4.0) / 8.0;
tflInputTensor->data.f[samplesRead * 6 + 2] = (aZ + 4.0) / 8.0;
tflInputTensor->data.f[samplesRead * 6 + 3] = (gX + 2000.0) / 4000.0;
tflInputTensor->data.f[samplesRead * 6 + 4] = (gY + 2000.0) / 4000.0;
tflInputTensor->data.f[samplesRead * 6 + 5] = (gZ + 2000.0) / 4000.0;
samplesRead++;
if (samplesRead == numSamples) {
// Run inferencing
TfLiteStatus invokeStatus = tflInterpreter->Invoke();
if (invokeStatus != kTfLiteOk) {
Serial.println("Invoke failed!");
while (1);
return;
}
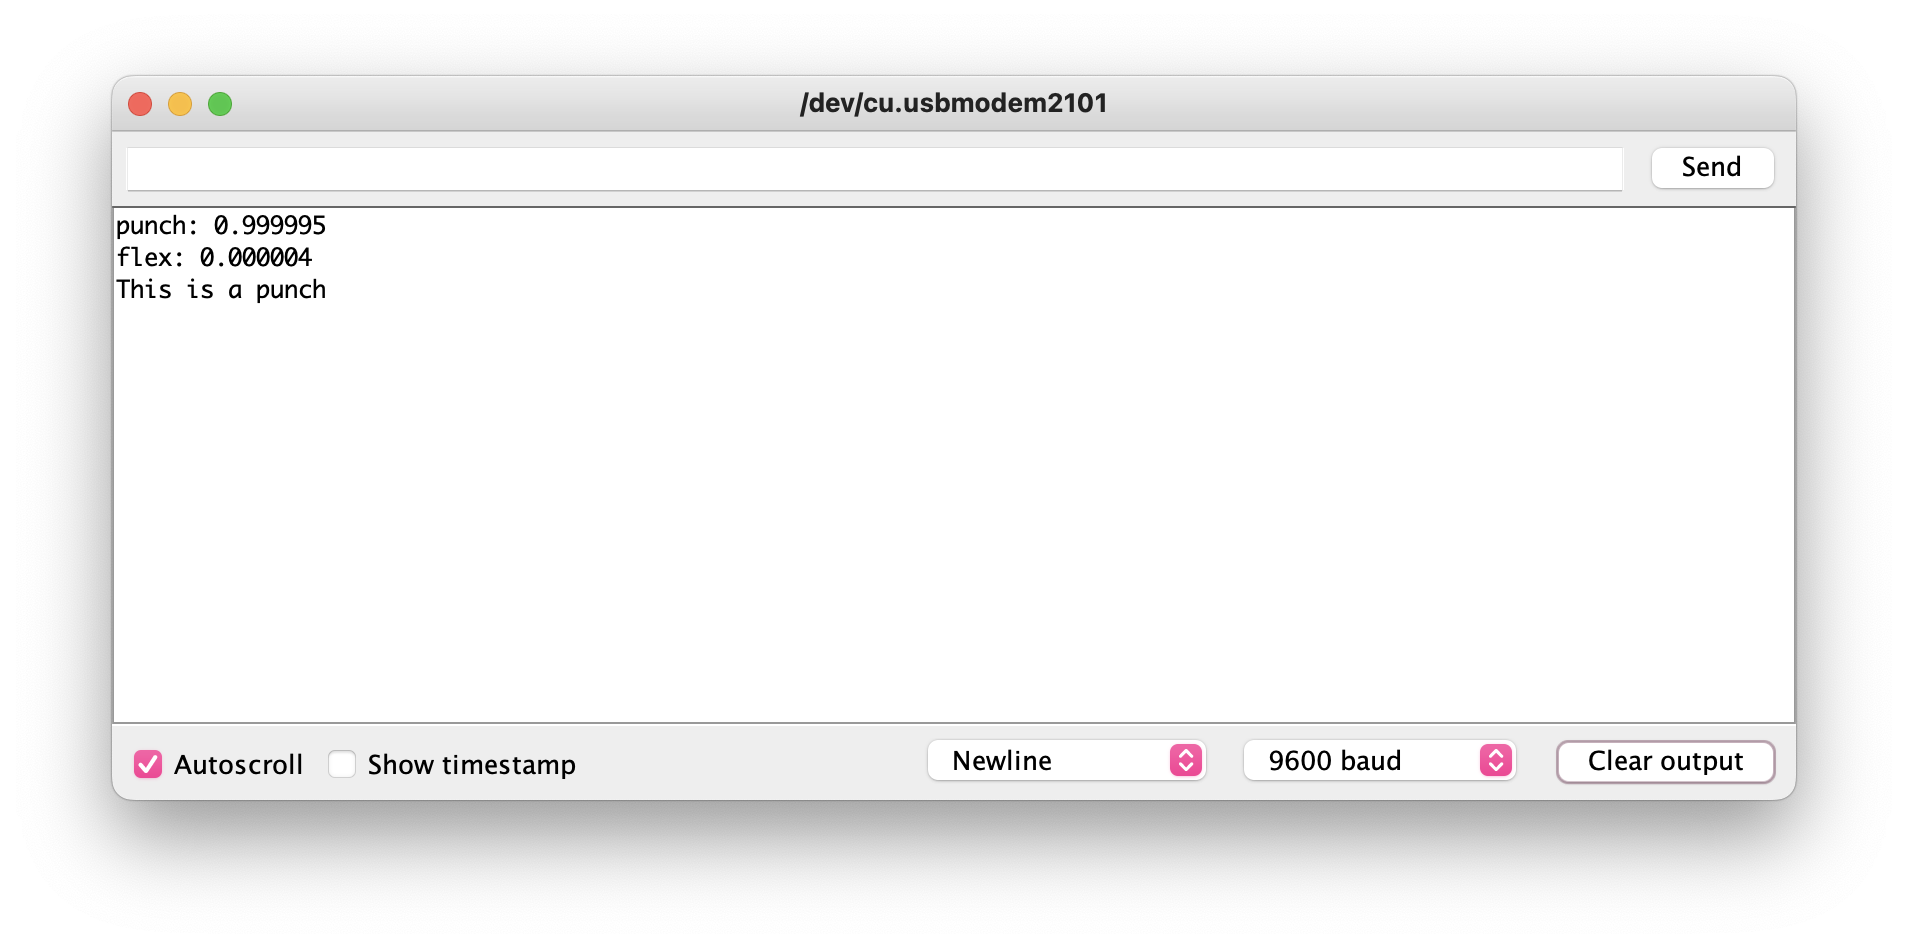
int highestIndex = findHighestIndex(tflOutputTensor->data.f, arraySize);
Serial.print("This is a ");
Serial.print(GESTURES[highestIndex]);
Serial.println("!");
Serial.println();
}
}
}
}
Click on the small arrow on the right and choose New Tab. Name the tab model.h and copy & paste from the Google Colab model.h file.
Upload the code and go to the serial monitor. Do one of the gestures you trained. You will see how confident the machine is in classifying each gesture and decide which gesture you just did.
HAVE FUN!